- Company
- Products
- Catalogs
- News & Trends
- Exhibitions
Kreon Ceiling brochure 2014
Kreon Ceiling brochure 2014
Kreon metal ceilings are crafted to meet high architectural standards, integrating building service systems like lighting, ventilation, and climate control. The design emphasizes simplicity and creativity.
Project Management
Kreon's project management ensures smooth transitions from concept to installation, serving as a central contact point. The process includes planning, drawing, installation, and technical integration, ensuring ceilings are adaptable and future-ready.
Ceiling Arrangement and Customisation
Kreon provides a range of tile dimensions, materials, colors, finishes, and perforations. Options include galvanized steel, aluminum, and stainless steel, with customizable sizes and finishes.
Vektron Clip-in Systems
The Vektron Clip-in system features a concealed structure for demountable tiles, allowing easy adaptation and individual tile removal. It supports various installation configurations.
Zenon Lay-on Systems
The Zenon Lay-on system uses a profile grid for hanging tiles, compatible with Kreon's luminaires and utilities, allowing for custom-made tiles.
Full Integration of Lighting and Utilities
Kreon integrates lighting and utilities into ceilings for aesthetic alignment and easy installation, supporting both Kreon's and existing solutions.
Creative Light Solutions
Kreon offers lighting solutions with tiles matching standard tiles in quality and color, ensuring architectural consistency. Installation is simplified with GST connectors.
Air Ventilation
Kreon provides efficient ventilation solutions integrated into tiles, ensuring optimal air mixing and minimal airflow.
Indoor Climate Control
Kreon clima tiles blend seamlessly with standard tiles, using capillary tubes for temperature control through radiation, minimizing draught and noise.
Overview of Clima Tiles
Clima tiles create a comfortable indoor climate using capillary tubes for temperature exchange. They can be plain or perforated, with acoustic inlays for sound absorption, available in various sizes and designs.
Acoustic Properties
Clima tiles with mineral wool inlays offer sound absorption, while those with gypsum board provide sound attenuation. The sound absorption coefficient can reach up to 0.9, and sound attenuation up to 43db.
Integrated Audio Systems
Kreon audio systems integrate into ceilings with miniaturized speakers and digital amplification, configurable as Left, Right, or Mono, with optional subwoofers.
Signage and Emergency Lighting
Kreon offers tiles with integrated signage and emergency lighting, compliant with standards like NEN 6088 and NEN-EN 1838, with autonomy of 1 or 3 hours.
Contact Information
Kreon has offices and showrooms worldwide, including in Belgium, Austria, France, Germany, Italy, the UK, Spain, the UAE, Brazil, Singapore, Turkey, and the USA, with contact details available for inquiries.
Catalog excerpts

Ceiling arrangement and customisation 12 transitions between levels 20 Full integration of lighting and utilities 44 Indoor climate control 62 Audio without visual compromise 64
Open the catalog to page 1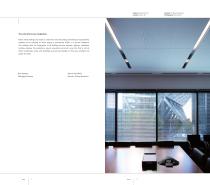
The only limit is your imagination Kreon metal ceilings are made to meet the most demanding architectural requirements, whether you're creating an office space, a commercial facility or a private residence. Our ceilings offer full integration of all building service systems: lighting, ventilation, cooling, heating, fire protection, sound, acoustics and much more. But that is not all. Kreon condenses, omits, and simplifies as much as possible, so that your creativity can Ben Vaessen Werner Van Rethy Managing Director Director Ceiling Solutions Project Herbert Smith LLP Architect T P Bennett Architects...
Open the catalog to page 2
Project Port de Monaco Location Monaco Project Management Peace of mind, from inception through installation Our project management process is designed to move you swiftly and faultlessly through concept, planning and execution. At every stage of your project, we will be the central point of contact for all parties involved. You can count on our full support during planning, drawing, installation, and integration of techniques. fit-out contractor architect lighting designer electrical consultant concept phase mechanical consultant HVAC contractor Your Kreon ceiling will be - arranged to perfectly...
Open the catalog to page 3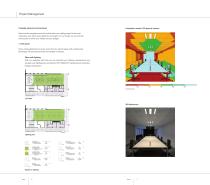
Project Management Carefully planned and monitored Kreon has the experience and the tools to plan your ceiling project in the most meticulous way. Since every detail of your project is in our scope, we can and will continuously monitor your wishes and your budget. Kreon creates grid plans for every room that you need to equip with a ceiling and techniques. All technical services are included in the plan. Plans with lighting With our expertise and tools we can calculate your lighting requirements and visualize your lighting plan according to EN 12464/LG7 standards and optimized energy consumption....
Open the catalog to page 4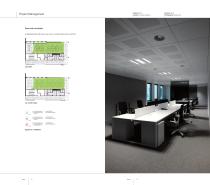
Project Management Plans with ventilation A detailed plan will show you how to create optimal air comfort. In non perforated tile white side connection 0160mm in non perforated tile white side connection 0160mm in non perforated tile white top connection 0160mm Project Belchim Location Londerzeel, Belgium Photographer Serge Brison
Open the catalog to page 5
Project Management Project Belchim Location Londerzeel, Belgium 2. Shop drawings Kreon uses construction documents to create shop drawings. A shop drawing is a visual explanation showing every specific aspect of an integrated ceiling that members of the installation crew need. Architect Plan 8 Photographer Serge Brison
Open the catalog to page 6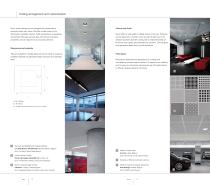
Ceiling arrangement and customisation Kreon metal ceilings can be arranged and customised to perfectly match your vision. We offer a wide variety of tile dimensions, materials, colours, finish, perforations, accessories, Kreon offers a wide pallet of ceiling colours of its own. Products and options. Because we have tiles with various acoustical can be delivered in any RAL colour as well. All tiles have a UV- properties, we can respond to any acoustic demand. resistant polyester powder coating with a minimal thickness of 60 micron and a gloss level between 3% and 20%. The low gloss level generates...
Open the catalog to page 7
Vektron Clip-in Project Luc Spits Bureau d’Architectes Location Berneau-Dalhem, Belgium The Vektron Clip-in system consists of a concealed supporting structure to which demountable steel tiles are clipped. A shadow joint having a width of 6 mm and a depth of 8 mm accentuates the grid pattern. Tiles without shadow gap can be delivered on demand. A double structure with specially developed cross connectors ensures perfect levelling and easy installation. Your ceiling can be adapted to changing needs. Each tile can be removed individually without any effort. Architect Luc Spits Photographer Serge...
Open the catalog to page 8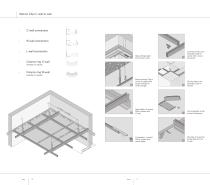
Vektron Clip-in: wall to wall C-wall connection W-wall connection L-wall connection Connect primary and secondary Clip-in carrier with a cross connector Mount primary Clip-in carrier to ceiling with support hanger or nonius hanger Clip the tiles in the secondary Clip-in carriers Align height of primary Clip-in carrier with C-wall Cut bordertiles to the correct dimensions If necessary, connect Clip-in cariers with carrier splice Use clips to press the border tiles into the C-wall. Align ceiling height and mount C-wall Column ring C-wall Column ring W-wall
Open the catalog to page 9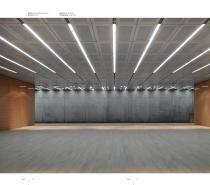
Project Lycee Hotelier de Monaco Architect Atelier Blanchi Location Monaco Photographer Serge Brison
Open the catalog to page 10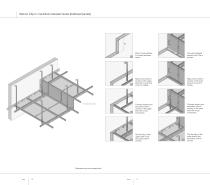
Vektron Clip-in: transitions between levels (bulkhead panels) Place C-wall profiles, h is height between levels. Align primary Clip-in carriers of the upper level with C-wall and mount to ceiling. Connect primary and secondary Clip-in carriers of the upper level with cross connectors. Clip the tiles of the upper level in the secondary Clip-in carriers. secondary Clip-in carrier Connect bulkhead pannels with Clip-in carriers. Align primary Clip-in carriers of the lower level and mount to ceiling. Connect primary and secondary Clip-in carriers of the lower level with cross connectors. Clip the...
Open the catalog to page 11
Vektron Clip-in: transitions between levels (bulkhead panels) Project BVOW Location Rotterdam, The Netherlands Bulkhead panels create an elegant transition between two ceiling levels. Tiles are clipped into the same carriers ensuring a rigid construction to the ceiling transition and can be tailored to specified depths where the parameters below should be taken into account. Remarks Dimension A should be between 22mm and 50mm. * Specify dimension B as height difference between two levels (max 750mm). Architect The Room Industry - Johan Romijn Photographer Arne Jennard
Open the catalog to page 12
Project Port de Monaco Architect Atelier Blanchi Location Monaco Photographer Serge Brison
Open the catalog to page 13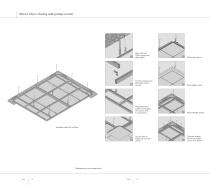
Vektron Clip-in: floating ceiling (edge covers) Mount primary Clip-in carrier and align height. Click other tiles in. Connect primary and secondary Clip-in carriers. Place edge covers. Place secondary profile on end grain of structure with T-connections. Place straight splices. Clip the tiles in, beginning from the center. Connect straight splices and edge covers with screw.
Open the catalog to page 14All KREON catalogs and technical brochures
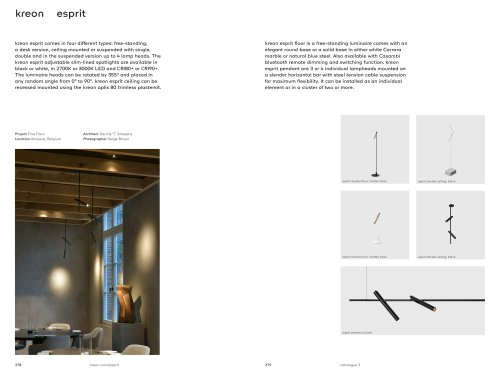 esprit
6 Pages
 holon 60
33 Pages
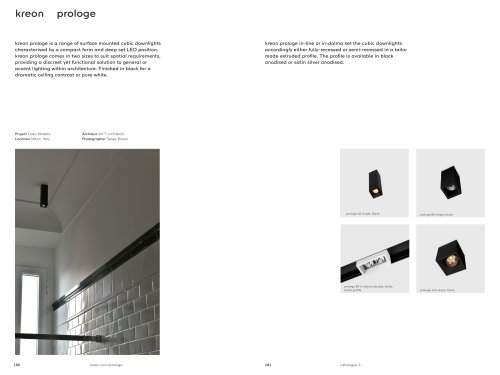 prologe 40
9 Pages
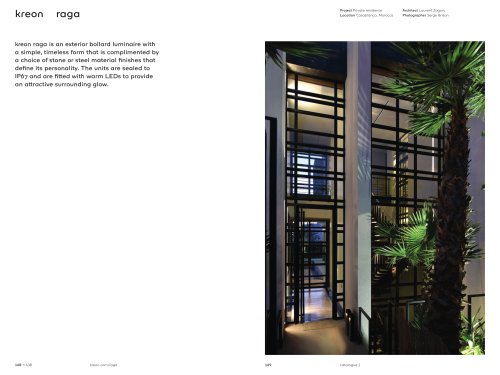 raga
raga7 Pages
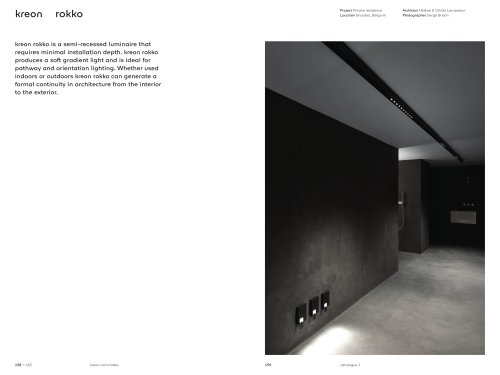 rokko
rokko7 Pages
 side
side8 Pages
 kreon side in-line
8 Pages
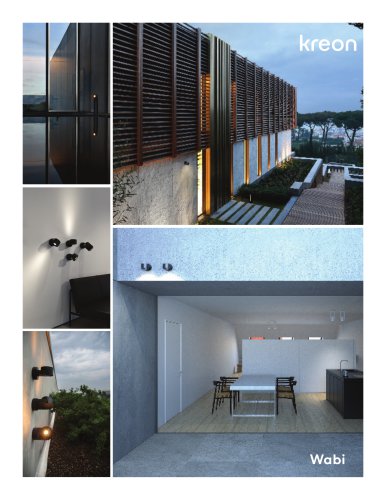
 wabi
wabi6 Pages
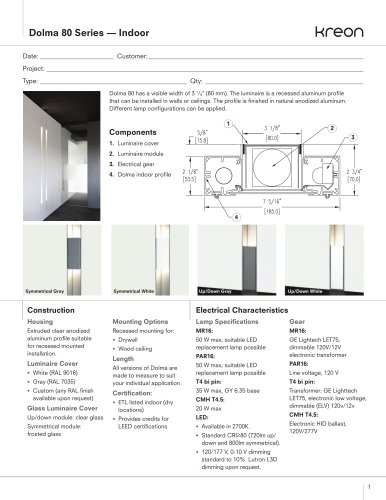 Dolma 80 Series
3 Pages
 Mama Cloud
4 Pages
 Cloud
Cloud5 Pages
 Cana 40
2 Pages
 Aplis 165
3 Pages
 kreon tools of light
129 Pages
 Fuga
Fuga2 Pages
 Wabi
Wabi2 Pages
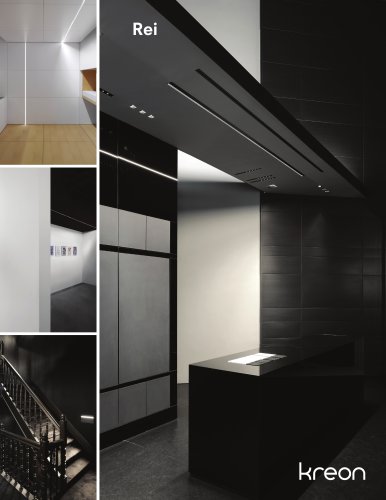 Rei
Rei2 Pages
 Raga
Raga2 Pages
 Kreon cana
15 Pages
 Kreon 1200
8 Pages
 Kreon aplis in-line
12 Pages
 Kreon aplis
11 Pages
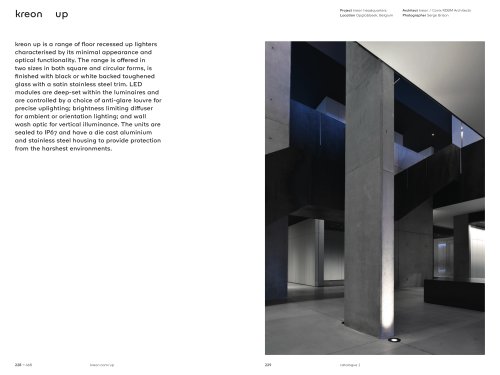 Kreon up
9 Pages
 Kreon dolma
8 Pages
 diapason 120
13 Pages
 audio in cadre
13 Pages
 side in-line
1 Page
 Kreon Novelties 2018
29 Pages
 Kreon Catalogue 1
266 Pages


Archived catalogs
 Novelties 2016
41 Pages
 Novelties 2015
39 Pages
 Kreon Acoustic Systems
23 Pages
 Kreon LEED
17 Pages
 US Catalog 2012-2013
169 Pages
 kreon Novelties
39 Pages
 Kreon Tools of Light 2012-2013 E-N
261 Pages
 Catalogue - Catalogus 2012-2013
550 Pages

