- Catalogs
- KOOLAIR S.A
- Series PE-45 Polystyrene plenum boxes
Series PE-45 Polystyrene plenum boxes
1 /10Pages

Series PE-45 Polystyrene plenum boxes
1 /10Pages
Catalog excerpts

PE-45 Polystyrene plenum boxes
Open the catalog to page 1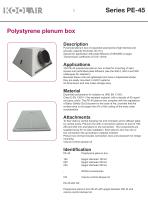
Description Pyramidal plenum box of expanded polystyrene (high thermal and acoustic capacity thickness 20 mm). Special for application with plate diffusers of 595x595 or larger. Transmission coefficient of 0.031 W/mk. Applications The PE-45 polystyrene plenum box is ideal for mounting of swirl, square and perforated-plate diffusers (see the S40.2, S40.3 and S50 catalogues for selection). Because these units are lightweight and have a trapezoidal shape, they are easily mounted in HVAC systems. Its dimensions and size make storage easy. Material Expanded polystyrene for isolation to UNE EN 13163. Class...
Open the catalog to page 3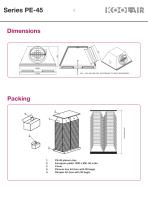
2. European pallet 1200 x 800. 50 units 4. Plenum box kit (box with 50 bags)
Open the catalog to page 4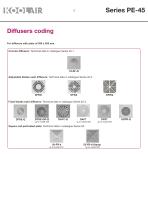
Diffusers coding For diffusers with plate of 595 x 595 mm. Circular diffusers: Technical data in catalogue Series 40.1. 43-SF-Q Adjustable blades swirl diffusers: Technical data in catalogue Series 40.2. Fixed blades swirl diffusers: Technical data in catalogue Series 40.3. Square and perforated plate: Technical data in catalogue Series 50.
Open the catalog to page 5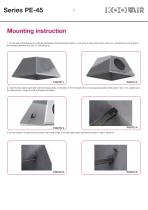
Mounting instruction 1. On the side of the plenum box with the premarked mouth diameters (photo 1) and using a cutting tool (knife, cutter, etc.). Machine the mouth inlet to the selected diameter 160, 200, or 250 (photo 2). 2. Insert the two plastic parts that hold the bridge (photo 3). Mounted in front of each other, on two opposing sides of the plenum box. Turn upside down the plenum box, in order to work at the plenum bottom. 3. On the inside of the plenum box, position the metal bridge in the two plastic parts that were mounted in step 2 (photo 4).
Open the catalog to page 6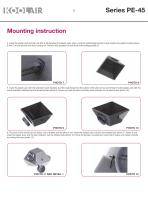
Mounting instruction 4. Insert the plastic stub into the hole that is left between the plastic parts, step 2, and the metal bridge (photo 5) and position the plastic bracket (photo 6 and 7) to prevent the stub from coming out. Perform this operation at both ends of the bridge (photo 8). 5. Insert the plastic part with the selected mouth diameter and the male thread into the interior of the plenum box and thread it to the plastic part with the mouth diameter selected and the female thread (photo 9). Screw one onto the other until they exert pressure on the plenum box (photo 10). 6. The neck of...
Open the catalog to page 7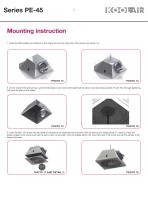
Mounting instruction 7. Insert the M8 threaded rod holding it to the ceiling into the hole at the top of the plenum box (photo 14). 8. On the inside of the plenum box, screw the flat-base nut and set to the height that the plenum box should have (photo 15 and 16). Stronger tightening will move the plenum box higher. 9. Insert the M6 x 120 screw into the middle of the plate of the rotational part and screw onto the plenum box bridge (photo 17, detail 2). Place the plastic stopper in the screw head with the same colour as the plate. Once completed (photo 18), mount the duct in the mouth and set...
Open the catalog to page 8
THIS CATALOGUE IS COPYRIGHTED. Partial or full reproduction of its content is strictly prohibited without express written authorisation from KOOLAIR, S.A. CEN-PE45-0415-00
Open the catalog to page 9
KOOLAIR, S.A. Calle Urano, 26 Poligono industrial nº 2 – La Fuensanta 28936 Móstoles - Madrid - (España) Tel: +34 91 645 00 33 Fax: +34 91 645 69 62 e-mail: [email protected]
Open the catalog to page 10All KOOLAIR S.A catalogs and technical brochures
 series FLOOR
23 Pages
 series Dampers 100-2
21 Pages
 FIRE protection
2 Pages
 KOOLCOM
2 Pages
 DFRE-P
1 Page
 PE-45
PE-451 Page
 Acoustic
2 Pages
 Series 100-200 Dampers
18 Pages
 VENTILATION HOODS
6 Pages
 Series SF Fire dampers
35 Pages
 Series SCDC Smoke dampers
11 Pages
 36-STE
2 Pages
 DTP-GT Multi-nozzles diffusers
15 Pages
 DTP Multi-nozzles diffusers
14 Pages
 Koolair product range
2 Pages
 Technical Selection Guide
145 Pages
 Bypass terminal units – KMSR
15 Pages
 Terminal units with fan – HVFS
12 Pages
 Air Volume Boxes – Series KD
7 Pages
 Measurement Station – EM
6 Pages
 Passive chilled beams – VPK
9 Pages
 Induction terminal units – IHK
20 Pages
 Square diffusers – Series 50
22 Pages
 Multinozzles diffusers – DF49MT3
20 Pages
 Long-throw nozzles – DF 89
19 Pages
 Long-throw nozzles – DF 49
19 Pages
 Linear grilles – Series 30
19 Pages
 S26
S261 Page
 21-DVC/21-DVR
1 Page
 21-SVC/21-SVR
1 Page
 20-SH/21-SH
1 Page
 20-DH/21-DH
1 Page
 Circular diffusers – DCL
2 Pages
 Extract valves – Series GPD
8 Pages
 Circular diffusers – Series 40.1
31 Pages
 Security grilles – KSG
12 Pages
 Return grilles – Series 20.2
19 Pages
 Supply grilles – Series 26
10 Pages
 Regulating dampers
18 Pages
 Silencers – Series SK
25 Pages
 Linear Diffusers – Series 70.1
26 Pages
 Circular diffuser – Series 40.1
31 Pages
 Supply grilles – Series 20.1
19 Pages


- Ventilation grill
- Metal ventilation grill
- Rectangular ventilation grill
- Industrial air diffuser
- Square ventilation grill
- Ceiling-mounted air diffuser
- White ventilation grill
- Home ventilation grill
- Circular displacement air diffuser
- Square air diffuser
- Interior ventilation grill
- Ventilation damper
- Air filter
- Linear air diffuser
- Adjustable ventilation grill
- Metal ventilation damper
- Slot air diffuser
- Linear ventilation grill
- Stainless steel ventilation grill
- Industrial jet nozzle