- Catalogs
- KLH Massivholz
- Assembly & Installation

Assembly & Installation

Assembly & Installation
The KLH solid wood panels are designed for efficient installation with minimal tools. Delivered directly to the site, the assembly set is checked by the installation company. Components are assembled using lifting gear, offering a faster process than traditional materials like bricks or concrete. This dry construction method reduces overall construction time by 20-40% and installation time by 10-30%.
Preparation involves selecting suitable lifting gear based on distance, weight, and height. Three assembly scenarios are considered: directly from transport, from stored components, or post-unloading from containers. Compliance with safety regulations and use of personal protective equipment is mandatory. Required tools include positioning and fixing tools, fasteners, and materials like sealing tapes and elastomer supports for soundproofing.
Assembly requires careful preparation due to its cost-intensive nature. The process includes applying wall positions, placing assembly brackets, applying moisture sealant, and height leveling. Fastening brackets ensure positioning, and moisture sealing is applied in specific areas. Height leveling ensures accurate placement, with mortar used to fill joints for stability.
Conventional wood construction tools such as drills, saws, and leveling instruments are used. The number of assemblers depends on planning and unloading situations, with specific roles for fastening, placement, and securing components.
Specifications and Procedures:
KLH components are pre-installed with lifting gear at the factory and unloaded in the correct order for assembly. The assembly team, typically two people, positions and fixes components according to the construction plan and structural engineer's instructions. Generally, 4-6 lifting operations per hour are expected, with deliveries consisting of 25 to 40 components. For larger buildings, one lorry load per day is a guideline. Time buffers should be considered for weather and reworking.
KLH components are suitable for service classes 1 and 2 and require protection from direct weather exposure. Short-term exposure is generally not damaging, but increased moisture should be allowed to evaporate. Visible surfaces may soil from exposure, necessitating immediate follow-up work.
Visible KLH surfaces are planed and sanded. It is recommended to clean any soiling immediately after assembly and apply a primer.
Follow-up work is quicker than conventional methods, and contractors should be familiar with KLH construction methods. Installations may influence the assembly process, such as prefabricated chimneys or stairs. Proper organization is crucial.
Grooves for installations are made with a groove cutter, maintaining a distance from the floor and ceiling. Static examination is required for milling at angles to the cover lamination. Proper sealing is necessary for penetrations through sealing layers.
Installations can be run in facing formwork or milled into KLH walls. For visible surfaces, lines are milled on the back. Proper sealing and sound insulation are essential.
Pipes are laid on the ground or in facing formwork. Sufficient sound insulation and proper sealing of penetrations are necessary. Wet rooms should include additional sealing layers.
The document includes various figures illustrating assembly and installation processes, such as socket drilling, cable routing, and installation of gypsum boards and radiator boxes.
Catalog excerpts

IMPRINT © KLH Massivholz GmbH Publisher and responsible for content: KLH Massivholz GmbH Version: 01/2012, Assembly & Installation The content of this brochure is the intellectual property of the company and is protected by copyright. The statements are recommendations and suggestions only; liability on the part of the publisher is excluded. Any type of reproduction is strictly forbidden and only permitted after written approval from the publisher.
Open the catalog to page 2
ASSEMBLY & install a tion The large KLH solid wood panels can usually be installed easily and using very few tools. The fully packaged assembly set is delivered directly to the construction site by lorry or container. The relevant installation company (usually a wood construction firm) will check and accept the delivery. The individual components are assembled and screwed together by using appropriate lifting gear. Compared to other construction materials, such as bricks, concrete or steel, KLH building shells take much less time to be assembled. Follow-up work can start immediately after the...
Open the catalog to page 4
01 GENER AL INFORMATION AS SEMBLY WORK COMPLETES THE PROJECT DE VELOPMENT CYCLE The clients submit their planning documentation including any additional information that we need in order to prepare a quotation. After consultation and after the order is placed, the actual preparation work with the client starts, submitted to us in the form of work planning documentation. Based on this work planning, which is approved by the client, production and CNC cutting of the relevant panels as well as delivery to the construction site will be carried out. At the construction site the components will be...
Open the catalog to page 5
PREPAR ATION FOR ASSEMBLY The means of transport delivering the components to the construction site as well as the loading and unloading order were already determined in the course of work planning and project submission. In order to identify the required type of lifting gear and any necessary measures, it is important to determine the exact position for the lifting gear and the delivery lorry. Usually, positioning takes at least one day, maybe longer. All resulting consequences have to be reviewed by the client and have to be duly organised, such as road blocks or various official permits that...
Open the catalog to page 6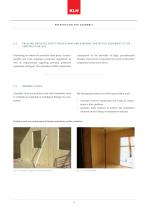
2.3 CHECKING EMPLOYEE SAFET Y REGUL ATIONS AND PERSONAL PROTECTIVE EQUIPMENT AT THE CONSTRUCTION SITE Depending on where the assembly takes place, countryspecific and local employee protection regulations as well as requirements regarding personal protective equipment will apply. The assembly of KLH components corresponds to the assembly of large, pre-fabricated wooden construction components by wood construction companies/construction firms. Assembly tools are auxiliary tools that assemblers need to complete an assembly or installation (fixing) of a component. We distinguish between the following...
Open the catalog to page 7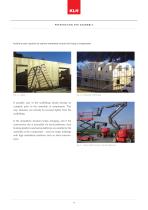
Auxiliary tools required to achieve installation and/or the fixing of components Sofern es möglich ist, sollte ein Teil des Gerüstaufb Fig. 4 – Assem ly sc folding erfolgen. bDiea fElementverschraubung ist damit bere If possible, part of the scaffolding should already be complete prior to the assembly of components. This way, elements can already be screwed tightly from the scaffolding. If the installation situation keeps changing, and if the construction site is accessible via aerial platforms, then hoisting platforms and aerial platforms are suitable for the assembly of the components – even...
Open the catalog to page 8
2.5 DETERMINING THE REQUIRED FASTENERS AND ADDITIONAL MATERIALS Fasteners are materials which connect or fix panels. Types and numbers of fasteners will result from the detailed construction plans as well as static calculations. Standard fasteners include e.g. screws, brackets, stud anchors (transition into concrete). Fig. 6 – Par tially threaded screw Fig. 7 – Flat head screw Depending on the architectural layout and the assembly situation, standard fasteners may sometimes not suffice. In this case special steel components, dimensioned by a structural engineer and organised in time by the assembly...
Open the catalog to page 9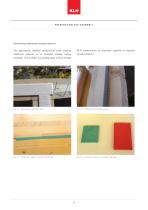
Determining additionally required material The appropriate detailed construction work requires additional material to be available already during assembly. This includes e.g. sealing tapes to form airtight KLH constructions or elastomer supports to improve sound insulation.
Open the catalog to page 10
2.6 DETERMINING THE TOOLS REQUIRED FOR ASSEMBLY The assembly work of KLH components requires nothing more than conventional tools used in wood construction, such as e.g. chalk line, hammer drill and drill with bits, aluminium levelling rod, hammer, sledgehammer, rafter clamps and the like. Figures 16 – 34 will give you an overview of the most common tools used for assembly.
Open the catalog to page 11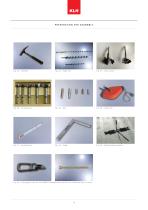
Fig. 33 – Rachet beam tensioner Fig. 34 – Lif ting gear from the firm WÜRTH (transpor tation anchor plus combined Assy- II -screw)
Open the catalog to page 12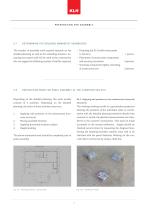
2.7 DETERMINING THE REQUIRED NUMBER OF ASSEMBLERS The number of assembly staff required depends on the detailed planning as well as the unloading situation. Assuming that expert staff will be used at the construction site, we suggest the following number of staff be required: • astening the KLH solid wood panels F to the lorry • lacement of construction components P and securing of position • crewing components tightly, reworking S at construction site 1 person 2 persons 2 persons PREPAR ATION WORK FOR PANEL ASSEMBLY AT THE CONSTRUCTION SITE Depending on the detailed planning, this work usually...
Open the catalog to page 13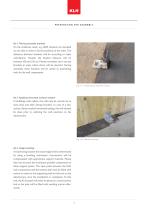
Ad 2. Placing assembly brackets On the chalk-line mark, e.g. BMF brackets are doweled on one side in order to fix the positions of the walls. The distances between brackets will be according to static calculations. Usually, the bracket distance will be between 100 and 150 cm. Please remember not to set any brackets in areas where doors will be inserted. During assembly, these brackets will be useful as positioning tools for the wall components. Ad 3. Applying horizontal moisture sealant In buildings with cellars, this will only be carried out in wall areas and after setting brackets. In case...
Open the catalog to page 14All KLH Massivholz catalogs and technical brochures
 RIB ELEMENTS
20 Pages
 STRUCTURAL PRE-ANALYSIS TABLES
32 Pages
 WCTE_2016_Special
35 Pages
 Wooden feelings
13 Pages
 Environment and Sustainability
40 Pages
 Building Physics
32 Pages
 Cross-laminated Timber
20 Pages
 Lifting Systems
28 Pages





Archived catalogs
 Mission Statement
8 Pages