
- Catalogs
- KitchenAid
- SIDE BY SIDE REFRIGERATOR

SIDE BY SIDE REFRIGERATOR

SIDE BY SIDE REFRIGERATOR
This section highlights the importance of safely disposing of old refrigerators to prevent accidents like child entrapment. It includes safety instructions to reduce risks of fire, electric shock, or injury, such as using a grounded outlet and avoiding flammable materials near the refrigerator.
Guidelines for unpacking and installing the refrigerator are provided, including location requirements for proper ventilation and electrical requirements for safe operation. It advises using two or more people for moving the refrigerator to prevent injury.
This section covers the operation of the refrigerator, including ensuring proper air circulation, using controls, and managing water and ice dispensers. It also explains the water filtration system and ice maker usage.
Details on various refrigerator features such as shelves, drawers, and bins are provided. It includes instructions on adjusting temperature controls and humidity settings for optimal storage.
Information on freezer components like shelves and baskets is included, along with door features such as bins and racks.
Instructions for cleaning, changing light bulbs, and handling power interruptions are outlined. It also provides guidance for vacation and moving care.
This section offers solutions for common issues related to refrigerator operation, temperature, moisture, and ice and water systems.
Contact information for assistance and service in the U.S.A. and Canada is provided, along with details on available accessories.
Certifications for water filters and product data sheets are included for reference.
Warranty information is provided, detailing the coverage and terms for the refrigerator.
The water pressure for the refrigerator's water inlet valve should be between 30 and 120 psi. If connected to a reverse osmosis system, the pressure should be at least 40 to 60 psi. If pressure is low, check the sediment filter, allow the storage tank to refill, or remove the refrigerator's water filter if necessary.
To remove the base grille, open both doors, push in on the top, and pull up on the bottom. To replace, align the grille support tabs with the metal clips and push firmly.
Ensure the refrigerator is plugged into a grounded 3-prong outlet. Do not remove the ground prong, use an adapter, or an extension cord to avoid electrical hazards.
Before removing doors, turn off the refrigerator and disconnect power. Remove food and bins. Follow specific steps to disconnect water tubing and wiring, and remove hinges. For replacement, reverse the steps, ensuring proper alignment and reconnection of water tubing and wiring.
Adjust the refrigerator's tilt using the front leveling screws to ensure stability and ease of door closure.
Before connecting the water line, turn off the refrigerator and main water supply. Use copper tubing and follow specific instructions for drilling and securing the shutoff valve. Check for leaks after turning the water supply back on.
After installation, flush the water system by dispensing and discarding 1.5 gallons of water. Turn on the ice maker and discard the first three batches of ice.
Instructions are provided for removing and replacing factory-installed trim kits and installing custom wood panels. Care instructions for decorator panels include using anti-static cleaner or mild soap and water.
- Refrigerator door panel should not exceed 25 lbs (9.98 kg).
- Freezer door panels should not exceed 18 lbs (6.80 kg) combined weight.
- Specifications for 22 cu. ft and 25 cu. ft freezer and refrigerator doors are provided.
- Routing handle sides of door panels should be 3¼" (8.25 cm).
- Buzzing from the ice maker's water valve.
- Pulsating or high-pitched sounds from the compressor or fans.
- Rattling from refrigerant flow or items on the refrigerator.
- Sizzling from water dripping on the defrost heater.
- Gurgling from refrigerant flow.
- Popping from contraction and expansion of walls.
- Air being forced over the condenser by the fan.
- Water running into the drain pan during defrost cycle.
- Ensure proper air circulation by not blocking vents.
- Odors can transfer between sections; clean thoroughly to prevent this.
- Refrigerator and freezer controls adjust compartment temperatures.
- Wait 24 hours after turning on the refrigerator before adding food.
- Slide, electronic, and digital controls are available, each with specific adjustment instructions.
- Flush the water system upon installation.
- Dispense water and ice using the lever; select between crushed or cubed ice.
- Dispenser lights and lock features are available on some models.
Instructions are provided for removing and replacing door rails, can racks, and door bins. The door air control can be adjusted to regulate the cold air flow to the bins or racks.
The refrigerator and freezer sections defrost automatically, but regular cleaning is recommended to prevent odors. Specific cleaning instructions are provided for different exterior finishes, and guidelines for cleaning the condenser are included.
Instructions for replacing light bulbs in various parts of the refrigerator are detailed, including the dispenser light, crisper lights, and freezer lights. It is important to use the correct wattage and type of bulb.
Guidance is provided for handling power outages, including keeping doors closed and using dry ice if necessary.
Steps are outlined for preparing the refrigerator for vacations or moving, including managing the ice maker and cleaning the unit.
Common issues such as the refrigerator not operating, excessive noise, door closure problems, and ice maker issues are addressed with suggested solutions.
Advice is given for dealing with temperature issues and moisture buildup, emphasizing proper door closure and control settings.
Solutions are provided for problems with ice production, ice quality, and dispenser operation, including checking water supply connections and pressure.
This section emphasizes the importance of safety when dealing with refrigerators, particularly when disposing of old units. It highlights the risks of child entrapment and suffocation, advising the removal of doors and leaving shelves in place to prevent accidents. Safety messages are marked with symbols and words like 'DANGER' and 'WARNING' to indicate potential hazards and necessary precautions.
Key safety instructions include connecting the appliance to a grounded outlet, avoiding the use of adapters or extension cords, and ensuring the appliance is unplugged during maintenance. It also advises using non-flammable cleaning products and keeping flammable materials away from the refrigerator.
This section provides detailed guidance on unpacking and installing the refrigerator. It includes instructions on removing packaging materials, cleaning before use, and ensuring proper ventilation by leaving adequate space around the unit. It warns against installing the refrigerator near heat sources or in areas where temperatures drop below 55°F (13°C).
The refrigerator requires a 115-volt, 60 Hz, 15 or 20 amp AC power supply, with a dedicated circuit recommended. It advises against using extension cords and emphasizes the importance of grounding the appliance.
For models with water dispensers or ice makers, a cold water supply with a pressure between 30 and 120 psi is necessary. It provides guidance on using copper tubing and ensuring compliance with local plumbing codes. It also addresses considerations for reverse osmosis water systems.
This section provides step-by-step instructions for safely removing and reinstalling refrigerator doors, including necessary tools and precautions to avoid electrical shock. It emphasizes the importance of disconnecting the power supply before starting and provides detailed diagrams for reference.
Ensure reconnection of the two grounding wires to prevent electric shock or death. Do not remove the grounding screw.
The refrigerator has two adjustable front rollers. To stabilize the refrigerator or ease door closure, adjust the tilt by turning the leveling screws with a hex socket wrench. Push the top of the refrigerator to reduce weight on the leveling screws for easier adjustment. Ensure doors close properly after adjustment.
Before connecting the refrigerator to the water line, turn off the ice maker. Disconnect the refrigerator from the power source and shut off the main water supply. Use a copper tube for connection, ensuring it is cut squarely. Secure the shut-off valve to the cold water line and check for leaks after opening the valve.
Plug the refrigerator into a grounded 3-prong outlet. Flush the water system by running and discarding 1.5 gallons of water to clear air from the line. Allow up to 24 hours for the ice maker to start producing ice.
For moving or installing custom panels, remove the original decorative set by unscrewing the handles. Clean panels with antistatic cleaner or mild soap and water. Avoid using paper towels or cleaners with solvents like ammonia.
Custom wood panels can be created or commissioned. Ensure panels do not exceed specified weight limits. Follow dimensional guidelines for panel inserts.
New refrigerators may produce unfamiliar sounds, which are typically normal. Hard surfaces can amplify these sounds. The ice maker may produce a gurgling sound when filling with water.
- Modern refrigerators with efficient fans may produce various sounds, including high-pitched or intermittent noises from the compressor and fans adjusting for optimal performance.
- Evaporator fan noise increases when doors are opened or warm food is added.
- Sound vibrations can originate from refrigerant flow, water lines, or items on the refrigerator.
- Dripping water during defrosting may cause sizzling sounds.
- Gurgling sounds occur at the end of cycles due to refrigerant circulation.
- Internal wall expansion and contraction can produce cracking noises.
- Condenser fan noise is normal as it forces air over the condenser.
- Water flow into the drip pan during defrosting is audible.
- To maintain appropriate temperatures, ensure air circulates between the freezer and refrigerator sections without obstruction.
- Blockages can impede airflow and affect temperature settings.
- Odors can transfer between sections; thorough cleaning and proper food wrapping are recommended.
- Refrigerator and freezer controls manage compartment temperatures. Wait 24 hours after starting the refrigerator before adding food.
- Pre-set controls should suffice for normal use, with adjustments made if temperatures are too warm or cold.
- Factory pre-set to medium settings; adjustments should be made gradually, waiting 24 hours between changes.
- Style 1 and Style 2 have different off settings affecting cooling.
- Pre-set at the factory; adjustments involve moving indicator lights to desired settings.
- Features include water filter status and accelerated ice production for high-demand periods.
- Factory pre-set with recommended settings of 0°F for the freezer and 37°F for the refrigerator.
- Temperature adjustments are made using plus or minus buttons, with a range for each compartment.
- Features include Max Cool for high-demand periods and OptimIce for increased ice production.
- Water dispenser requires initial flushing to clear air and impurities.
- Ice dispensers offer cubed or crushed ice, with settings for easy use and cleaning.
- Initial ice batches may have an off-taste due to new plumbing; discard these.
- Style 1: The dispenser area has a light that can be manually turned on by pressing the ON button. In some models, the lever automatically turns on the light when using the dispenser.
- Style 2: The lever automatically turns on the light when using the dispenser. The light can be set to ON, AUTO, or OFF. In AUTO mode, the light adjusts based on room brightness. The lights are LEDs and typically do not need replacement.
- The dispenser can be locked to prevent accidental use. This does not cut power to the refrigerator or ice maker.
- Style 1: Press LOCK to stop the dispenser; press UNLOCK to resume.
- Style 2: Press LOCK OUT to stop the dispenser; press again to resume.
- The indicator helps track when to change the water filter cartridge. It changes from green to yellow, indicating 90% of the filter's life is used. Replace the cartridge when the indicator turns red or water flow decreases.
- Style 1: Reset by pressing the light switch 5 times within 10 seconds.
- Style 2: Reset by pressing the reset button until the indicator turns green.
- To replace the water filter cartridge, locate the cover at the base grille, turn counterclockwise, and remove. Install the new cartridge by sliding the cover onto it and turning clockwise.
- After replacement, purge the system by dispensing and discarding 1.5 gallons of water to remove air from the line.
- Style 1: The ice maker is controlled by a wire arm. Lower the arm to start and raise it to stop.
- Style 2: The ice maker is controlled by a switch. Slide to ON to start and OFF to stop.
- To remove the ice bin, lift and pull it out. Ensure the bin is fully inserted to resume operation.
- Adjustable shelves and specialty drawers help organize food and reduce energy use by minimizing door opening time.
- Convertible vegetable/meat drawer can be adjusted for optimal storage temperatures.
- Freezer Efficiency: A freezer full of meat stays cold longer than one filled with cooked foods. If food contains ice crystals, it can be refrozen, though quality may be affected. Discard food if it appears of poor quality.
- Vacation Preparation: If leaving the refrigerator on, consume perishable items and freeze others. For refrigerators with automatic ice makers, turn off the ice maker and water supply, and empty the ice bin. If turning off the refrigerator, remove all food, turn off the ice maker and water supply, clean and dry the refrigerator, and leave doors slightly open to prevent odors and mold.
- Moving Preparation: Disconnect the water supply to the ice maker, remove all food, empty the ice bin, turn off the refrigerator, unplug it, and clean thoroughly. Secure removable parts and doors for transport.
- Refrigerator Not Working: Check if the power cord is plugged in, the outlet is working, and the circuit breaker is not tripped. Ensure controls are set to ON.
- Excessive Motor Operation: New refrigerators may run longer due to high-efficiency compressors and fans, especially in warm rooms or with frequent door openings.
- Noise Issues: Modern refrigerators may produce intermittent sounds such as buzzing, pulsating, or hissing due to normal operations.
- Door Issues: Ensure doors are not blocked and seals are clean to prevent difficulty in opening or closing.
- Lighting Issues: Check if bulbs are loose or burnt out.
- High Temperature: Allow 24 hours for cooling after installation. Minimize door openings and adjust settings if necessary.
- Humidity Accumulation: Normal in humid environments; keep doors closed to minimize.
- Ice Production: Ensure water supply is connected and open. Allow time for ice production after installation.
- Ice Quality: Check for water line kinks and ensure proper water pressure.
- Dispenser Functionality: Ensure freezer door is closed and ice bin is properly installed.
- Water Dispenser: Check water supply connection and pressure. Flush the system if newly installed or filter changed.
- Check troubleshooting section before seeking service to save on repair costs. Have purchase date and model/serial numbers ready when calling for assistance.
- Use factory-specified replacement parts for repairs.
Catalog excerpts
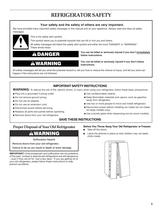
To reduce the risk of fire, electric shock, or injury when using your refrigerator, follow these basic precautions: > ■ Plug into a grounded 3 prong outlet. > ■ Use nonflammable cleaner. > ■ Do not remove ground prong. > ■ Keep flammable materials and vapors, such as gasoline, away from refrigerator. > ■ Do not use an adapter. > ■ Do not use an extension cord. > ■ Use two or more people to move and install refrigerator. > ■ Disconnect power before servicing. > ■ Disconnect power before installing ice maker (on ice maker kit ready models only). > ■ Replace all parts and panels before operating....
Open the catalog to page 3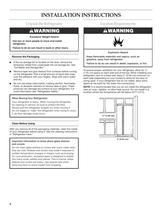
■ If the ice storage bin is located on the door, remove the temporary shield from underneath the ice storage bin. See Ice Maker and Storage Bin.Ӕ > ■ Remove tape and glue residue from surfaces before turning on the refrigerator. Rub a small amount of liquid dish soap over the adhesive with your fingers. Wipe with warm water and dry. To ensure proper ventilation for your refrigerator, allow for ٢D₂ " (1.25cm) space on each side and at the top. When installing your refrigerator next to a fixed wall, leave 2" (5.08cm) minimum on each side (depending on your model) to allow for the door to swing...
Open the catalog to page 4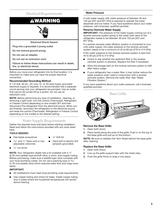
A cold water supply with water pressure of between 30 and 120psi (207and 827kPa) is required to operate the water dispenser and ice maker. If you have questions about your water pressure, call a licensed, qualified plumber. > IMPORTANT: The pressure of the water supply coming out of a reverse osmosis system going to the water inlet valve of the refrigerator needs to be between 30 and 120psi (207and 827kPa).If a reverse osmosis water filtration system is connected to your cold water supply, the water pressure to the reverse osmosis system needs to be a minimum of 40 to 60psi (276to 414kPa).If...
Open the catalog to page 5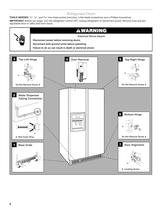
TOOLS NEEDED: ٢D₄ ", ٢D₂ " , and ⁵⁄₁₆ " hex-head socket wrenches, a flat-blade screwdriver and a Phillips screwdriver. IMPORTANT: Before you begin, turn the refrigerator control OFF. Unplug refrigerator or disconnect power. Remove food and any adjustable door or utility bins from doors. Electrical Shock HazardDisconnect power before removing doors.Reconnect both ground wires before operating.Failure to do so can result in death or electrical shock. 3 > Top Left Hinge 4 > Door Removal Water Dispenser Tubing Connection Base Grille 5 > Top Right Hinge A A Do Not Remove Screw A A. Red Outer Ring...
Open the catalog to page 6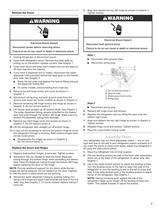
4. Align and replace the top left hinge as shown in Graphic3. Tighten screws. > Style 1 1. Unplug refrigerator or disconnect power. 2. Open both refrigerator doors. Remove the base grille by pulling up on the bottom outside corners. See Graphic1. > ■ Reconnect both ground wires. > ■ Reconnect wiring plug. 3. Close both doors and keep them closed until you are ready to lift them free from the cabinet. > 4. If you have a dispenser (ice or water), disconnect the water dispenser tubing located behind the base grille on the freezer door side. See Graphic2. > ■ Press the red outer ring against the...
Open the catalog to page 7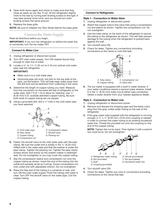
4. Open both doors again and check to make sure that they close as easily as you like. If not, tilt the refrigerator slightly more to the rear by turning both leveling screws to the right. It may take several more turns, and you should turn both leveling screws the same amount. > 5. Replace the base grille. NOTE: Be sure to refasten the Tech Sheet behind the base grille. 1. Unplug refrigerator or disconnect power. 2. Attach the copper tube to the valve inlet using a compression nut and sleeve as shown. Tighten the compression nut. Do not overtighten. > 3. Use the tube clamp on the back of the...
Open the catalog to page 8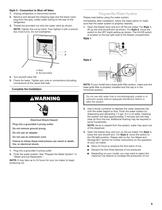
1. Unplug refrigerator or disconnect power. > 2. Remove and discard the shipping tape and the black nylon plug from the gray, coiled water tubing on the rear of the refrigerator. Please read before using the water system.Immediately after installation, follow the steps below to make sure that the water system is properly cleaned. 3. Thread the provided nut onto the water valve as shown. 1. Open the freezer door and turn off the ice maker. For Style 1 , lift up the wire shutoff arm as shown. For NOTE: Tighten the nut by hand. Then tighten it with a wrench two more turns. Do not overtighten. Style...
Open the catalog to page 9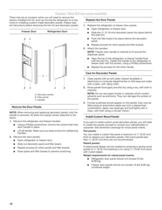
There may be an occasion when you will need to remove the factory-installed trim kit, such as moving the refrigerator to a new home or installing custom-made decorator panels. Please read all instructions before removing the trim kit and decorator panels. > Freezer DoorRefrigerator Door 1. Replace the refrigerator or freezer door panels: > ■ Open refrigerator or freezer door. > ■ Slide the ٢D₈ " (3.18 mm) decorator panel into place behind the side trim. > AB ABABC ■ Push the filler board into place behind the decorator panel. > ■ Repeat process for other panels and filler boards. 2. Attach the...
Open the catalog to page 10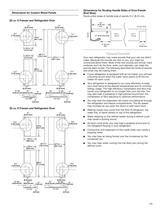
3 ٢D₄ "(8.25 cm)min. 1 / > 4 "(6.35 mm) > 1 / > 4 "(6.35 mm) > 5 / > 16 "(7.93 mm) > 5 / > 16 "(7.93 mm) > DoorPanel DoorPanelHinge Side ٢D₄ " (6.35 mm) max. 18 > 5 / > 32 "(46.1 cm) > Handle 2" (5 cm)min. 1"(2.54 cm) 12 > 7 / > 16 "(31.6 cm) 28 > 11 12 > 7 / > 16 "(31.6 cm) / > 16 "(154.2 cm)19 > 15
Open the catalog to page 11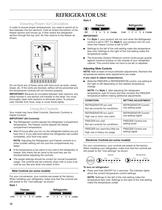
In order to ensure proper temperatures, you need to permit air to flow between the two sections. Cold air enters the bottom of the freezer section and moves up. It then enters the refrigerator section through the top vent. Air then returns to the freezer as shown. Do not block any of these vents with food such as soda, cereal, bread, etc. If the vents are blocked, airflow will be prevented and the temperature controls will not function properly. > Off1234 Colder ColdColder 1234 ■ For Style 1 , your product will not cool when the Refrigerator control is set to OFF. For Style 2 , your product will...
Open the catalog to page 12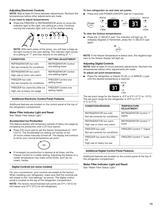
To turn refrigerator on and view set points: > NOTE: Wait at least 24 hours between adjustments. Recheck the temperatures before other adjustments are made. > ■ Press and hold POWER (ON/OFF) pad for 2 seconds. To view the Celsius temperatures: If you need to adjust temperatures: > ■ Press the FREEZER or REFRIGERATOR arrow to move the indicator light to the right, one setting at a time. Continue moving the indicator light until it is at the desired setting. > ■ Press the C SELECT pad. The indicator will light up. To redisplay degrees in Fahrenheit, press the аC SELECT pad again. NOTE: With each...
Open the catalog to page 13All KitchenAid catalogs and technical brochures
 KDRS483V
1 Page
Archived catalogs
 WINE CELLAR OVERLAY MODEL
40 Pages
 BEVERAGE CENTER
32 Pages
 GAS RANGE ARCHITECT® SERIESII
56 Pages
 ELECTRIC RANGE
28 Pages
 GAS COOKTOP
28 Pages
 ELECTRICCOOKTOP
36 Pages
 Microwave Oven
52 Pages


- Oven
- Electric oven
- Extractor hood
- Range hood with built-in lighting
- Industrial hob
- Industrial coffee machine
- Industrial range cooker
- Hob with front controls
- Wall-mounted cooker hood
- Built-in hob
- Barbecue
- Convection oven
- Automatic coffee machine
- Industrial dishwasher
- Built-in oven
- Hob with knobs
- Gas range cooker
- Mobile barbecue
- Electric range cooker