
- Catalogs
- KitchenAid
- ELECTRIC RANGE ARCHITECT® SERIES II

ELECTRIC RANGE ARCHITECT® SERIES II

ELECTRIC RANGE ARCHITECT® SERIES II
The document emphasizes the importance of safety when using the electric range, particularly the necessity of the anti-tip bracket to prevent tipping, which could cause serious injury or death. Users are advised to follow all safety instructions to reduce risks of fire, electrical shock, and injury.
This section describes the components of the electric range, including the glass touch-activated electronic oven control panel, cooktop controls, and oven interior features. It details the functions of elements like the dual-size and triple-size elements, warming drawer, and temperature probe jack.
The guide explains the use of the ceramic glass cooktop, cookware recommendations, and home canning tips. It details the operation of different cooktop controls and provides guidance on managing temperature settings.
This section covers the use of aluminum foil, bakeware, and meat thermometers. It explains rack positioning and provides instructions for cooking methods such as baking, broiling, and convection cooking. Special features like EasyConvect conversion and proofing bread are also discussed.
Instructions for maintaining the range include details on the self-cleaning cycle, general cleaning tips, and care for the oven light and door. The importance of keeping the oven vent unobstructed and proper placement of oven racks is emphasized.
This section provides solutions for common issues that may arise with the range, offering guidance on how to address problems before seeking professional assistance.
Contact information for customer support in the U.S.A. and Canada is provided for users needing further assistance or service.
The document concludes with warranty information, outlining the terms and conditions under which the range is covered.
- Dual-size Element: Available on both rear and electronic control models.
- Anti-tip Bracket: Ensures stability and safety.
- Warming Drawer: Functions as a storage drawer on standard control models.
- Ceramic Surface Cooking Area: Provides a smooth cooking surface.
- Selectable Simmer Feature: Available on standard control models for precise simmering.
- Hot Surfaces Indicator Lights: Alerts when the surface is too hot to touch.
- Control Panel: Centralized control for oven functions.
- Automatic Oven Light Switch/Self-clean Latch: Enhances convenience and safety.
- Temperature Probe Jack: Available on electronic knob control models.
- Door Gasket: Ensures a tight seal for efficient cooking.
- Model and Serial Number: Identification for service and support.
- Oven Door Window: Allows viewing of cooking progress.
- Ceramic Glass Surface: Glows red when an element is on and may cycle to maintain heat. Requires regular cleaning to prevent stains and ensure even heating.
- Safety Precautions: Avoid storing heavy objects above the cooktop, leaving hot lids on the surface, and sliding cookware to prevent damage.
- Cookware Recommendations: Use flat-bottomed cookware that matches the size of the cooking area for optimal heat conduction.
- Touch-Activated Controls: Offer a range of heat settings, including MELT & HOLD for low temperatures and KEEP WARM for maintaining food temperature.
- Control Lock/All Off: Prevents unintended use and turns off all elements simultaneously.
- Knob-Activated Controls: Provide similar functionality with manual adjustment for heat settings.
- Hot Surface Indicator Lights: Remain on as long as the surface is hot.
- Power On Lights: Indicate when a control knob is active.
- For Single Zone: Turn the knob from OFF to any position between LO and HI. Turn to OFF when done.
- For Dual Zone: Push in and turn the knob from OFF to any position between LO and HI. Turn to OFF when done.
- Provides adjustable heat for precise simmering on the right front surface.
- To use, set the SIMMER switch to ON, select temperature from LO to HI, and turn OFF when finished.
- HI: Boil liquids.
- MED-HI: Rapid boil, brown or sear food.
- MED: Slow boil, fry, cook pudding/sauce.
- MED-LO: Stew, steam, simmer.
- LO: Keep warm, melt chocolate/butter.
- Turn off all controls after cooking to prevent fire hazards.
- Cooktop may become hot during use or self-cleaning.
- Power On Lights: Indicate when a control knob is on.
- Hot Surface Indicator: Glows when the surface is too hot to touch.
- Style 1: Touch-activated and knob control systems.
- Style 2: Standard knob controls.
- Start: Begins oven functions except Timer, Control Lock, and Sabbath Mode.
- Control Lock: Prevents unintended use of the oven.
- Timer: Can be set in minutes/seconds or hours/minutes.
- Allows customization of oven settings, including temperature conversion, tone settings, and special modes like Dehydrate and Sabbath Mode.
- Dehydrate: Preserves food by removing moisture.
- Oven Temperature Calibration: Adjusts cooking speed.
- Sabbath Mode: Keeps the oven on in a bake setting for religious observance.
- Odors and smoke are normal during initial use or when heavily soiled.
- Do not line the oven bottom with foil to avoid damage.
- Use a meat thermometer for accurate doneness.
The temperature probe is used to measure the internal temperature of meat and poultry. It should not be used during broiling, dehydrating, or proofing bread. Insert the probe into the thickest part of the meat, avoiding fat or bone, and connect it to the oven. The probe temperature can be set between 130°F and 190°F. The oven will shut off automatically when the set temperature is reached.
Different types of bakeware affect cooking results. Light-colored aluminum provides even browning, while dark aluminum may require a temperature reduction. Insulated cookie sheets may need increased baking time. Stoneware and glassware may require temperature adjustments as per manufacturer instructions.
The oven vent should remain unobstructed to ensure proper air circulation. Racks should be positioned before turning on the oven, and bakeware should have space around it for even cooking.
The BAKE function is suitable for baking and roasting. The oven cycles the bake and broil elements to maintain temperature. Preheating is recommended for baking, but not always necessary for roasting.
Broiling uses direct heat with options for full or center broil. Use the broiler pan provided, and avoid covering the grid with foil. Broiling times and rack positions vary based on food type and thickness.
Convection ovens use a fan to circulate hot air, cooking food more evenly and quickly. Cooking temperatures can be reduced by 25°F to 50°F, and cooking times may be shortened by up to 30%. Foods should not be covered to allow browning.
This feature automatically adjusts standard cooking temperatures and times for convection cooking. Foods are categorized into meats, baked goods, and other foods for optimal results.
Convection Bake is suitable for single or multiple racks, while Convection Roast is used for meats and poultry. Both functions require temperature adjustments and may reduce cooking times.
Ideal for cooking thinner cuts of meat, fish filets, boneless chicken, vegetables, and garlic bread. The broil elements cycle to maintain temperature while a fan circulates hot air, often eliminating the need to turn food. The default temperature is 450°F but can be adjusted. If the oven door is opened, the elements and fan turn off after 30 seconds and resume once closed.
Activates yeast in dough. Place dough in a greased bowl, cover with wax paper, and position in the oven with boiling water in the broiler pan. The oven is set to 100°F. Check dough after 20-25 minutes. For second proofing, shape dough, cover with plastic wrap, and follow the same steps.
Allows setting the oven to start and stop at specific times. Not recommended for breads and cakes. Set the desired temperature and cooking time. The oven will automatically shut off when the time is reached.
Keeps cooked foods warm. Foods should be at serving temperature before placing in the drawer. Different settings are available for various foods. Do not let food sit for more than one hour before or after cooking to avoid food poisoning.
Uses high temperatures to turn soil into ash. The cycle can be set between 2 hours 30 minutes and 4 hours 30 minutes. Ensure the oven is prepared by removing items and cleaning certain areas manually. The door locks during the cycle and unlocks once cooled.
Use appropriate cleaning methods for different surfaces. Avoid abrasive materials on stainless steel and ceramic glass. Use specific cleaners for cooktops and control panels to maintain their condition.
- Oven Door Exterior: Use glass cleaner with a soft cloth or sponge. Avoid direct application on the panel.
- Oven Cavity: Avoid oven cleaners. Clean spills when cool to prevent staining. Use the Self-Cleaning cycle as per instructions.
- Oven and Roasting Racks: Use the Self-Cleaning cycle after removing racks to prevent discoloration. Steel-wool pads can also be used.
- Broiler Pan and Grid: Do not use in Self-Cleaning cycle. Use mildly abrasive cleansers or ammonia solution for cleaning.
- Storage Drawer: Ensure it is cool and empty before cleaning with mild detergent.
- Warming Drawer: Use KitchenAid Stainless Steel Cleaner or mild detergent.
- Ensure the oven is cool and unplugged.
- Remove the glass bulb cover and bulb by turning counterclockwise.
- Replace with a new bulb and cover, turning clockwise.
- Reconnect power.
- Open the door fully and flip up the hinge latches.
- Close the door partially and lift it away from the frame.
- To replace, insert hanger arms, open the door, and lock the hinges.
- Storage Drawer: Pull out to the stop, lift, and remove.
- Warming Drawer: Open fully, pull loops forward, and remove. Align glides to replace.
- Ensure power supply is connected and check circuit breakers.
- Verify control knobs and settings for cooktop and oven operation.
- Check cookware size and appliance leveling for optimal performance.
- For display issues, clear messages and reset if necessary.
Contact KitchenAid Customer Experience Center for assistance with features, installation, and parts. In the U.S., call 1-800-422-1230; in Canada, call 1-800-807-6777.
- One-Year Limited Warranty: Covers parts and labor for defects in materials or workmanship.
- Second to Fifth Year Warranty: Covers specific components like electric elements and control systems.
- Exclusions include service calls for installation errors, consumable parts, and damages from misuse.
Catalog excerpts
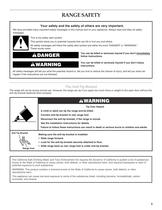
We have provided many important safety messages in this manual and on your appliance. Always read and obey all safety messages.This is the safety alert symbol.This symbol alerts you to potential hazards that can kill or hurt you and others. All safety messages will follow the safety alert symbol and either the word DANGERӔ or WARNING.ӔThese words mean: > You can be killed or seriously injured if you don't immediately You follow instructions.instructions. > can be killed or seriously injured if you don'tfollow All safety messages will tell you what the potential hazard is, tell you how to reduce...
Open the catalog to page 3
To reduce the risk of fire, electrical shock, injury to persons, or damage when using the range, follow basic precautions, including the following: > ■ Protective Liners Do not use aluminum foil to line surface unit drip bowls or oven bottoms, except as suggested in the manual. Improper installation of these liners may result in a risk of electric shock, or fire. > ֢֠ TO REDUCE THE RISK OF TIPPING OF THE RANGE, THE RANGE MUST BE SECURED BY PROPERLY INSTALLED ANTI-TIP DEVICES. TO CHECK IF THE DEVICES ARE INSTALLED PROPERLY, SLIDE RANGE FORWARD, LOOK FOR ANTI-TIP BRACKET SECURELY ATTACHED TO FLOOR,...
Open the catalog to page 4
E A FG B H I J KL C M D > A.Dual-size oval elementB.Triple-size elementC.Anti-tip bracketD.Warming drawerE.Dual-size elementF.Electronic cooktop touch controlsG.Ceramic surface cooking areaH.Oven control panelI.Automatic oven light switch/self-clean latchJ. Temperature probe jack(not shown) Parts and Features not shown (on some models)Broiler pan and gridRoasting rackTemperature probe A.Oven lightsB.Full and center broil elementsC.Oven cavity sensorD.T.H.E. convection fan and element (not visible)E.CleanBakeٙ element (not visible) K.Door gasketL.Model and serial number M. Oven door window ABCA...
Open the catalog to page 6
D E FG A B H I J K L C > A.Dual-size element(rear element also dual on electronic control models)B.Anti-tip bracketC.Warming drawer(storage drawer on standard control models)D.Ceramic surface cooking areaE.Selectable simmer feature(available on standard control models)F.Hot surfaces indicator lightsG.Control panelH.Automatic oven light switch/self-clean latchI. Temperature probe jack(not shown)(electronic knob control only) Parts and Features not shown (on some models)Broiler pan and gridRoasting rackTemperature probeSimmer feature switch A.Oven lightsB.Full and center broil elementsC.Oven cavity...
Open the catalog to page 8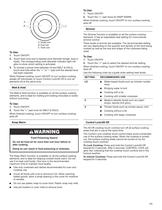
1. Touch ON/OFF. 2. Touch the +Ӕ pad twice for KEEP WARM.When finished cooking, touch ON/OFF to turn surface cooking area off. > The Simmer function is available on all the surface cooking elements. It has an adjustable heat setting for more precise simmer control. Three levels of simmer are available. The recommended setting will vary depending on the quantity and density of the food being cooked as well as the size and shape of the cookware being used. > A.Single sizeB.Dual sizeC.Triple size 2. Touch heat zone size to desired zone diameter (single, dual or triple). The corresponding zone diameter...
Open the catalog to page 11
Use the following chart as a guide when setting heat levels. Hot Surface Indicator Lights SETTING RECOMMENDED USE DUAL-SIZE ELEMENT Large diameter cookware. Large quantities of food. Home canning. HI Bring liquid to a boil. MED- HI Hold a rapid boil. Quickly brown or sear food. MED Maintain a slow boil. Fry or saut foods. Cook soups, sauces and gravies. MED-LO Stew or steam food. LO [SIMMER] Simmer (range of simmer temperatures). WARM Keep cooked foods warm. MELT Melt chocolate or butter. i- n n i- n n r>i- un / i i \ REMEMBER: When range is m use or (on some models) during the Self-Cleaning...
Open the catalog to page 12
The Dual-Size Elements offer flexibility depending on the size of the cookware. Single size can be used in the same way as a regular element. The dual size combines both the single and outer element and is recommended for larger size cookware. SETTINGRECOMMENDED USELO > ■ Water-based foods such as chicken noodle soup. > 1. Push in and turn knob counterclockwise from the OFF position to the SINGLE zone anywhere between LO and HI. > ■ Bringing water to boil. > ■ Cooking with a lid. 2. Turn knob to OFF when finished. > ■ Cooking with smaller cookware. > 2 > ■ Medium-density foods such as cream soups,...
Open the catalog to page 13
rols - Standard Knobs AWARNING Single and Dual-Size Elements je Fire Hazard Turn off all controls when done cooking. Failure to do so can result in death or fire. The cooktop controls can be set to anywhere between HI and LO. A. Single size B. Dual size Push in and turn to the desired heat setting.Use the following chart as a guide when setting heat levels. The Dual-Size Elements offer flexibility depending on the size of the cookware. Single size can be used in the same way as a regular element. The dual size combines both the single and outer element and is recommended for larger size cookware,...
Open the catalog to page 14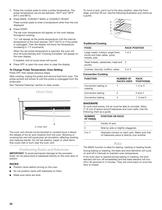
1. Press the number pads to enter a probe temperature. The probe temperature can be set between 130F and 190аF (54C and 88аC). 2. Press BAKE, CONVECT BAKE or CONVECT ROAST.Press number pads to enter a temperature other than the one displayed. 3. Press START.The set oven temperature will appear on the oven display throughout cooking.LoӔ will appear as the probe temperature until the internal temperature of the food reaches 130F (54аC) or if the probe is unplugged. Then the display will show the temperature increasing in 1F increments.When the set probe temperature is reached, the oven will shut...
Open the catalog to page 20
When using convection temperature conversion for BAKED GOODS and OTHER FOODS, allow the oven to preheat before placing food in the oven. > 1. Press MEATS, BAKED GOODS or OTHER FOODS. In a convection oven, the fan-circulated hot air continually distributes heat more evenly than the natural movement of air in a standard thermal oven. This movement of hot air helps maintain a consistent temperature throughout the oven, cooking foods more evenly, crisping surfaces while sealing in moisture and yielding crustier breads.Most foods can be cooked by lowering cooking temperatures 25F to 50аF (14C to 28аC),...
Open the catalog to page 22All KitchenAid catalogs and technical brochures
 KDRS483V
1 Page
Archived catalogs
 SIDE BY SIDE REFRIGERATOR
60 Pages
 WINE CELLAR OVERLAY MODEL
40 Pages
 BEVERAGE CENTER
32 Pages
 GAS RANGE ARCHITECT® SERIESII
56 Pages
 ELECTRIC RANGE
28 Pages
 GAS COOKTOP
28 Pages
 ELECTRICCOOKTOP
36 Pages
 Microwave Oven
52 Pages


- Electric oven
- Extractor hood
- Range hood with built-in lighting
- Industrial coffee machine
- Industrial range cooker
- Wall-mounted cooker hood
- Hob with front controls
- Built-in hob
- Barbecue
- Automatic coffee machine
- Industrial dishwasher
- Built-in oven
- Hob with knobs
- Gas range cooker
- Mobile barbecue
- Industrial refrigerator
- Electric range cooker