
- Catalogs
- KitchenAid
- DUAL FUEL RANGE ARCHITECT® SERIESII

DUAL FUEL RANGE ARCHITECT® SERIESII

DUAL FUEL RANGE ARCHITECT® SERIESII
This section emphasizes the importance of following safety instructions to prevent serious injury or death. It highlights the dangers of improper use, such as fire or explosion, and provides specific actions to take if gas is smelled. The importance of the anti-tip bracket is stressed to prevent the range from tipping over.
This section outlines the various components of the dual fuel range, including cooktop controls, burners, and electronic oven controls. It provides a detailed description of each part and its function.
Instructions on using the cooktop controls, including the TripleTier® Flame Burner and sealed surface burners, are provided. The section also covers suitable cookware and home canning tips.
This section explains the use of electronic control pads, oven displays, and various options such as temperature calibration and Sabbath mode. It also includes instructions for setting the clock and timer.
Guidelines for using aluminum foil, bakeware, and meat thermometers are provided. The section also covers convection cooking, proofing bread, and timed cooking.
Maintenance instructions include the self-cleaning cycle, general cleaning tips, and care for the oven light and door. The importance of regular cleaning to ensure optimal performance is emphasized.
This section provides solutions to common problems that may arise during the use of the range, helping users to resolve issues without professional assistance.
Contact information for obtaining assistance or service in the U.S.A. and Canada is provided, ensuring users can easily reach out for help if needed.
Details of the warranty coverage for the dual fuel range are outlined, providing users with information on what is covered and how to make a claim.
- Do not heat unopened food containers to prevent pressure build-up and potential injury.
- Ensure oven vent ducts are unobstructed.
- Place oven racks in desired location while the oven is cool to avoid burns.
- Avoid touching heating elements or interior surfaces of the oven as they can cause burns.
- Ensure proper installation and grounding of the range according to local codes or the National Electrical Code.
- Disconnect electrical supply before servicing the appliance.
- Avoid misuse of appliance doors or drawers to prevent injuries.
- Keep the range area clear of combustible materials.
- Adjust top burner flame size to not extend beyond the edge of the cooking utensil.
- Do not clean the door gasket to maintain a good seal.
- Avoid using commercial oven cleaners or protective coatings.
- Clean only parts listed in the manual.
- Remove broiler pan and utensils before self-cleaning.
- Clean ventilating hoods frequently to prevent grease accumulation.
- Turn the fan on when flambéing foods under the hood.
- The manual covers several models with varying features such as control panels, warming drawers, and different burner types.
- Key components include surface burner locators, oven displays, and control knobs for various burners.
- The cooktop is factory-set for natural gas but can be converted to LP gas using the included conversion kit.
- Electric igniters light the surface burners when control knobs are turned to LITE.
- In case of power failure, burners can be lit manually with a match.
- The TripleTier® Flame Burner offers high power and simmer settings for versatile cooking.
- Use cookware with a flat bottom, straight sides, and a well-fitting lid for best results.
- Different materials like aluminum, cast iron, and stainless steel have varying heating properties.
- Use the pad of your finger to press control pad functions.
- The oven display shows temperature, heat sources, and timers during use.
- The START pad initiates oven functions, and the Control Lock feature prevents unintended use.
To lock or unlock the oven control, ensure the oven, Timer, and Timed Cooking are off. Press and hold the START pad for 5 seconds until “CONTROL LOCK” appears on the display. Repeat to unlock.
The oven features a 12-hour clock. To set the time, press CLOCK SET/START, enter the time using number pads, and press CLOCK SET/START again.
The Timer can be set in minutes and seconds or hours and minutes. It does not start or stop the oven. To set, press TIMER SET/START, enter the time, and press TIMER SET/START again. Press TIMER OFF to cancel.
This pad allows access to special functions like temperature conversion between Fahrenheit and Celsius, adjusting tones, and setting Dehydrate and Sabbath Mode.
Used to preserve food by removing moisture. The oven can be set between 100°F and 200°F. The oven will turn off after 12 hours unless restarted.
Adjust the oven temperature if it cooks faster or slower than expected. Use the OPTIONS pad and number pads to adjust.
Keeps the oven on in a bake setting until turned off. It can be set for a specific time. During this mode, only number and start pads function, and no tones sound.
Initial use may produce odors and smoke. Avoid lining the oven bottom with foil to prevent damage. Follow bakeware recommendations for optimal results.
Used to measure the internal temperature of meats and casseroles. Insert into the thickest part of the food, avoiding fat and bone.
Ensure the oven vent is not blocked to allow proper air circulation.
Position racks before turning on the oven and ensure they are level. Allow space around bakeware for air circulation.
Preheat the oven before placing food unless the recipe suggests otherwise. Press BAKE for 350°F or enter the desired temperature, then press START. The display will show 'Preheating' until the set temperature is reached. Press OFF when finished cooking.
Broiling uses direct radiant heat with options for Full Broil or Center Broil. Use the provided broiler pan and grid for optimal results. Do not cover the grid with foil. Position the rack according to the Broiling Chart and close the door for proper operation. Press BROIL for the desired setting, then START. Press OFF when done.
Convection ovens circulate hot air for even cooking, allowing for lower temperatures and shorter cooking times. Avoid covering foods to allow browning. Use a meat thermometer for doneness. EasyConvect Conversion adjusts standard recipes for convection cooking. Preheat the oven before placing food.
Convection Bake is suitable for single or multiple racks, requiring preheating. Convection Roast is ideal for meats and poultry, using a roasting rack for air circulation. Reduce recipe temperatures by 25°F and adjust cooking times as needed.
Convection Broil is suitable for thinner cuts of meat and vegetables. Preheat for 5 minutes, then place food on the broiler pan. The temperature can be adjusted between 300°F and 500°F.
Proofing activates yeast in dough. Place dough in a greased bowl, cover, and place in the oven with boiling water in the broiler pan. Press BREAD PROOF and START. Check dough after 20-25 minutes.
Set the oven to turn on and off automatically with Timed Cooking. Enter the desired temperature and cook time, then press START. For delayed start, set the stop time after entering the cook time.
The oven display shows the set temperature and minute countdown. The oven shuts off automatically when the stop time is reached, with end-of-cycle tones sounding. The warming drawer keeps cooked foods at serving temperature and can warm breads and pastries. Foods should be at serving temperature before being placed in the drawer. Do not use plastic wrap to cover foods in the warming drawer.
Place cooked food in the drawer. Press the WARMING DRAWER ON button to set the temperature. Press WARM DRAWER OFF when finished. Warning: Do not let food sit for more than one hour before or after cooking to avoid food poisoning.
The drawer is preset to "low" but can be adjusted. A temperature chart provides guidance for different foods.
Birds should be moved to a well-ventilated room due to fumes. The cycle uses high temperatures to turn soil into ash. The oven is preset for a 2 hour 30 minute cycle, adjustable for soil level. Ensure the door is closed completely before starting. The oven light does not work during this cycle.
Exterior surfaces should be cleaned with appropriate cleaners. Avoid abrasive materials on stainless steel. Porcelain-coated grates and caps should not be cleaned in the self-cleaning cycle or dishwasher. Use nonabrasive pads and cleansers.
Ensure the oven is cool and unplugged before replacing the bulb. Follow specific steps to replace the bulb and cover.
Instructions are provided for safely removing and replacing the oven door.
Common issues such as power supply problems, burner operation, and uneven flames are addressed with suggested solutions.
- Control Lock and Sabbath Mode: Ensure these modes are not activated if the oven is not functioning as expected. Refer to the respective sections for guidance.
- Oven Burner Flames: Yellow or noisy flames may indicate improper propane conversion. Contact a repair specialist.
- Cooling Fan Operation: The fan running during or after use is normal to cool electronic controls.
- Oven Temperature Calibration: Adjust if the oven temperature is too high or low. Refer to the calibration section.
- Display Messages: Clear any error messages by pressing OFF. If issues persist, seek service assistance.
- Convection Fan Issues: Delays in fan operation or cycling during convection broil are normal. Ensure the oven door is closed during operation.
- Self-Cleaning Cycle: Ensure the oven door is closed and the function is correctly set. Check for any delay start settings.
- Cooking Results: Verify appliance leveling, temperature settings, preheating, bakeware, rack positioning, and air circulation for optimal results.
- Before seeking service, consult the troubleshooting section to potentially avoid unnecessary service calls.
- For replacement parts, use only factory-specified parts for compatibility and performance.
- Contact KitchenAid Customer Experience Center for assistance with features, installation, maintenance, and parts sales.
- For further assistance, write to KitchenAid with your appliance details and contact information.
- One-Year Limited Warranty: Covers factory-specified parts and repair labor for defects in materials or workmanship.
- Extended Warranty: Covers certain components for up to ten years, including electric elements, gas burners, and steam-assist oven cavities.
- Exclusions: Warranty does not cover installation errors, consumable parts, misuse, or unauthorized modifications.
- Legal Rights: Warranty limitations may not apply in all states or provinces, providing specific legal rights.
- Follow all safety messages to prevent potential hazards, including fire, electric shock, and injury.
- Ensure anti-tip brackets are installed to prevent the range from tipping over.
- Avoid using the appliance for heating rooms to prevent carbon monoxide poisoning.
- Do not cover oven vents or racks with aluminum foil to ensure proper air circulation and prevent fire hazards.
- Keep children away from the appliance to prevent burns or injuries.
- Users should not attempt to repair or replace any part of the stove unless specifically recommended in the manual. All other maintenance or repair should be performed by a qualified technician.
- Flammable materials should not be stored in or near the oven or surface elements.
- Do not use water to extinguish grease fires; instead, smother the flames or use a dry chemical or foam extinguisher.
- Only use dry oven mitts, as wet or damp mitts can cause steam burns. Avoid contact with heating elements.
- Surface elements and nearby areas can remain hot even after they appear dark. Avoid contact until they have cooled sufficiently.
- Never leave cooking elements unattended at high power to prevent boil-overs and potential fires.
- Only certain types of glass, ceramic, or other glazed cookware are suitable for stovetop use.
- Handles of cookware should be turned inward to prevent burns and accidental spills.
- Exercise caution when cleaning hot surfaces to avoid steam burns.
- Allow hot air or steam to escape before removing or replacing dishes from the oven.
- Do not heat sealed containers to prevent pressure buildup and potential explosions.
- The manual covers multiple models, and the features listed may not correspond to your specific model.
- Key components include the control panel, oven display, and various burner controls.
- The cooktop is configured for natural gas but can be converted to propane using the provided kit.
- Electric igniters automatically light surface burners when control knobs are turned to LITE.
- Ensure cookware is placed on the grate before adjusting burner controls.
- In case of power failure, surface burners can be manually lit with a match.
- Offers high power and simmer settings, ideal for large quantities or large pots.
- Settings range from high power for boiling to low for simmering.
- Vent hoods should be cleaned frequently to prevent grease buildup.
- When flambéing, ensure the fan is on.
- The stove must be grounded according to local codes or the National Electrical Code.
- Disconnect the power source before servicing the appliance.
- Improper use of doors or drawers can lead to injury.
- Ensure burner flames do not exceed the edge of cookware to prevent fire hazards.
To ensure proper ignition and flame uniformity, regularly clean the burner caps and keep the gas inlet tube opening free from spills and debris. A clean burner flame should be blue, not yellow. If the burner does not ignite, check the alignment of the burner cap and contact a qualified technician if necessary.
Use cookware with a flat bottom and straight sides for optimal cooking results. Materials like aluminum and copper provide even heat distribution but may leave marks on the cooktop. Avoid using nonstick cookware under the broiler.
When canning, alternate the use of surface burners to allow them to cool. Center the canner on the grate and do not use two burners simultaneously.
The oven features touch controls for various functions. The display shows oven temperature, heat source, and timing information. The START button initiates oven functions, while the OFF button stops them. The Control Lock feature prevents accidental use.
The timer can be set in minutes and seconds or hours and minutes. The OPTIONS button allows customization of settings, including temperature conversion between Fahrenheit and Celsius, sound signals, and oven calibration.
The oven can be used for dehydration, with temperature settings between 100°F and 200°F. The Sabbath Mode allows the oven to remain on a bake setting without displaying messages or making sounds, suitable for observance of the Sabbath.
To activate the Sabbath mode, the oven must be turned on once. Open the oven door, press OFF, then press the numeric keys 7, 8, 9, 6 in order, and press START. "SABBATH ENABLED" will appear on the display. To deactivate, repeat the activation steps.
For normal settings, press BAKE and enter a temperature other than 325°F (163°C), then press START. For timed settings, press BAKE, enter the desired temperature, press COOK TIME, enter the duration up to 11 hours 59 minutes, and press START. "SABBATH MODE" will appear on the display.
The oven temperature can be adjusted in Sabbath mode without sound or display changes. Use numeric keys to adjust temperature, then press START.
The warming drawer can be used during Sabbath mode if set before activation. It cannot be adjusted during Sabbath mode.
Odors and smoke are normal during initial use or when the oven is dirty. Avoid using aluminum foil on the oven bottom to prevent damage. Follow manufacturer recommendations for cookware.
Always use a meat thermometer to check the internal temperature of meat, poultry, and fish. Insert it into the thickest part, avoiding fat and bone.
Insert the probe into the thickest part of the meat, connect it, and set the desired temperature. The oven will stop automatically when the set temperature is reached.
Do not block the oven vent. Place racks before turning on the oven and ensure they are level.
Preheat the oven before baking. For roasting, preheating is not necessary unless specified. Use the BAKE function and set the desired temperature.
Use the provided broiler pan and grid. Choose FULL BROIL for large quantities or CENTER BROIL for smaller portions. Do not cover the grid with foil.
Ensure the clock is set correctly before programming. Use the BAKE, CONVECT BAKE, or CONVECT ROAST buttons to set the desired temperature. Enter the cooking duration and stop time using the numeric keys. The oven will start and stop automatically based on these settings, with signals indicating the end of the program.
Ideal for keeping cooked food warm. Different foods can be placed simultaneously, but avoid keeping egg-based dishes for more than 30 minutes. Adjust the temperature using the WARMING DRAWER ON button. Do not place food directly on the drawer surface.
Ensure the kitchen is well-ventilated during the self-cleaning process. Remove all items from the oven and storage drawer. The self-cleaning cycle can be set between 2.5 to 4.5 hours depending on the level of soil. The oven door locks during the process and unlocks once cooled.
Use non-abrasive cleaners for enamel and stainless steel surfaces. Avoid using steel wool or abrasive pads on control knobs and the oven door. For the oven cavity, use the self-cleaning program to remove spills and stains.
Do not leave food in the warming drawer for more than an hour before or after cooking to prevent food poisoning. During self-cleaning, keep children away from the oven to avoid burns.
Ensure the warming drawer is cold and empty before cleaning. Use mild detergent and KitchenAid® stainless steel cleaner for maintenance. The oven light is a standard 15-watt bulb that turns on when the door is opened. It does not operate during self-cleaning cycles. For bulb replacement, ensure the oven is cool and disconnected from power.
Removing the oven door is not recommended for regular use. If necessary, ensure the oven is off and cool. Follow the steps to remove and reinstall the door carefully, as it is heavy.
Remove all items and let the appliance cool before attempting to remove the drawer. Follow the steps to remove and reinstall the drawer, ensuring it is properly aligned.
Common issues include power supply problems, burner ignition issues, and uneven cooking results. Solutions involve checking power connections, ensuring proper burner installation, and using appropriate cookware.
Consult the troubleshooting section before seeking service. For further assistance, contact KitchenAid with purchase details and appliance information. Use only factory-specified parts for replacements.
KitchenAid offers a one-year limited warranty covering parts and labor for defects. Extended warranties cover specific components for up to ten years. Exclusions apply, such as service visits for installation corrections and repairs due to misuse or unauthorized modifications.
Catalog excerpts

The California Safe Drinking Water and Toxic Enforcement Act requires the Governor of California to publish a list of substances known to the State of California to cause cancer, birth defects, or other reproductive harm, and requires businesses to warn of potential exposure to such substances.WARNING: This product contains a chemical known to the State of California to cause cancer, birth defects, or other reproductive harm.This appliance can cause low-level exposure to some of the substances listed, including benzene, formaldehyde, carbon monoxide, toluene, and soot. > The range will not tip...
Open the catalog to page 4
To reduce the risk of fire, electrical shock, injury to persons, or damage when using the range, follow basic precautions, including the following: > ■ Clean Cooktop With Caution If a wet sponge or cloth is used to wipe spills on a hot cooking area, be careful to avoid steam burn. Some cleaners can produce noxious fumes if applied to a hot surface. > ֢֠ TO REDUCE THE RISK OF TIPPING OF THE RANGE, THE RANGE MUST BE SECURED BY PROPERLY INSTALLED ANTI-TIP DEVICES. TO CHECK IF THE DEVICES ARE INSTALLED PROPERLY, SLIDE RANGE COMPLETELY FORWARD, LOOK FOR ANTI-TIP BRACKET SECURELY ATTACHED TO THE WALL...
Open the catalog to page 5
Use the following chart as a guide when setting Simmer Burner heat levels. SETTINGRECOMMENDED USEHI SIMMER SETTINGSRECOMMENDED USELITE > ■ Start food cooking. > ■ Light the burner. > ■ Bring liquid to a boil. HI > ■ Cooking thicker foods such as tomato sauce, chili. Medium High between MED and HI > ■ Hold a rapid boil. > ■ Stew or steam foods. > ■ Quickly brown or sear food. MED(Medium) LO > ■ Cooking medium-density foods such as cream soups, sauces and gravy. MED (Medium) > ■ Hold a slow boil. > ■ Fry poultry or meat. > ■ Keep food warm. Medium LowbetweenMED and LO > ■ Stew or steam food. >...
Open the catalog to page 8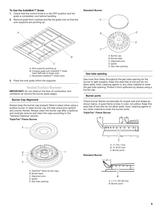
1. Check that the control knob is in the OFF position and the grate is completely cool before handling. 2. Remove grate from cooktop and flip the grate over so that the wok supports are pointing up. > A.Burner cap B.Burner baseC.Alignment pinsD.IgniterE.Gas tube opening A. A.Wok supports pointing upB.Cooktop grate with InstaWokٙ Grate insert (left side of range only)C.Reversible InstaWok Grate insert A.TripleTier 3. Place the wok grate within the supports. Gas must flow freely throughout the gas tube opening for the burner to light properly. Keep this area free of soil and do not allow spills,...
Open the catalog to page 9
To move a rack, pull it out to the stop position, raise the front edge, then lift out. Use the following illustration and charts as a guide. > Before baking and roasting, position racks according to the Positioning Racks and BakewareӔ section. For baking, allow the range to preheat before placing food in the oven. When roasting, it is not necessary to wait for the oven to preheat before putting food in, unless recommended in the recipe. 1. Press BAKE once for 350F (177аC), or press the number pads to enter the desired temperature. > 2. Press START.PreheatingӔ will show in the display until the...
Open the catalog to page 16
When using convection temperature conversion for BAKED GOODS and OTHER FOODS, allow the oven to preheat before placing food in the oven. > Convection Roast can be used to roast meat and poultry, and bake foods, such as yeast breads, pies, loaf, bundt and tube cakes on a single rack. During convection roasting, the bake and broil elements will cycle on and off in intervals to maintain oven temperature, while the fan constantly circulates the hot air.If the oven door is opened during convection roasting, the broil element and convection fan will turn off immediately and the bake element will turn...
Open the catalog to page 18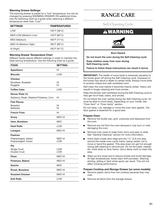
The warming drawer is preset for a lowӔ temperature, but can be changed by pressing WARMING DRAWER ON additional times. Use the following chart as a guide when selecting a different temperature other than Low.Ӕ > Different foods require different settings in order to maintain the ideal serving temperature. Use the following chart as a guide. > Appetizers HI Biscuits LOW IMPORTANT: The health of some birds is extremely sensitive to the fumes given off during the Self-Cleaning cycle. Exposure to the fumes may result in death to certain birds. Always move birds to another closed and well-ventilated...
Open the catalog to page 21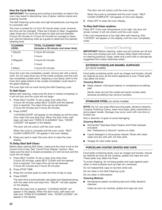
5. Press OFF to clear the oven display. IMPORTANT: The heating and cooling of porcelain on steel in the oven may result in discoloring, loss of gloss, hairline cracks and popping sounds.The Self-Cleaning cycle uses very high temperatures, burning soil to a powdery ash. The oven is preset for a 2 hour 30 minute clean cycle, however the time can be changed. There are 5 levels of clean. Suggested clean times are 2 hours 30 minutes for light soil and between 3 > hours 30 minutes to 4 hours 30 minutes for average to heavy soil. Use the following chart as a guide to determine the desired cleaning level....
Open the catalog to page 22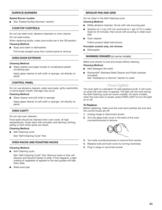
Sealed Burner models Do not clean in the Self-Cleaning cycle. > ■ See Sealed Surface BurnersӔ section. Cleaning Method: > ■ Mildly abrasive cleanser: Scrub with wet scouring pad. > ■ Solution of ٢ cup (125 mL) ammonia to 1 gal. (3.75 L) water: Soak for 20 minutes, then scrub with scouring or steel-wool pad. Do not use steel wool, abrasive cleansers or oven cleaner.Do not soak knobs.When replacing knobs, make sure knobs are in the Off position. Cleaning Method: > ■ Oven cleaner: Follow product label instructions. > ■ Soap and water or dishwasher: Pull knobs straight away from control panel to...
Open the catalog to page 23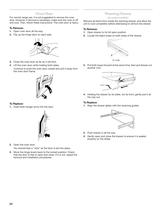
For normal range use, it is not suggested to remove the oven door. However, if removal is necessary, make sure the oven is off and cool. Then, follow these instructions. The oven door is heavy. > Remove all items from inside the warming drawer, and allow the unit to cool completely before attempting to remove the drawer. > 1. Open oven door all the way. > 1. Open drawer to its full open position. 2. Flip up the hinge latch on each side. 2. Locate the black loops on both sides of the drawer. > 3. Close the oven door as far as it will shut. > A.Loop 4. Lift the oven door while holding both sides.Continue...
Open the catalog to page 24All KitchenAid catalogs and technical brochures
 KDRS483V
1 Page
Archived catalogs
 SIDE BY SIDE REFRIGERATOR
60 Pages
 WINE CELLAR OVERLAY MODEL
40 Pages
 BEVERAGE CENTER
32 Pages
 GAS RANGE ARCHITECT® SERIESII
56 Pages
 ELECTRIC RANGE
28 Pages
 GAS COOKTOP
28 Pages
 ELECTRICCOOKTOP
36 Pages
 Microwave Oven
52 Pages


- Electric oven
- Extractor hood
- Range hood with built-in lighting
- Industrial coffee machine
- Industrial range cooker
- Hob with front controls
- Wall-mounted cooker hood
- Built-in hob
- Barbecue
- Automatic coffee machine
- Built-in oven
- Hob with knobs
- Gas range cooker
- Mobile barbecue
- Industrial refrigerator
- Electric range cooker