

SOFFIT, FASCIA & RAINWARE SYSTEMS

SOFFIT, FASCIA & RAINWARE SYSTEMS
- Soffit Panels: Measure the length of eaves and width of overhang to determine the number of panels needed.
- Fascia: Measure the length of eaves and divide by 10 feet to order the required number of 10-foot pieces.
- Soffit J-trim and Sill Trim: Use fascia measurements to calculate the number of 12-foot pieces needed.
- Soffit Nails: Available in one-pound packages, with 1 1/4” trim nails in matching colors.
- Nail soffit panels in grooves whenever possible.
- Handle with care to protect the paint finish.
- Use touchup paint on screw heads for a clean finish.
- Gutter and Rainspout Installation: Includes steps for joining gutters, installing hangers, and securing downpipes.
- Joint Sealing: Use joint sealer around all joints and rivets for a secure installation.
- End Cap and Gutter Guard Installation: Apply joint sealer to end caps and install gutter guards to prevent blockages.
Catalog excerpts
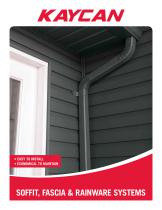
• EASY TO INSTALL • ECONOMICAL TO MAINTAIN SOFFIT, FASCIA & RAINWARE SYSTEM
Open the catalog to page 1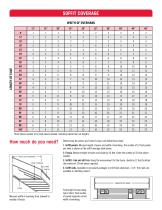
SOFFIT COVERAGEWIDTH OF OVERHANG Chart shows number of 12-foot panels needed, including waste from cut lengths. Measure width of overhang from sidewall to outside of fascia. Determining the pieces you’ll need is easy. Just follow these steps: 1. Soffit panels. Measure length of eaves and width of overhang. The number of 12-foot panels you need is shown on the soffit coverage table above. 2. Fascia. Measure length of eaves and divide by 10 feet. Order the number of 10-foot pieces needed. 3. Soffit J-trim and sill trim. Using the measurement for the fascia, divide by 12 feet to obtain the number...
Open the catalog to page 2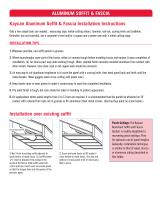
ALUMINUM SOFFIT & FASCIA Kaycan Aluminum Soffit & Fascia Installation Instructions Only a few simple tools are needed... measuring tape, metal-cutting shears, hammer, nail-set, scoring knife and chalkline. Desirable, but not essential, are a carpenter’s level and/or a square and a power saw with a metal cutting edge. INSTALLATION TIPS 1. Whenever possible, nail soffit panels in grooves. 2. Where eavestroughs cover part of the fascia, either (a) remove trough before installing fascia and replace it upon completion of installation; (b) run fascia part way under existing trough. (Note: painted finish...
Open the catalog to page 3
1. Make guide line along wall with a chalk line or straight-edge, keeping line exactly parallel to and level with bottom of the subfascia. 2. Install 2” x 2” wood nailing strip. Bottom edge of strip must be level with bottom edge of fascia board. Fasten J-trim to underside of nailing strip. 3. Measure the distance from the wall to the outside edge of the fascia board. Cut the soffit panels 1/4” shorter than the overall distance. 4. To install the first soffit panel, insert end into J-trim, tack the ends at wall and at fascia through groove and nailing slot. Insert each successive panel so that...
Open the catalog to page 4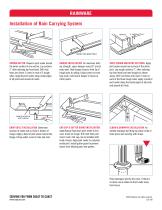
RAINWARE Installation of Rain Carrying System SEALER HOOK THIS END FIRST JOINING GUTTER. Requires joint sealer around the entire surface of one section. Lap sections 2” after notching top front bead. Drill rivet holes and insert 2 rivets in each of 3 trough sides. Apply bead of sealer along inside edges of all joints and around all rivets. HANGER INSTALLATION. For maximum holding strength, space hangers every 18” and at every joint. Hook hanger strap to front lip of trough prior to nailing. Using screws or twist type nails, nail back of hanger to fascia at rafter points. JOINT TROUGH AND MITRE...
Open the catalog to page 6All KAYCAN catalogs and technical brochures
 Vinyl Siding (West)
2 Pages
 Verona Brochure
2 Pages
 Montebello RUSTIC CHARM
4 Pages
 OCEAN PARK XL ULTRA
2 Pages
 Hardwood Valley II brochure
2 Pages
 DaVINCI west
2 Pages
 Timberlake West brochure
6 Pages
 Ocean Park XL brochure
2 Pages
 Richmond brochure
4 Pages
 Ocean Park brochure
2 Pages
 Pation Doors Collection
4 Pages
 Timberlake East brochure
2 Pages
 AgriTuff brochure
2 Pages
 Vinyl Siding Pamphlet ? East
2 Pages
 Vinyl Shutters Flyer
1 Page
 Prova brochure
2 Pages
 Corporate Brochure
2 Pages
 Perfection Shingles
2 Pages
 Ocean Park Ultra brochure
2 Pages
 Richmond Ultra brochure
8 Pages
 DaVinci brochure
2 Pages
 Vinyl Siding Pamphlet
2 Pages
 Specialty brochure
5 Pages
 Eagle Rock Brochure
16 Pages
 Aluminum Rainware Systems
3 Pages


- Rainscreen cladding
- Metal cladding
- Ventilation grill
- Smooth rainscreen cladding
- Decorative cassetta
- Industrial shutter
- Metal ventilation grill
- Gray cassetta
- Aluminum façade cladding
- Sustainable rainscreen cladding
- Rectangular ventilation grill
- Window shutter
- Metal shutter
- Insulated cladding
- Textured cladding
- Brown cassetta
- Exterior ventilation grill
- Aluminum ventilation grill
- Aluminum shutter
- Interlocking cladding