


E10
E10
Catalog excerpts
Additional online content Tap, click or scan the QR code to access additional online resources. There are video tutorials to help you operate your E10. jura.com/support-E10
Open the catalog to page 1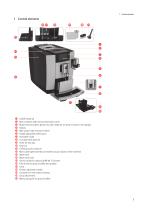
Control elements 1 Control elements O On/Off button Q w Bean container with aroma preservation cover e Multi-function buttons (button function depends on what is shown in the display) G Milk system with fine foam frother G Height -adjustable coffee spout G Hot-water nozzle G Cup grille with aperture o Insert for drip tray © Drip tray 0 Coffee grounds container © Mains cable (permanently connected or plug-in) (back of the machine) © Water tank f Water tank cover g Service socket for optional JURA Wi-Fi Connect h Filler funnel for ground coffee (removable) j Cover k Grinder adjustment switch 1...
Open the catalog to page 3
Before using the machine, read these instructions for use thoroughly and completely and comply with the instructions they contain. Keep these instructions for use close to the machine and pass them on to the next user. Failure to observe the instructions for use may result in serious injuries or damage to property. Safety information is therefore indicated as follows: J WARNING Indicates circumstances that may result in serious injuries or death. J CAUTION Indicates circumstances that may result in minor injuries. CAUTION Indicates circumstances that may result in damage to property. The machine...
Open the catalog to page 4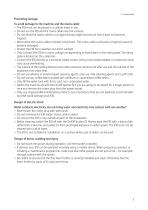
Preventing damage To avoid damage to the machine and the mains cable: ■ The E10 must not be placed in a cabinet when in use. ■ Do not use the E10 and the mains cable near hot surfaces. ■ Do not allow the mains cable to rub against sharp edges and ensure that it does not become trapped. ■ Never allow the mains cable to loosely hang down. The mains cable could pose a tripping hazard or become damaged. ■ Protect the E10 from weather and direct sunlight. ■ Only connect the E10 to a mains voltage corresponding to that stated on the rating plate. The rating plate is located on the underside. ■ Connect...
Open the catalog to page 5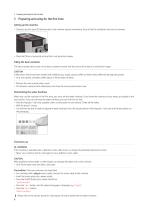
Preparing and using for the first time Preparing and using for the first time Choose a spot for your E10 which protects the machine against overheating. Ensure that the ventilation slots are not covered. Place the E10 on a horizontal surface that is not sensitive to water. Filling the bean container The aroma preservation cover on the bean container ensures that the aroma of the beans is retained for longer. CAUTION Coffee beans which have been treated with additives (e.g. sugar), ground coffee or freeze-dried coffee will damage the grinder. T Only use roasted, untreated coffee beans to fill...
Open the catalog to page 6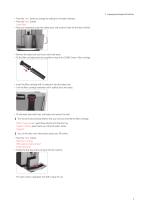
Press the 0 or 9 button to change the setting for the water hardness. Press the ‘Save’ button. ‘Insert filter’ Place one receptacle under the coffee spout and another under the fine foam frother. Remove the water tank and rinse it with cold water. Fit the filter cartridge extension supplied on top of the CLARIS Smart+ filter cartridge. Insert the filter cartridge with its extension into the water tank. Turn the filter cartridge clockwise until it audibly clicks into place. Fill the water tank with fresh, cold water and reinsert the tank. Preparing and using for the first time E The machine automatically...
Open the catalog to page 7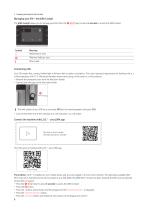
Preparing and using for the first time Managing your E10 – the JURA Cockpit The JURA Cockpit allows you to manage your E10. Press the Ö d Ü Á key for about 2 seconds to access the JURA Cockpit. Meaning ‘Maintenance’ area ‘Machine Settings’ area Filter mode Connecting milk Your E10 creates fine, creamy, feather-light milk foam with a perfect consistency. The most important requirement for frothing milk is a milk temperature of 4–8 °C. We would therefore recommend using a milk cooler or a milk container. T Remove the protective cover from the fine foam frother. T Connect the milk pipe to the fine...
Open the catalog to page 8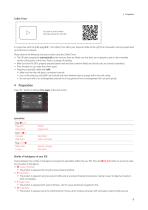
In conjunction with the JURA app J.O.E.®, the Coffee Timer offers your favourite coffee at the right time. Preparation can be programmed up to 16 hours in advance. Please observe the following instructions when using the Coffee Timer: ■ The E10 starts preparation automatically at the time you have set. Make sure that there are no people or pets in the immediate vicinity of the spouts at this time. There is a danger of scalding. ■ Make sure that the E10 is properly prepared (water tank and bean container filled) and that all parts are correctly assembled. ■ Place the glass or cup under the correct...
Open the catalog to page 9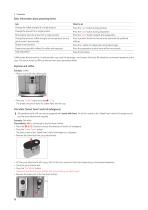
Basic information about preparing drinks Aim Change the coffee strength of a single product Change the amount for a single product Press the 9 or 0 button during preparation Press the ‘Save’ button straight after preparation Press a product button for two seconds and enter the preferred settings Permanently save the amount for a single product Change the amount, coffee strength and temperature for any given product permanently Display more products Prepare two speciality coffees (for coffee and espresso) Stop preparation Press the 9 or 0 button during grinding Press the 0 button to display the...
Open the catalog to page 10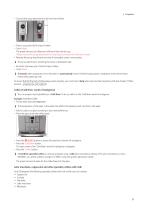
Connect the syrup attachment to the fine foam frother. Place a cup under the fine foam frother. Touch ‘Next’. The preset amounts of coffee and milk foam flow into the cup. ‘Please remove the syrup attachment for cleaning and connect the fine foam frother.’ Remove the syrup attachment and rinse it thoroughly under running water. E The syrup attachment, including the cover, is dishwasher-safe. T T Re-attach the lower part of the fine foam frother. Touch ‘Next’. E 15 minutes after preparation, the milk system is automatically rinsed. Therefore always place a receptacle under the fine foam frother...
Open the catalog to page 11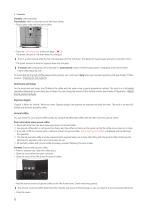
Example: Latte macchiato Precondition: Milk is connected to the fine foam frother. T Place a glass under the fine foam frother. Press the ‘Latte macchiato’ button (on page ä ö ä). The preset amount of milk foam flows into the glass. E There is a short interval while the hot milk separates from the milk foam. This allows the typical layers of a latte macchiato to form. The preset amount of water for espresso flows into the glass. E 15 minutes after preparation, the milk system is automatically rinsed. Therefore always place a receptacle under the fine foam frother after preparing milk. To ensure...
Open the catalog to page 12
Archived catalogs
 COOL CONTROL 600ML
9 Pages
 E8/E80
44 Pages
 S8/S80
48 Pages
 Z6
Z652 Pages
 X8
X848 Pages
 GIGA X8c Professional
60 Pages
 X6
X62 Pages
 Z8
Z852 Pages
 ENA 8
ENA 831 Pages
 GIGA X3c
60 Pages
 MANUAL_ENA4_COFFEE MACHINE
30 Pages
 J6/J600
48 Pages
 AUTOMATIC MILK FROTHER
9 Pages
 MANUAL_JOE_ANDRIOD
13 Pages
 MANUAL_JOE_IOS
14 Pages
 GIGA X9c Professional
60 Pages
 ENA Micro 90
29 Pages
 GIGA X7 Professional
2 Pages
 IMPRESSA X9 Win
2 Pages
 GIGA X9 Professional
2 Pages
 Coffee to Go - Options
1 Page
 IMPRESSA X9 Platinum
2 Pages
 IMPRESSA Xf50 Classic
2 Pages