- Catalogs
- James Hardie - France
- HZ10™-HardiePanel pg. 99-105
HZ10™-HardiePanel pg. 99-105

HZ10™-HardiePanel pg. 99-105
- Getting Started: Begin at the lowest point of the sheathing or sill plate, using a chalk line for guidance and securing panels with appropriate fasteners.
- Vertical Joint Treatment: Options include moderate contact, caulking with high-quality paintable caulk, covering with batten strips, or using metal or PVC "H" moldings.
- Horizontal Joint Treatment: Use "Z" flashing at horizontal joints to prevent water penetration, ensuring a 1/4-in. gap between the panel and flashing, which should not be caulked.
- Windows, Doors, and Wall Penetrations: Proper flashing techniques are crucial to prevent water infiltration around openings.
Catalog excerpts
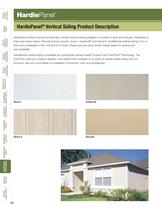
98 HardiePanel® Vertical Siding Product Description HardiePanel siding is factory-primed fiber-cement vertical siding available in a variety of sizes and textures. Examples of these are shown below. Textures include smooth, stucco, Cedarmill© and Sierra 8. HardiePanel vertical siding is 5/16-in. thick and is available in 4x8, 4x9 and 4x10 sizes. Please see your local James Hardie dealer for texture and size availability. HardiePanel vertical siding is available as a prefinished James Hardie® product with ColorPlus® Technology. The ColorPlus coating is a factory applied, oven baked finish available on a variety of James Hardie siding and trim products. See your local dealer for availability of products, color and accessories. Stucco Cedarmill © Sierra 8 Smooth General Product Information Working Safely Tools for Cutting and Fastening General Installation Requirements General Fastener Requirements Finishing and HardieTrim® Maintenance Boards/Battens HardieWrap® Weather Barrier HardieSoffit® Panels HardiePlank® Lap Siding HardieShingle® Siding HardiePanel® Vertical Siding NER -405 Legacy Report Appendix/ Glossary
Open the catalog to page 1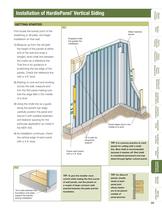
99 TIP: For Sierra 8 panels, double studs at each panel joint allows fasteners to be placed outside of panel grooves. TIP: It is common practice to mark panels for cutting with a chalk line. Blue chalk is recommended because it washes off. Red chalk is considered permanent and may bleed through lighter colored paints. Water resistive barrier 16-d nails for temporary support Snapped chalk line guides the installation. Panel edges land in the middle of a stud. gett ing started First locate the lowest point of the sheathing or sill plate, and begin installation on that wall. 1) Measure up from the...
Open the catalog to page 2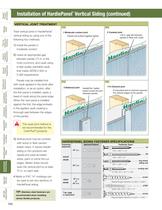
100 vertical jo int treatment Treat vertical joints in HardiePanel® vertical siding by using one of the following four methods: 1) Install the panels in moderate contact. 2) Leave an appropriate gap between panels (1/8 in. is the most common), and caulk using a high-quality paintable caulk, that meets ASTM C-834 or C-920 requirements. Panels may be installed first with caulk applied in the joints after installation; or as an option, after the first panel is installed, apply a bead of caulk along the panel edge. When the next panel is installed against the first, the edge embeds in the applied...
Open the catalog to page 3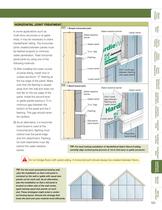
101 horizo ntal jo int treatment In some applications such as multi-story structures or at gable ends, it may be necessary to stack HardiePanel® siding. The horizontal joints created between panels must be flashed properly to minimize water penetration. Treat horizontal panel joints by using one of the following methods: 1) After installing the lower course of panel siding, install vinyl or coated aluminum “Z” flashing at the top edge of the panel. Make sure that the flashing is sloped away from the wall and does not rest flat on the top edge of the panel. Install the second level or gable panels...
Open the catalog to page 4
102 In panel installations, trim is typically overlaid on top of the panel. Special attention needs to be paid to trim flashing at the tops of openings. Below is one method for properly flashing trim in a panel application: 1) After installing the window, cut and install a 1/4-in. thick shim above the window. The shim should be the same width as the trim, and it should be as long as the top or header piece of trim. 2) Over the shim install flashing that is wide enough to allow for the thickness of the trim. 3) Install the panel to the window and around the shim taking care not to damage the flashing...
Open the catalog to page 5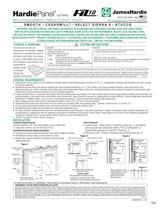
103 HS0919-P1/2 1/10 GENERAL REQUIREMENTS: INSTALLATION: Fastener Requirements Position fasteners 3/8" from panel edges and no closer than 2" away from corners. Do not nail into corners. HardiePanel Vertical Siding Installation • Framing must be provided at horizontal and vertical edges for nailing. • HardiePanel vertical siding must be joined on stud. • Double stud may be required to maintain minimum edge nailing distances. Figure 2 Caulk Joint leave appropriate gap between panels, then caulk* water-resistive barrier 2 x 4 stud “H” Joint water-resistive barrier 2 x 4 stud Batten Joint water-resistive...
Open the catalog to page 6
104 © 2010 James Hardie Technology Limited. All rights reserved. TM, SM, and ® denote trademarks or registered trademarks of James Hardie Technology Limited. is a registered trademark of James Hardie Technology Limited. HS0919-P2/2 1/10 * The illustration (figure 11) was reprinted with permission of THE JOURNAL OF LIGHT CONSTRUCTION. For subscription information, visit www.jlconline.com. RECOGNITION: In accordance with ICC-ES Legacy Report NER-405, HardiePanel® vertical siding is recognized as a suitable alternate to that specified in: the BOCA National Building Code/1999, the 1997 Standard Building...
Open the catalog to page 7All James Hardie - France catalogs and technical brochures
 Complete facade brochure
40 Pages


Archived catalogs
 HZ10™-HardieShingle pg. 88-98
11 Pages
 HZ10™-HardiePlank pg. 77-87
11 Pages
 HZ10™-HardieSoffit pg. 65-76
12 Pages
 HZ10™-HardieTrim pg. 40-64
24 Pages
 HZ10™-HardieWrap pg. 27-39
13 Pages
 HZ5™-HardieShingle pg. 60-68
9 Pages
 HZ5™-HardiePlank pg. 49-59
11 Pages
 HZ5™-HardieSoffit pg. 39-48
10 Pages
 HZ5™-HardieTrim pg. 23-38
16 Pages
 power of design
2 Pages
 the value of design
3 Pages
 Hardie Warp
8 Pages
 Hardie® Reveal™ Panel
4 Pages
 HardiePlank - Dovercourt
2 Pages
 HardiePlank
2 Pages
 HardieBacker
2 Pages
 Hardie Pipe
41 Pages


- Rainscreen cladding
- Decorative paint
- Panel rainscreen cladding
- Outdoor paint
- Trim board
- Profile
- Smooth rainscreen cladding
- Decorative cassetta
- Industrial acrylic paint
- Gray cassetta
- Sustainable rainscreen cladding
- Metal profile
- Industrial wood paint
- Finish paint
- Vertical cladding
- Textured cladding
- Composite cladding
- Metal paint
- Aluminium edge trim
- Brown cassetta