Manual_F 360 Advance
1 /88Pages

Manual_F 360 Advance
1 /88Pages
Catalog excerpts

UK - Installation and Operating Instructions FR - Manuel d’installation et d’utlisation ES - Instrucciones para montaje e instalación The manuals which are enclosed with the product must be kept throughout the product’s entire service life. Les manuels fournis avec le produit doivent être conservés pendant toute la durée de vie du produit. Los manuales suministrados con este producto deben guardarse durante todo el ciclo de vida del producto. I manuali inclusi con il prodotto vanno conservati per l’intera durata di vi
Open the catalog to page 1
1.0 Relationship to the authorities Installation of a fireplace must be according to local codes and regulations in each country. All local regulations, including those which refer to national and European standards, must be observed when installing the product. The installation can only be put into use after it has been checked by a qualified inspector. Contact your local building authorities before installing a new fireplace. A rating plate made of a heat-resistant material is attached to the product This contains information about identification and documentation for the product. Register your...
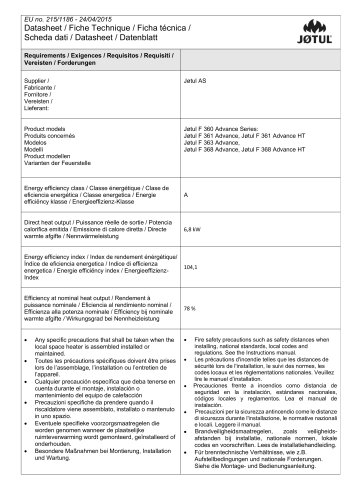
Open the catalog to page 3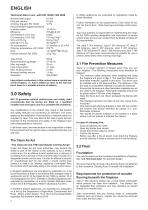
Technical data in acc. with EN 13240 / NS 3058 Nominal heat output: Flue gas volume: Chimney draught, EN 13240: Recommended negative pressure in smoke outlet: Efficiency: CO emissions (13% O2): CO emissions (13% O2): NOx at 13% O2: OGC @ 13 % O2: Air consumption: Chimney temperature, EN 13240: Dust: Particle emission NS 3059: Type of fuel: Wood Nominal kindling amount: 1.6 kg Operation: Intermittent Intermittent combustion in this context means normal use of the fireplace, i.e. fuel is added as soon as the fuel has burnt down to a suitable amount of embers. 3.0 Safety NB! To guarantee...
Open the catalog to page 4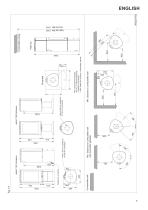
Combustible wall Min. distance to cumbustible wall with revolvable pedestal Hole in floor for outside air Ø 100 mm connection Combustible ceiling Min. measurement floorplate X/Y Acc. to national standards * Outside air connection ** Min. distance to furniture / combustible material Min. distance to combustible wall Hole in floor for outside air Ø 100 mm connection
Open the catalog to page 5
ENGLISH Requirements for protection of inflammable floors in front of the fireplace Through an outside wall The front plate must comply with national laws and regulations. Contact your local building authorities regarding restrictions and installation requirements. 3.3 Walls Distance from the wall of flammable material Distance to walls made of combustible material - see fig. 1a Distance to combustible wall protected by firewall: See fig. 1b Through the floor and ground plate The fireplace can be installed with a minimum of 50 mm to non-combustible wall if the distance from the fireplace to all combustible...
Open the catalog to page 7
Before installing the fireplace, check it carefully for any signs of damage. The product is heavy! Ask someone to help you when positioning and installing it. Make sure that furniture and other household items are at a safe distance from the fireplace to protect them from drying out. Do not place anything on the top plate of the stove as this could cause permanent damage to the paint/enamel. The standard product comes in two packages. One contains the fireplace itself, the other contains the base or pedestal in cast iron. When the product is unpacked, take out the ash pan and its contents, the fire...
Open the catalog to page 8
Requirement for UK “The Jotul F 360 Advance stoves have been recommended as suitable for use in smoke control areas when burning wood logs and when fitted with a mechanical stop to prevent secondary air control closure beyond the 382mm2 and the tertiary air control closure beyond the 402 mm2 open positions.” Note! In order to achieve this see the instructions in fig. 6. Jøtul F 361 Advance - with base Fig. 5 A 1. Spread the cardboard packaging out on the floor. Place the other cardboard packaging on the pallet to protect the paintwork. Carefully lay the burn chamber on its side on the pallet. 2....
Open the catalog to page 9
ENGLISH Jøtul F 361 HT Advance - product with base and High Top See installation instructions for High Top Art. nr. 10050932 2. Attach the base to the burn chamber using the screws (fig. 5 A) provided. Fig. 8 A Rear outlet flue pipe 1 Jøtul F 368 Advance - product with base and cast iron door for base 2 See installation instructions for High Top Art. nr. 10050932 Rear outlet external air supply B Rear outlet for the flue pipe 3. Drill holes in the removable cover (A) for the smoke outlet. Then knock the cover out using a hammer. Rear outlet for external air supply (optional extra) 4. If an outside...
Open the catalog to page 10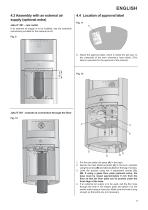
ENGLISH 4.3 Assembly with an external air supply (optional extra) Jøtul F 361 - rear outlet 4.4 Location of approval label Fig. 11 A If an external air supply is to be installed, see the assembly instructions provided for the external air kit. Fig. 9 5. Attach the approval label, which is inside the ash pan, to the underside of the burn chamber’s heat shield. (This label is important for the approval of the product). Jøtul F 361 - outside air connection through the floor Fig. 10 xxxxxxx xxxxxxx Product: 370 Advance fuel for solid Jøtul F Room heater xxxxx xxxxxxxxxxxx xxxxx xxxxxxxxxxxx xxxxxxxxxxxx...
Open the catalog to page 11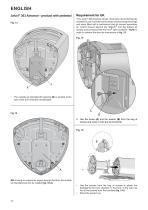
ENGLISH Jøtul F 363 Advance - product with pedestal Requirement for UK “The Jotul F 360 Advance stoves have been recommended as suitable for use in smoke control areas when burning wood logs and when fitted with a mechanical stop to prevent secondary air control closure beyond the 382mm2 and the tertiary air control closure beyond the 402 mm2 open positions.” Note! In order to achieve this see the instructions in fig. 15. The outside air inlet (A) with opening (B) is located at the rear of the burn chamber as standard. B 5. Use the screw (A) and the washer (B) from the bag of screws and screw it...
Open the catalog to page 12
ENGLISH 4.5 Assembly with an external air supply (optional extra) If installing a rotation set (optional extra) do not use the hose clip Jøtul F 363 - rear outlet Fig. 17 Hose clip Jøtul F 363 - outside air connection through the floor If the Jøtul F 363 Advance is to be installed with an external air supply through the floor, the outside air inlet (A) must first be rotated. 2. The external air kit is attached to the external air inlet on the underside of the burn chamber. NB: If a rotating set is to be installed, this must be fitted before the stove is raised into the upright position. See the assembly...
Open the catalog to page 13All Jøtul catalogs and technical brochures
 DoP_F_145-CPR-160617_UK
2 Pages
 Manual_JOTUL_F 230
24 Pages
 F 360_EU
1 Page


Archived catalogs
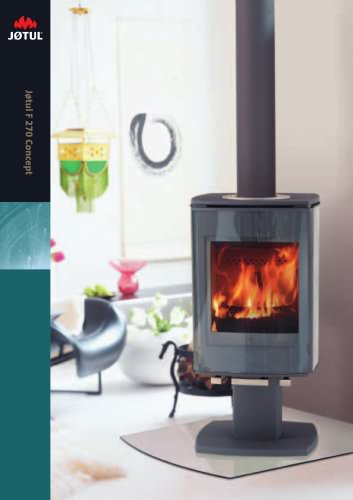
 Jøtul F 270 Concept
12 Pages
 F270 UK September 2005
12 Pages
 CastIron Stoves & Fireplaces
60 Pages


- Contemporary heating stove
- Metal heating stove
- Contemporary fireplace
- Wood heating stove
- Black heating stove
- Single-sided fireplace
- Wood-burning fireplace
- Insert
- Open fireplace
- Cast iron heating stove
- Wood-burning fireplace insert
- Traditional heating stove
- Steatite heating stove
- Outdoor fireplace
- Floor-mounted fireplace
- 3-sided heating stove
- 8 kW heating stove
- Log holder
- Corner fireplace insert