Installation instructions - Hempcrete blocks
1 /28Pages

Installation instructions - Hempcrete blocks
1 /28Pages
Catalog excerpts

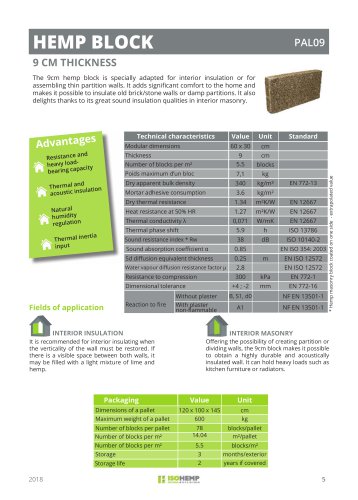
IMPLEMENTATION GUIDE The insulating hemp block for building & renovation.
Open the catalog to page 1
INTRODUC TION Choosing the right building materials is of primary importance. The criteria that guide your choices or those of your client include the technical performance of the building, ease of implementation and the impacts on the environment and health. You have decided to use an uncompromising solution, IsoHemp blocks, and will soon benefit from their many advantages: water and thermal regulation, acoustic insulation, protection and fire resistance in a natural material. We have designed this guide to give you the best possible insight into the use of IsoHemp blocks. Nevertheless, this...
Open the catalog to page 2
USAGE PRECAUTIONS STORAGE OF HEMP BLOCKS Storage precautions for IsoHemp block pallets: 6 months outdoors or 2 years indoors. The blocks must be protected from rain but not wrapped in plastic film or tarpaulins. STORAGE OF BAGGED PRODUCTS Bagged IsoHemp products (Prokalk lime, HempBag, Adhesive Mortar and PCS) must be stored indoors and protected from moisture. Always follow the validity dates of the products. ISOHEMP ADHESIVE MORTAR IsoHemp Adhesive Mortar – only this product is perfectly suited to the laying of blocks. To ensure good adhesion of the Adhesive Mortar, do not use the product if...
Open the catalog to page 3
IMPLEMENTATION EQUIPMENT OPENING AND PROTECTION OF PALLETS 1 Remove and store the protective honeycomb. At the end of the day, protect and cover your opened pallets. TIP Use the protective honeycomb to protect your masonry at night or during inclement weather. IMPLEMENTATION GUIDE To ensure the correct laying of IsoHemp blocks, it is advisable to use the following equipment:
Open the catalog to page 4
BASE COURSE LAYING IN INDOOR MASONRY Make sure that the top course of the substrate is dry, clean and level before starting the laying. The IsoHemp blocks must be protected from capillary rise. Apply a sealing tape (of the DIBA type) going up 2 cm along the IsoHemp block. Glue the vertical joint and apply the next block. Adjust with a mallet if necessary to obtain a 3 mm vertical slim joint. Apply a uniformly spread mortar bed 1 to 2 cm thick. It is essential for this base course to be perfectly level. Check the perpendicularity and wait for the mortar to dry. § On a flat surface with no risk...
Open the catalog to page 5
BASE COURSE LAYING IN OUTDOOR MASONRY The IsoHemp block must be protected from capillary rise and heavy rain. Depending on the situation, choose one of these solutions: ON WATERPROOF MEMBRANE § Start laying the hemp block masonry to protect the blocks from capillary rise, after installing a waterproof membrane. Be sure to raise it by at least 15 cm. ON A ROT - PROOF SUBSTRATE § Start laying the hemp block masonry on a rotproof and resistant insulation block to protect the blocks from capillary rise, after having laid a waterproof strip (see previous point). ON A BRACKET § Use a substrate bracket...
Open the catalog to page 6
LAYING OF THE SUBSEQUENT COURSES 1 Lay using IsoHemp Adhesive Mortar. Prepare the Adhesive Mortar with 7 to 8 l of water per bag of 25 kg – usable for 1 hour. If the air temperature is high, make a more liquid mixture or sprinkle the blocks with a little water to prevent too rapid setting of the glue. Find and abrade the high points. Apply the adhesive using a notched trowel over the entire horizontal surface of the already laid block to seal the joint. The Adhesive Mortar should be very fluid and almost liquid, having a yogurt-like consistency. Remove dust from the support. Lay the blocks in...
Open the catalog to page 7
LAYING OF THE SUBSEQUENT COURSES Glue the vertical surface. Adjust with a mallet and check the levels. Place the block on the adhesive for masonry in 3 mm slim joints after taking care to glue the surfaces of the block (double gluing). Remove excess adhesive using the trowel. FINAL COURSE LAYING § Cut the blocks to leave a maximum of 2 cm between the blocks and the ceiling. § Seal the space with hemp concrete, mortar, flexible insulation or a bonding foam. IMPLEMENTATION GUIDE
Open the catalog to page 8
CUTTING AND ADJUSTMENT IsoHemp blocks are very easy to cut. To minimise losses and waste, use the broken or chipped blocks to make the necessary cuts and adjustments. ALLIGATOR SAW Fast cutting and easy handling. PRECAUTIONS Do not use a reciprocating saw or handsaw, as they do not allow good cuts to be achieved.. BAND SAW Recommended for larger projects for perfectly square cuts, rounded corners or precise angles. MANUAL SAW Satisfactory result in the case of small projects.
Open the catalog to page 9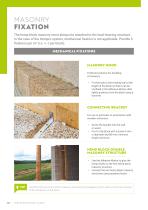
MASONRY FIXATION The hemp block masonry must always be attached to the load-bearing structure. In the case of the Hempro system, mechanical fixation is not applicable. Provide 5 fixations per m² (i.e. +-1 per block). MECHANICAL FIXATIONS MASONRY HOOK Preferred solution for doubling of masonry. § Fix the hook to the existing wall at the height of the block so that it can be confined in the Adhesive Mortar, after lightly pushing it into the block using a hammer. CONNECTING BRACKET For use in particular in association with wooden structures. § Screw the bracket into the wall or wood. § Fix it to...
Open the catalog to page 10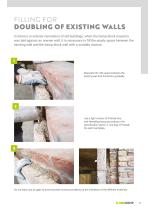
FILLING FOR DOUBLING OF EXISTING WALLS In interior or exterior renovation of old buildings, when the hemp block masonry was laid against an uneven wall, it is necessary to fill the empty space between the existing wall and the hemp block wall with a suitable mixture. 1 Manually fill in the space between the existing wall and the blocks gradually. 2 Use a light mixture of ProKalk lime and HempBag hemp according to the specification sheet, i.e. one bag of ProKalk for each HempBag. Do not leave any air gaps to avoid possible moisture problems at the interfaces of the different materials.
Open the catalog to page 11
CHOOSE TRANSPORT YOUR LINTEL AND HANDLING Choose your lintel according to the desired thickness and the bay opening to be covered. Provide a minimum support of 20 cm on either side of the bay and 30 cm for lintels measuring over 2 m. Lintels must always be stored and transported with the concrete side facing upwards. Wedges must always be used to support the lintel at the ends during storage. Always handle the lintels by the ends. They must never be lifted by the middle of them. Fix the lintel to the hemp block masonry using Adhesive Mortar. The concrete must be directed upwards so that it is...
Open the catalog to page 12All ISOHEMP catalogs and technical brochures
 IsoHemp Hemp block
3 Pages
 Masonry in IsoHemp blocks
5 Pages
 Catalogue 2022 EN IsoHemp
32 Pages
 Product catalogue
24 Pages
 Folder - Hempcrete blocks
4 Pages
 Folder - Hempro system
2 Pages