Krystal Clear Saltwater System Model CS8110

Krystal Clear Saltwater System Model CS8110
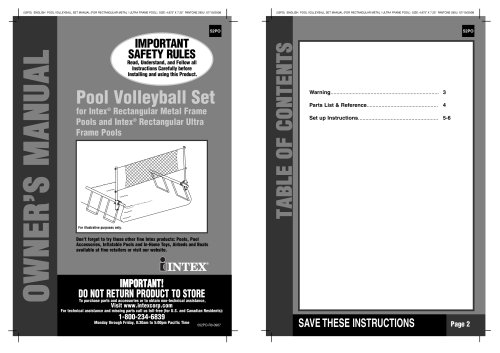
The document emphasizes safety when using the Krystal Clear Saltwater System Model CS8110. Key measures include supervising children, ensuring assembly and disassembly by adults, and avoiding extension cords. The system must connect to a grounding type receptacle with a GFCI to prevent electric shock.
A detailed parts list is provided, including optional components and reference numbers. Users should familiarize themselves with all parts before assembly.
The system is designed for above-ground pools, using salt to generate chlorine for sanitizing pool water. Specifications include power requirements (110-120 Volt AC), ideal salt level (3000 ppm), and maximum chlorine output (12 grams/hour).
Instructions for setting up the system with different pool and pump configurations are provided. The system should be installed after the filter pump in the water return line to the pool.
Users are instructed to use only sodium chloride salt that is at least 99.8% pure for optimal performance.
Detailed steps for operating the system are included, along with an LED code chart for troubleshooting.
Regular maintenance procedures are outlined to ensure the longevity and efficiency of the system.
A guide is provided to help users diagnose and resolve common issues with the system.
Safety guidelines for pool use are included to prevent accidents and injuries.
Information on the warranty coverage for the product is provided, along with service center locations for support.
This document provides detailed instructions for the operation and maintenance of the Intex Model CS8110 Saltwater System, which is used to generate chlorine for pool sanitation through the electrolysis of salt.
The optimal salt level for pool water is between 2500-3500 ppm, with 3000 ppm being ideal. Using purer salt enhances the performance of the electrolytic cell. Avoid iodized or yellow-colored salt as it can affect the system's efficiency.
To add salt, ensure the filter pump is on and the Saltwater System is off. Spread the required amount of salt evenly around the pool's perimeter, avoiding the skimmer. Brush the pool bottom to aid dissolution and run the filter pump for 24 hours. Once dissolved, activate the Saltwater System.
If excess salt is detected (Code 92), partially drain and refill the pool with fresh water until the code disappears.
Formulas are provided for calculating pool volume based on shape and dimensions, essential for determining the correct salt dosage.
The system requires programming for operating hours, which vary based on pool size and ambient temperature. The filter pump should run longer than the Saltwater System to ensure proper operation.
If copper levels are low, a boost cycle can be initiated to increase chlorine production. This cycle runs for four times the programmed operating hours.
Regular testing of pool water is necessary to maintain proper chlorine and copper levels. High copper levels can cause discoloration of hair, which can be mitigated by wearing a swimming cap and using special shampoo.
After completing its cycle, the system enters a stand-by mode, automatically resuming operation after 24 hours.
The document includes a chart explaining various LED codes that indicate system status and operating conditions.
The document outlines the operating hours for the Saltwater System, ranging from 8 to 12 hours, with 12 being the maximum. It also lists alarm codes for various issues such as low water flow (Code 90), low salt level (Code 91), and high salt level (Code 92). The system enters Stand-By Mode (Code 93) when the operating process is finished. It is important to set the filter pump timer one hour longer than the Saltwater System to avoid issues.
Before cleaning, unplug the power cord and close the plunger valves to prevent water spillage. The flow sensor and electrolytic cell require regular cleaning to maintain efficiency. The flow sensor should be cleaned with a garden hose or plastic brush, while the electrolytic cell may need vinegar soaking if mineral deposits are present. Monthly inspection of the electrolytic cell is recommended.
The document provides guidelines for testing copper ion concentration and water chemistry using test strips. It emphasizes maintaining proper levels of free chlorine, pH, total alkalinity, calcium hardness, and stabilizer to ensure pool safety and efficiency. Preferred water chemistry readings are provided for each parameter.
Common issues such as insufficient chlorine, copper ion levels, and white flakes in the water are addressed with potential causes and solutions. The guide also covers problems like no LED display and green hair, providing steps to resolve these issues.
General aquatic safety tips are provided, emphasizing constant supervision, learning CPR, and using protective devices. The document encourages familiarization with safety guidelines from recognized organizations and includes a "NO DIVING" sign for pool safety.
The Krystal Clear Saltwater System® is manufactured with high-quality materials and comes with a limited warranty covering defects in materials and workmanship.
This document outlines the Limited Warranty for the Krystal Clear Saltwater System and associated components. The warranty is non-transferable and applies only to the original purchaser. Proof of purchase is required for any warranty claims.
- Krystal Clear Saltwater System: 2 years
- Hoses, Plunger Valves & Fittings: 180 days
If a manufacturing defect is identified within the warranty period, contact the appropriate Intex Service Center. The Service Center will assess the claim's validity. If instructed to return the product, ensure it is packaged securely and sent with prepaid shipping and insurance. Upon receipt, the Service Center will inspect the product and, if covered, repair or replace it at no charge.
Disputes regarding the warranty must be addressed through an informal dispute settlement board, following FTC rules. Civil actions cannot be initiated until these procedures are completed.
The warranty does not cover damages due to negligence, abnormal use, accidents, improper operation, or external environmental forces. It also excludes unauthorized repairs or alterations.
For U.S. and Canadian residents, contact Intex Recreation Corp. at 1-800-234-6839 or visit www.intexcorp.com. For residents outside these regions, refer to the specific service center locations listed in the document.
Do not return products to the place of purchase. For missing parts or assistance, contact Intex directly.
Catalog excerpts

(131) MODEL CS8110 SALTWATER SYSTEM ENGLISH 7.5” X 10.3” PANTONE 295U 11/17/2011 OWNER’S MANUAL English 131 IMPORTANT SAFETY RULES Read, understand, and follow all instructions carefully before installing and using this product. Krystal Clear ® Saltwater System Model CS8110 For illustrative purposes only. Don’t forget to try these other fine Intex products: pools, pool accessories, inflatable pools and in-home toys, airbeds and boats available at fine retailers or visit our website. IMPORTANT! DO NOT RETURN PRODUCT TO STORE To purchase parts and accessories or to obtain non-technical assistance, Visit www.intexcorp.com For technical assistance and missing parts call us toll-free (for U.S. and Canadian Residents): 1-800-234-6839 Monday through Friday, 8:30am to 5:00pm Pacific Time 131-***-R1-1211
Open the catalog to page 1
(131) MODEL CS8110 SALTWATER SYSTEM ENGLISH 7.5” X 10.3” PANTONE 295U 11/17/2011 131 IMPORTANT SAFETY RULES Read, Understand and Follow All Instructions Carefully Before Installing and Using this Product. READ AND FOLLOW ALL INSTRUCTIONS WARNING • To reduce the risk of injury, do not permit children to use this product. Always supervise children and those with disabilities. • Children must stay away from this product and all electrical cords. • Assembly and disassembly by adults only. • Risk of electric shock. Connect only to a grounding type receptacle, this product is provided with a ground-fault...
Open the catalog to page 3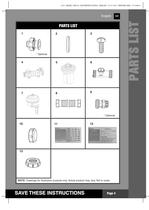
(131) MODEL CS8110 SALTWATER SYSTEm ENGLISH 7.5” X 10.3” PANTONE 295U 11/17/2011 131 PARTS LIST English PARTS LIST 1 2 3 4 5 6 7 8 9 * Optional * Optional 10 11 12 13 NOTE: Drawings for illustration purpose only. Actual product may vary. Not to scale. SAVE THESE INSTRUCTIONS Page 4
Open the catalog to page 4
(131) MODEL CS8110 SALTWATER SYSTEM ENGLISH 7.5” X 10.3” PANTONE 295U 11/17/2011 131 PARTS REFERENCE Before assembling your product, please take a few minutes to check the contents and become familiar with all the parts. 13 3 7 5 1 2 4 2 6 2 9 8 10 NOTE: Drawings for illustration purpose only. Actual product may vary. Not to scale. Operation is subject to the following two conditions: (1) this device may not cause interference, and (2) this device must accept any interference, including interference that may cause undesired operation of the device. Changes or modifications not expressly approved...
Open the catalog to page 5
(131) MODEL CS8110 SALTWATER SYSTEM ENGLISH 7.5” X 10.3” PANTONE 295U 11/17/2011 131 PARTS REFERENCE (continued) Before assembling your product, please take a few minutes to check the contents and become familiar with all the parts. REF. NO. DESCRIPTION QTY. SPARE PART NO. ADAPTOR A WITH THREADED COLLAR (OPTIONAL) 1 10849 2 O-RING A 3 10712 3 SCREW 4 10713 4 ELECTROLYTIC CELL (WITH TITANIUM PLATES) (O-RING A INCLUDED) 1 11233 5 COPPER ELECTRODE 1 11234 6 FLOW SENSOR CONDUIT 1 11250 7 FLOW SENSOR 1 11460 8 CONNECTOR HOSE WITH THREADED FITTINGS 1 10720 THREADED ADAPTOR B (OPTIONAL) 1 10722 10 CELL...
Open the catalog to page 6
(131) MODEL CS8110 SALTWATER SYSTEM ENGLISH 7.5” X 10.3” PANTONE 295U 11/17/2011 131 HOW THE CHLORINE IS GENERATED This product is specially designed for above ground pools. It will destroy the bacteria, oxidize bather organics and control algae, which provide a safe, clean and comfortable swimming pool. Common salt (sodium chloride) is made up of two elements, sodium and chloride. During the installation of your Saltwater System, a measured quantity of salt is dissolved in the pool water to make it slightly salty. The pool water flows through the Saltwater System ’s electrolytic cell to produce...
Open the catalog to page 7
(131) MODEL CS8110 SALTWATER SYSTEM ENGLISH 7.5” X 10.3” PANTONE 295U 11/17/2011 131 SETUP INSTRUCTIONS IMPORTANT • The Saltwater System requires a separate filter pump [700~4000 gph (2650~15140 lph)] to drive the water and function properly. • The Saltwater System must be installed as the last piece of pool equipment in the water return line to the pool as displayed in Drawing #1. This location extends the life of the titanium plates. 1. Assemble the above-ground-pool (AGP) and its filter pump according to their installation instructions. 2. Take the Saltwater System and its accessories out...
Open the catalog to page 8
(131) MODEL CS8110 SALTWATER SYSTEM ENGLISH 7.5” X 10.3” PANTONE 295U 11/17/2011 131 SETUP INSTRUCTIONS (continued) 1. Go directly to step 2 if your pool is empty. If your above-ground-pool is filled with water, unscrew the strainer grids from the strainer connectors and insert the black hat-like plugs into the connectors, before installing the saltwater pool system. 2. Connect the adaptor A (1) to the electrolytic cell (4) outlet as shown in Drawing #1. Tighten securely. 4 1 3. Disconnect the water return hose from the filter pump connection and connect it to the adaptor A (1) on the Saltwater...
Open the catalog to page 9
(131) MODEL CS8110 SALTWATER SYSTEM ENGLISH 7.5” X 10.3” PANTONE 295U 11/17/2011 131 SETUP INSTRUCTIONS (continued) Connecting the system to pump and pool with 1-1/2” (38mm) connections/hoses: Pump and pool with 1-1/2” (38mm) connections do not require the adaptors A (1) or B (9). Install as follows: Drawing #2 PLUNGER VALVE WATER TO POOL SWIMMING POOL WATER FROM POOL FILTER PUMP ID 1-1/2” (38mm) HOSE SALTWATER SYSTEM 8 ID 1-1/2” (38mm) HOSE 1. Go directly to step 2 if your pool is empty. If your above-ground-pool is filled with water, close the plunger valves before installing the Saltwater...
Open the catalog to page 10
(131) MODEL CS8110 SALTWATER SYSTEM ENGLISH 7.5” X 10.3” PANTONE 295U 11/17/2011 131 SETUP INSTRUCTIONS (continued) Connecting the system to other types of pump (with different type of thread or no thread): The Saltwater System can also be adapted to other filter pumps with different thread or those without a thread on the connection. Connection to 1-1/4” (32mm) hose: 9 8 FILTER PUMP ID 1-1/4” (32mm) CONNECTION SALTWATER SYSTEM 1. Connect one end of adaptor B (9) to the connector hose (8). Tighten securely. 2. Now, connect the other end of adaptor B (9) to the filter pump outlet. Tighten securely....
Open the catalog to page 11All INTEX catalogs and technical brochures
 Pool Ladder
6 Pages
 Pool Volleyball Set
4 Pages
 Rectangular Ultra Frame™ Pool
18 Pages
 Pool Ladder
11 Pages


Archived catalogs
 SEQUOIA SPIRIT™
15 Pages
 RECTANGULAR ULTRA FRAME™ POOLS
16 Pages
 ULTRA FRAME™ POOLS
13 Pages
 OVAL FRAME POOLS
17 Pages
 CIRCULAR METAL FRAME POOLS
15 Pages
 EASY SET POOLS
13 Pages

- Home hot tub
- Outdoor swimming pool
- Above-ground hot tub
- Swimming pool cover
- 4-seater hot tub
- Security swimming pool cover
- Round hot tub
- Metal swimming pool
- Plastic swimming pool
- Above-ground swimming pool
- Swimming pool filter
- Polyester swimming pool
- Wall swimming pool
- Sand swimming pool filter
- Salt chlorinator
- Swimming pool salt chlorinator
- Industrial pool heater
- Electric pool heater
- Steel swimming pool