
- Catalogs
- INGO MAURER
- Kabokov


Kabokov

Kabokov
Catalog excerpts
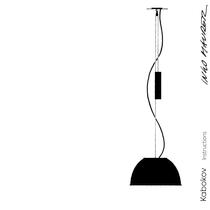
Kabokov Instructions
Open the catalog to page 1
Bitte vor der Montage aufmerksam lesen und Mounting Instructions Please read the following carefully before use, and keep the leaflet in a safe place for future reference! Avant le montage veuillez lire attentivement les Prima del montaggio, leggere attentamente le
Open the catalog to page 2
Deutsch Deutsch Die Montage und der Elektroanschluss sind von einer Elektrofachkraft auszuführen. Zur Montage sind zwei Personen notwendig. Markieren der Bohrlöcher. Bohren Sie drei Dübellöcher Ø 8 mm, setzen Sie die Dübel (5) ein und schrauben Sie den Baldachin fest. Lassen Sie die abgemantelten Zuleitungen (6) des Deckenauslasses etwa 8 cm aus der Decke ragen und isolieren Sie die Enden jeweils ca. 5 mm ab. Falls Sie Kabokov an einer vom Deckenauslass entfernten Stelle montieren möchten, befindet sich seitlich am Baldachin eine Bohrung (7) zum Einführen der Leitung. Schließen Sie die Zuleitungen...
Open the catalog to page 3
Deutsch Deutsch L Einhängen des Reflektors L Wechsel des Leuchtmittels Achtung: Schalten Sie die Sicherung des Deckenauslasses aus und lassen Sie die Lampe vollständig abkühlen. L Eine Person hält den Reflektor. Die zweite Person führt den Reflektor mit der Öffnung über den Reflektorhalter (9). Setzen Sie den Reflektorhalter so in den Rand des Reflektors ein, dass er genau mittig in der Aussparung sitzt. Sichern Sie den Reflektor, indem Sie die s-förmigen Haltefedern (18) so weit drehen, dass die Prägungen in den Bohrungen einrasten und die Federenden auf den Reflektorrand drücken. 3 Falls der...
Open the catalog to page 4
English English The lamp assembly and electrical installation must be carried out by a qualified electrician. The operation requires two people. ceiling fixture. Drill the three 8 mm-diameter holes, insert the plugs (5), and attach the canopy with the three screws (4). Remove an 8 cm section of the outer covering from the power cable (6) and strip about 5 mm from the ends of the leads. An aperture (7) for the power cable is provided in the side of the canopy in case you wish to hang the lamp at a distance from the power outlet. Connect the three leads from the ceiling outlet to the contacts on...
Open the catalog to page 5
English English L Attaching the reflector L Changing the bulb Caution: Switch off or remove the fuse for the power outlet and allow the lamp to cool down completely. L One person holds the reflector while an assistant feeds the reflector-holder (9) through the gap in the top and aligns it with the edges of the reflector so that it sits exactly in the middle of the gap. Now secure the reflector by turning the S-shaped retaining clips (18) to the point where the nipples click into position in the small drill-holes and the ends of the clips press on the edge of the reflector. 3 If the reflector...
Open the catalog to page 6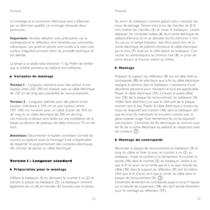
Français Français Le montage et la connexion éléctrique sont à effectuer par un életricien qualifié. Le montage nécessite deux personnes. Se servir du baldaquin comme gabarit pour marquer les trous de perçage. Percer trois trous de chevilles de Ø 8 mm, insérer les chevilles (5) et visser le baldaquin. Laisser dépasser les conduites isolées (6) de la sortie électrique de plafond d'environ 8 cm et dénuder les fils d'environ 5 mm. Au cas où la lampe Kabokov doit être placé loin de la sortie électrique de plafond introduire le câble électrique par le trou (7) situé sur le côté latéral du baldaquin....
Open the catalog to page 7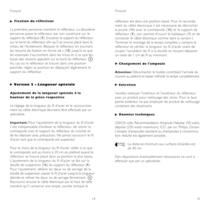
Français Français L Fixation du réflecteur Ajustement de la longueur spéciale à la hauteur de la pièce respective Important: Pour l'ajustement de la longueur du fil d'acier il est indispensable d'enlever le réflecteur, de retirer le contrepoids avec le support du réflecteur du crochet et de les déposer avec précaution. Ne jamais raccourcir le fil d'acier tant que le contrepoids est suspendu! Entretien Veuillez nettoyer l'intérieur et l'extérieur du réflecteur avec un produit pour nettoyage des vitres. Pour la face peinte extérieur ne pas employer de produit de nettoyage contenant des dissolvants....
Open the catalog to page 8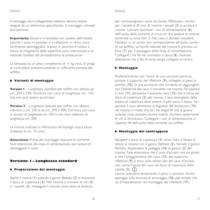
Italiano Italiano Il montaggio ed il collegamento elettrico devono essere eseguiti da un elettricista specializzato. Il montaggio richiede due persone. per contrassegnare i punti da forare. Effettuare i tre fori per i tasselli di Ø mm. 8, inserire i tasselli (5) e avvitare il rosone. Lasciare spuntare i cavi di alimentazione (6) dell'uscita della corrente di circa cm. 8 e spelare le relative estremità su circa mm. 5. Nel caso si desideri installare Kabokov in un punto non corrispondente all'uscita corrente sul soffitto, sul bordo laterale del rosone è previsto un foro (7) per il passaggio della...
Open the catalog to page 9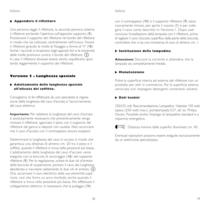
Italiano Italiano L con il contrappeso (10) e il supporto riflettore (9) siano nuovamente rimossi, per aprire il rosone (1) e per collegare il cavo come descritto in Versione 1. Dopo aver concluso l’installazione della lampada con il riflettore, prima di tagliare il cavo d’acciaio superfluo dalla parte della boccola, controllare che vi sia una rimanenza di cavo di almeno cm. 1. Appendere il riflettore L Una persona regge il riflettore, la seconda persona sistema il riflettore portando l'apertura sull'apposito supporto (9). Posizionare il supporto del riflettore nel bordo del riflettore in modo...
Open the catalog to page 10
Ingo Maurer GmbH Kaiserstrasse 47 80801 München Tel. 089-381606-0 Fax 089-381606 20 Oktober 2000 Made in Germany
Open the catalog to page 13All INGO MAURER catalogs and technical brochures
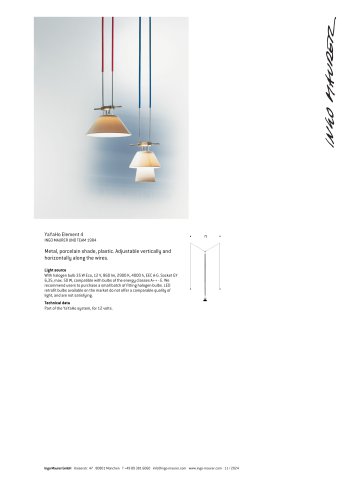 YaYaHo Element 4
1 Page
 Ingo Maurer Catalogue 2018 & 2019
223 Pages
 More Maurer 2017
39 Pages
 MORE MAURER 2016
23 Pages
 Ingo Maurer Flyer
2 Pages
 Main catalogue 2015
397 Pages
 Ingo Maurer 2007/2008
364 Pages
 Luminophor
1 Page
 Willydilly Bon
1 Page
 I Ricchi Poveri - Toto
1 Page
 Extended Catalogue 2014
47 Pages
 Main catalogue 2011/2012
324 Pages
 News 2012
32 Pages
 News 2013
26 Pages
 Bang Boom Zettel'z
1 Page
 Radarrr
1 Page
 ManOMan
1 Page
 Looksoflat
1 Page
 Led's Oskar
1 Page
 Da + Dort
1 Page
 Lucellino Table
2 Pages
 Max.Up_Down
10 Pages
 YaYaHo
60 Pages
 Floatation
2 Pages
 Hot_Hot
9 Pages
 Projects en
7 Pages
 News 2010
2 Pages
 Ingo Maurer 2011_2012
324 Pages
 Ingo Maurer 2009_2010
265 Pages
Archived catalogs
 Ingo Maurer Brochure_2012
32 Pages
 Product Flyer 2012/201
1 Page