- Catalogs
- ILO TECHNOLOGY
- EMERAUDE
EMERAUDE
1 /27Pages

EMERAUDE
1 /27Pages
Catalog excerpts

INSTRUCTION FOR INSTALLATION AND USE - GARANTY You have just acquired this radiant radiator EMERAUDE And we thank you for your choice. This device has been studied, designed and realized with care, In order to give you full satisfaction. NO-135001C - ILO EMERAUDE INSTRUCTION MANUAL ECODESIGN US
Open the catalog to page 1
Markings & Indications . . . . . . . . . . . . . . . . . . . . . . . . . . . . . . . . . . . . 2 General Instructions . . . . . . . . . . . . . . . . . . . . . . . . . . . . . . . . . . . . 3 Safety Instructions . . . . . . . . . . . . . . . . . . . . . . . . . . . . . . . . . . . . 3 Precautions for use . . . . . . . . . . . . . . . . . . . . . . . . . . . . . . . . . . . . . 5 Installation of radiator EMERAUDE . . . . . . . . . . . . . . . . . . . . . . . . 6 Composition . . . . . . . . . . . . . . . . . . . . . . . . . . . . . . . . . . . . . . . . . . . . 6 Tools required for Installation...
Open the catalog to page 2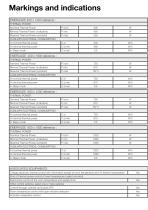
Markings and indications EMERAUDE 400 x 1200 reference : THERMAL POWER Nominal Thermal Power Minimal Thermal Power ( indicative) Maximal Thermal Power (constant) At nominal thermal power At minimal thermal power Nominal Thermal Power Minimal Thermal Power ( indicative) Maximal Thermal Power (constant) AUXILIARY ELECTRICAL CONSUMPTION EMERAUDE 400 x 1800 reference : THERMAL POWER AUXILIARY ELECTRICAL CONSUMPTION At nominal thermal power At minimal thermal power Nominal Thermal Power Minimal Thermal Power ( indicative) Maximal Thermal Power (constant) EMERAUDE 600 x 1200 reference : THERMAL POWER...
Open the catalog to page 3
General Instructions Before installing and using your EMERAUDE radiator, please read these instructions carefully and observe the following instructions : SAFETY INSTRUCTIONS The electrical connection must be carried out by a qualified electrician. The installation must be protected by a 25 or 30 mA differential circuit- breaker (NFC15-100 electrical safety standard). The power supply outage must be of omnipolar type (phase and neutral cut-off). The radiator EMERAUDE must be connected to the power supply (230V AC 50/60Hz) by an electrical circuit protected by an overcurrent circuit breaker16A...
Open the catalog to page 4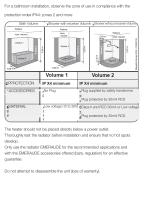
For a bathroom installation, observe the zone of use in compliance with the protection index IP44: zones 2 and more Bath Volume Shower with receiver Volume Shower without receiver Volume IPPROTECTION ACCESSORIES Plug supplied by safety transformer Plug protected by 30mA RCD Low voltage (12 to 30V) Class II and RCD 30mA or Low voltage Plug protected by 30mA RCD The heater should not be placed directly below a power outlet. Thoroughly test the radiator before installation and ensure that no hot spots develop. Only use the radiator EMERAUDE for the recommended applications and with the EMERAUDE...
Open the catalog to page 5
This device is not intended for use by persons (including children) with reduced physical, sensory or mental capacities, or persons without experience or knowledge, unless they have been By a person responsible for their safety, supervision or prior instructions relating to the use of the appliance and that the risks incurred have been apprehended. The radiator EMERAUDE is a certified device for its performance and safety. Caution : As with any heating appliance, some parts may become very hot and cause burns in case of prolonged contact. Particular attention must be paid to the presence of children...
Open the catalog to page 6
Installation of radiator EMERAUDE COMPOSITION The EMERAUDE extra-fine design radiator consists of: • From a tempered glass decorative surface, • From an aluminum heating film (patented), • A mounting system for an installation Horizontal or vertical wall, • An electrical box and a radio receiver for proper operation of the thermostat (See package insert). Towel bars can be added To your radiator EMERAUDE before fixing it to the wall To turn it into a real towel dryer: ideal for your bathroom (accessories supplied separately). TOOLS REQUIRED FOR INSTALLATION Minimum tools required For installation...
Open the catalog to page 7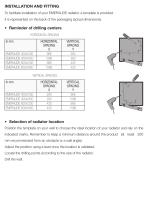
INSTALLATION AND FITTING To facilitate installation of your EMERAUDE radiator, a template is provided. It is represented on the back of the packaging (actual dimensions). • Reminder of drilling centers HORIZONTAL SPACING In mm EMERAUDE 400x1200 EMERAUDE 400x1800 EMERAUDE 600x1200 EMERAUDE 600x1800 VERTICAL SPACING In mm EMERAUDE 400x1200 EMERAUDE 400x1800 EMERAUDE 600x1200 EMERAUDE 600x1800 • Selection of radiator location Position the template on your wall to choose the ideal location of your radiator and rely on the indicated marks. Remember to keep a minimum distance around the product (at...
Open the catalog to page 8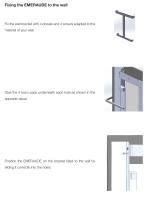
Fixing the EMERAUDE to the wall Fix the wall bracket with 4 dowels and 4 screws adapted to the material of your wall. Glue the 4 foam pads underneath each hole as shown in the opposite visual. Position the EMERAUDE on the bracket fixed to the wall by sliding it correctly into the holes.
Open the catalog to page 9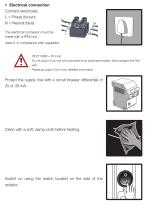
• Electrical connection Connect electrically. L = Phase (brown) N = Neutral (blue) The electrical connexion must be made with a IPX4 box , class II, in compliance with regulation. PILOT WIRE = FP (noir) Do not plug in if you are not connected to an automated system that manages the Pilot wire. Please go page 24 for more detailled information. Protect the supply line with a circuit breaker differential of 25 or 30 mA. Clean with a soft, damp cloth before heating. Switch on using the switch located on the side of the radiator..
Open the catalog to page 10
Operation of the programmable wireless thermostat DESCRIPTION The heating column is managed by an autonomous radio frequency regulation system. It is composed of 2 elements ; the thermosthat and the reciever located inside the facade. The carton includes : The wireless thermostat 2 batteries AAA 2 feet for free installation of the thermostat 1 Connector board et 4 screws for wall mounting Quality certificate Characteristics: Dimensions (L/l/p in mm) : 135 / 87.5 / 23.2 Adjustment accuracy : ± 0.5°C Temperature min/max : 5~35°C Programmation 24/24 – 7J/7 Wall hanging or free-standing (hiding to...
Open the catalog to page 11All ILO TECHNOLOGY catalogs and technical brochures
 ILO CATALOGUE DECORS
54 Pages
 FANMIX
29 Pages
- Wall-mounted radiator
- Vertical radiator
- Rectangular radiator
- Living room radiator
- Horizontal radiator
- 0...500 w radiator
- Customizable color radiator
- Electric radiator
- White radiator
- Decorative radiator
- Radiant panel radiator
- Bathroom radiator
- Black radiator
- Office radiator
- Gray radiator
- Bedroom radiator
- Custom-made radiator
- Red radiator
- Dining room radiator