- Catalogs
- Ice-O-Matic
- CD40030 Dispenser
CD40030 Dispenser

CD40030 Dispenser
This manual covers the installation, startup, cleaning, maintenance, and repair of the CD40030 and CD40022 hotel ice dispensers, including specifications, procedures, and warranty details.
The CD40022 is a 22-inch wide ice dispenser compatible with Ice-O-Matic ICE0320 or ICE0520 machines, while the CD40030 is a 30-inch wide version for ICE0250 through ICE0500 cubers. Both models come with a 3-year parts and labor warranty from the installation date.
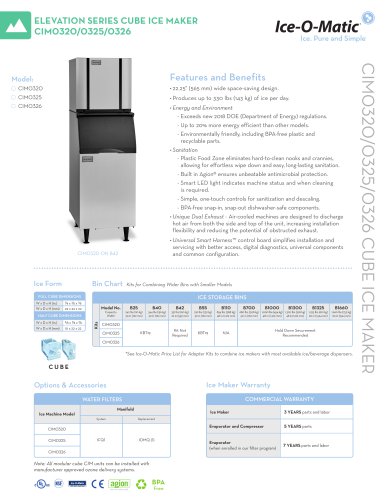
Designed for indoor use, these dispensers operate within air temperature limits of 50°F to 100°F and water pressure between 20 psi and 60 psi. The CD40030 offers basic, coin/token, and water dispenser versions, whereas the CD40022 is available only as a basic model.
Both models feature a plastic-lined, insulated hopper with a 15-blade dispense wheel and stainless steel sweep arm. The dispense mechanism is activated by pushing the ice chute.
After unpacking, install the legs, position the dispenser, and connect the drain and water lines according to local codes. Ensure the dispenser is plugged into a grounded outlet and installed separately from the ice machine.
Verify electrical power supply, drain connection, and correct installation of the ice machine. Start the dispenser by connecting power and following the ice machine startup procedures.
Basic models activate the dispense mechanism by pushing the ice chute, while coin/token models require a coin or token, indicated by a green "ready" light.
Regular cleaning and maintenance are crucial for optimal performance. Follow the outlined cleaning procedures.
Routine maintenance involves checking the dispense mechanism and ensuring all components function correctly. Adjustments may be necessary to maintain performance.
The manual includes troubleshooting steps for diagnosing and resolving common dispenser issues.
Wiring diagrams for different voltage models assist with electrical connections and troubleshooting.
The document details the operation and maintenance of CD40030/CD40022 models, featuring a free vend switch for ice dispensing and a water faucet. The dispenser does not affect water temperature.
Regular inspection and cleaning are necessary for peak performance. Clean the exterior with warm water and soap, and sanitize the ice storage bin every 90 days.
- Remove ice and disconnect power.
- Disassemble front panels and remove the deflector and access door.
- Clean the bin and delivery area with ice machine cleaner and warm water.
- Rinse with fresh water and sanitize with an approved sanitizer.
- Reassemble parts and reconnect power.
Regular maintenance includes cleaning the ice catch pan to prevent leaks. Adjustments can be made for agitation time and water flow.
- Agitation time: Standard is 3 seconds every 6 hours, adjustable based on environment.
- Water flow: Adjust using the screw on the valve body.
- Vend timer: Adjust for desired ice delivery time.
Troubleshooting steps for issues like no ice or water dispensed, leaks, and small ice amounts include checking power, switches, and mechanical components.
Wiring diagrams for different models and voltages show connections and components involved in ice dispensing.
Catalog excerpts

SERVICE/INSTALLATION MANUAL HOTEL DISPENSER MODEL CD40030 and CD40022 Ice-O-Matic 11100 East 45th Ave Denver, Colorado 80239 Part Number 9081317-01
Open the catalog to page 1
SERVICE PARTS MANUAL 22 INCH WIDE ICE SERIES CUBERS MODEL-ICE0320, ICE0520 Includes 50Hz. Units ICE-O-Matic 11100 East 45th Ave Denver, Colorado 80239 Part Number 9081297-01
Open the catalog to page 2
To the owner or user: This product manual is a source of information about the installation, start up, cleaning, maintenance and repair of the product. Table of Contents Introduction General Description and Warranty Information Product Description Installation-Electrical and Ice Machine Assembly Final Check List/Initial Start Up General Care and Cleaning Service Diagnosis Wiring Diagram-115 volt 60Hz. Basic and Water Station Wiring Diagram-Coin Mechanism Wiring Diagram-230 volt, 50HZ basic Ice-O-Matic 11100 E. 45th Ave. Denver, Co. 80239 800-423-3367 The CD400 Service Parts Manual is available...
Open the catalog to page 3
General Description The CD40022 is a 22 inch wide hotel/motel cubed ice dispenser. It is designed to use an Ice-O-Matic ICE0320 or ICE0520 cube ice machine as the source for ice. The CD40030* is a 30 inch wide version of the CD40022 and is designed to use Ice-O-Matic ICE0250 through ICE0500 cubers as its source of ice. Note: 22 inch wide ice machines are not for use on the 30 inch wide dispensers. *Higher capacity cubers, ICE0606, ICE0806 and ICE1006 may also be used, but they require 230-volt power. Ice from the cuber falls into the insulated hopper, where it is stored until needed. When a user...
Open the catalog to page 4
General Description Dimensions RIGHT SIDE Page 3
Open the catalog to page 5
General Description Dimensions POWER CORD WATER INLET 3/8 FLARE (WATER FILLER ONLY) Machine Support Screwed to Back Panel RIGHT SIDE Page 4
Open the catalog to page 6
Specification & Limitations This dispenser is designed to be installed and operated indoors, in a controlled environment. It’s minimum and maximum operating temperature limits are the same as those for the ice machine. Minimum Maximum 100oF Air Temp 50oF Water Pressure* 20 psi 60 psi * for water dispenser model Check the dispenser nameplate, located on the back of the cabinet for specific information. Ice-O-Matic reserves the right to make design changes and/or improvements at any time. Specifications and designs are subject to change without notice. Ice-O-Matic assumes no liability or responsibility...
Open the catalog to page 7
Product Description All models consist of a plastic lined, insulated hopper mounted to a metal base. The hopper contains a 15 blade plastic dispense wheel and a stainless steel sweep arm. The top front of the hopper has a removable door to facilitate maintenance and cleaning of the hopper without removal of the ice machine. The dispense wheel and sweep arm rotate when the ¼ HP dispense drive motor is actuated. The drive motor’s actuation is controlled by the agitation timer or the vend switch. When the ice dispense chute is pushed back it moves the actuation lever up. The actuation lever releases...
Open the catalog to page 8
After removing the carton, check for the loose-shipped parts packed in the storage bin. The parts will include a carton with four legs. Remove the leg carton and any other loose-shipped items. To remove the skid, place part of the carton behind the unit and tip the unit on its back. Remove the bolts holding the skid to the base of the CD dispenser and separate the skid from the unit. Install the legs into the base of the unit, using the holes where the skid bolts were. Turn the leg leveler part of the legs in all the way, adjust them later after the unit is in its final installed position. Move...
Open the catalog to page 9
Installation - Plumbing Drain: All models of the dispenser have a 3/4" FPT drain fitting at the bottom of the back panel. Connect 3/4" rigid tubing to this connection, a vent is recommended for most installations. Route the drain tubing to the building drain. Note: Drain fitting material is plastic. If using copper, sweat the copper tube to copper fitting together before installing on the dispenser. Note: Keep PVC solvent away from all plastic parts of the dispenser. Follow all applicable plumbing codes. Because the drain tubing will be very cold, insulation is recommenced for the tubing. Water:...
Open the catalog to page 10
Installation – Continued The dispenser is supplied with a power cord. Do not use with an extension cord. The unit must be plugged into a properly grounded outlet. The dispenser must be installed so that it is a separate piece of equipment from the ice machine. The drains and electrical supply must be separate. Follow All Local, State and National Codes Ice Machine All models: Place the dispenser in the location where it will be used. Level the top edge of the dispenser front to back and left to right. Sanitize the dispenser bin with a locally approved sanitizer. See page 12. Place the ice machine...
Open the catalog to page 11
Final Check List 1. Check that electrical power has been supplied. 2. Check that a drain, separate from the ice machine, insulated and made of rigid tubing, has been connected to the dispenser. 3. Check that the ice machine has been properly installed per the ice machines installation directions. This includes the machine support included with the dispenser. 4. Check that the ice machine/dispenser assembly is level front to back and left to right. 5. Check that the coin box access key, if used, is available. To Start: 1. Connect electrical power. The dispensing system will cycle on for a few...
Open the catalog to page 12
Basic Model After the ice machine has operated for a few hours, the CD dispenser can be used. Pushing the ice chute back will activate the dispense mechanism and ice will drop out of the chute into the user’s container. Coin/Token Model Operation Without activation the dispenser will not dispense ice when the ice chute is depressed. To activate the dispense system, the user must insert a quarter or a token in the coin mechanism. If the quarter or token is accepted, the Ready Light above the ice chute glows green, indicating that ice can now be dispensed. The dispense system will allow ice vending...
Open the catalog to page 13All Ice-O-Matic catalogs and technical brochures
 CIM0530/0535
2 Pages
 CIM0430/0436/0435
2 Pages
 CIM0330/0335
2 Pages
 CIM0320/0325/0326
2 Pages
 CIM2046/2047
2 Pages
 GEM0450
2 Pages
 GEM0650/0655
2 Pages
 MFI1256/1255
2 Pages
 GEM2006
2 Pages
 Ec03 IceTM
2 Pages
 The Elevation series
2 Pages
 B110 SLOPE-FRONT BIN
1 Page
 ICEU86
2 Pages
 GEM0956/0955
2 Pages
 ICEU106
2 Pages
 ICE1806/1807
2 Pages
 Elevation Series
2 Pages
 ICEU46
2 Pages
 ICEU36
2 Pages
 ICEU56
2 Pages
 ICEU186
2 Pages
 ICEF155
2 Pages
 GEM1306
2 Pages
 Full Line
20 Pages
 ICE0726 / ICE0926
2 Pages
 EC1807 - B2 Series Cuber
102 Pages
 ICE0726
2 Pages
 MFI0800/0805
2 Pages
 IOD200
2 Pages
 IOD250
2 Pages
 IOD150
2 Pages
 WATER FILTERS
2 Pages
 Full-Line Product Brochure
20 Pages
 MFI1256/1255-Flake Ice Maker
2 Pages
 MFI0800/805-Flake Ice Maker
2 Pages
 MFI0500-Flake Ice Maker
2 Pages
 Storage Bins
2 Pages
 Cube Ice Brochure
8 Pages
 GEMU090 Series
16 Pages


Archived catalogs
 GEM-MFI Series
68 Pages
 Series 250 through 2306
20 Pages
 MODEL-GEMD270A
28 Pages
 B, EC and ECP Séries
102 Pages
 MFI2406-Flake Ice Maker
2 Pages
 MFI0805
30 Pages
 HIS Line
2 Pages
 MFI1506
2 Pages
 GEM-MFI Series
30 Pages
 B100 Storage Bin - Parts Manual
13 Pages
 Ice-O-Matic Full Line Brochure
24 Pages


- Cold water dispenser
- Ice cube maker
- Commercial ice cube maker
- Commercial water dispenser
- Industrial water filter
- Air cooling ice cube maker
- Professional water filter
- Cube ice cube maker
- Water cooling ice cube maker
- Modular ice cube maker
- Restaurant ice cube maker
- Vertical evaporator ice cube maker
- Hospital water dispenser
- Commercial ice bin
- Ice flaker
- Commercial ice flaker