INSTALLATION INSTRUCTIONS PRE-PAINTED WALLS
1 /2Pages

INSTALLATION INSTRUCTIONS PRE-PAINTED WALLS
1 /2Pages
Catalog excerpts
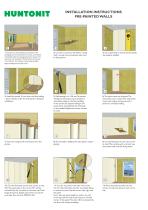
INSTALLATION INSTRUCTIONS PRE-PAINTED WALLS 1 1) The panels must be allowed to acclimatise in the packaging at room temperature for 2 days, and installed immediately after the packaging has been opened. The panels must be installed on timber battens at intervals of c/c 600 mm. The ceiling is usually ready panelled. Begin installing from the left corner. 4 4) Install the panels 10 mm from the floor/ceiling - place 2 blocks under the wall panel to facilitate installation. 7 7) Insert the tongue side of the panel into the groove. 10 10) Cut the final panel to the next corner to size. Nail the panel open in the corner. This will be concealed by the 1st panel on the next wall. Don’t forget the punch. Staples and screws can also be used (see also inst.instr. M004-01-04). 2 2) Cut the 1st panel to size. When cutting with a circular saw, the painted side must be facing down. 5 5) Nail spacing is c/c 150 mm. To prevent damage to the panel, a punch should be used when nailing to the final studding. In the corner, the exposed nailing in the panel will be concealed by the final panel to be installed. Staples and screws can also be used. 8 8) This provides a hidden joint that doesn’t require glueing. 11 11) Cut the 1st panel in the next row to size. Corner clips should be used for concealed nailing in internal corners. Tap the corner clips right into the panel. Use 3 clips per panel height as well as one nail at the top and one nail at the bottom in the left corner of the panel. The nails will be concealed by the floor and ceiling mouldings. 3 3) Use a spirit level to ensure that the panels are properly installed.. 6 6) The joints must not be glued. The next panel is put in place. The wall panels come with tongue and groove and vjoints for concealed nailing. 9 9) Cut the final panel to the next corner to size. When cutting with a circular saw, the painted side must be facing down. 12 12) Place the panel securely into the corner and tap into place at each corner clip
Open the catalog to page 1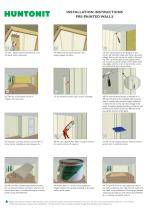
INSTALLATION INSTRUCTIONS PRE-PAINTED WALLS 13) Use a batten between the hammer and the panel when hammering. 14) Make sure the panel has been thoroughly tapped into place. 16) The rest of the panels can be installed in the same way. 17) For external corners use a corner moulding. 19) This gives a perfect, external corner. The external corner moulding can also be glued on. 20) We can supply Acrylic Filler in original colours for internal corners if required. 22) We can offer combined (profiles/architrave) for use around windows and doors, where an additional panel layer is installed directly...
Open the catalog to page 2All Huntonit catalogs and technical brochures
 FIRE - SOUND - U-VALUE
30 Pages
 PREPAINTED WALLS AND CEILINGS
20 Pages
 Huntonit
28 Pages
 NEW COLORS AND SURFACES
12 Pages
- Decorative panel
- Commercial decorative panel
- Wall-mounted decorative panel
- Home decorative panel
- Cover decorative panel
- Industrial suspended ceiling
- Furniture decorative panel
- Plastic decorative panel
- High-resistance decorative panel
- Custom decorative panel
- Building decorative panel
- Wood decorative panel
- Panel suspended ceiling
- Smooth decorative panel
- Decorative suspended ceiling
- Decorative panel
- Wood look decorative panel
- Sustainable decorative panel
- 3D effect decorative panel
- Home decorative panel