

TrueEASE™ Humidification System

TrueEASE™ Humidification System
- Step One: Remove the humidifier cover and bottom cover.
- Step Two: Understand the wiring terminals for HE150/HE250/HE300, including connections for system fan, power, and sensors.
- Step Three: Configure DIP switches to control humidity and fan operations.
- Step Four: Install the transformer for bypass models, ensuring compliance with NEC and CEC codes.
- Step Five: Wire the humidifier using the appropriate diagram for your equipment.
1. Replace the humidifier pad and ensure the tray is correctly seated with arrows pointing into the duct. Reset the maintenance timer by pressing the RESET button after replacing the pad.
Troubleshooting Guide:
- Low Humidity: Check furnace blower operation, circuit breaker, power, wiring connections, and humidity control settings. Address rapid air changes by closing doors, windows, and fireplace dampers.
- High Humidity: Turn off humidity control and water to eliminate condensation. Increase ventilation if needed.
- Replace Pad Light: Indicates yearly maintenance to replace the pad. Press RESET after replacement.
- Service Light (HE150/HE250): Check damper operation and connections. Replace damper motor if necessary.
- Service Light (HE300): Check fan motor operation and replace if needed.
Specifications:
- Humidifying Capacity: HE100/150: up to 12 gpd; HE200/250: up to 17 gpd; HE300: up to 18 gpd.
- Humidified Area: HE100/150: up to 16,000 cubic feet; HE200/250: up to 20,000 cubic feet; HE300: up to 24,000 cubic feet.
- Dimensions: Vary by model, with specific width, height, and depth measurements provided.
- Operating Ranges: Temperature: 34ºF–90ºF; Humidity: 0–95% RH, non-condensing.
- Electrical Ratings: HE100/200: 24VAC, 0.5 A; HE150/250: 24VAC, 0.75 A; HE300: 120VAC, 1 A.
Wiring Configurations:
Detailed wiring instructions for advanced and basic models, including connections for HumidiPRO, fan interlock, and air proving devices.
Parts List:
Includes part numbers and descriptions for replacement pads, solenoid valves, frame assemblies, transformers, and other components specific to each model.
The document provides comprehensive guidelines for the installation and operation of Honeywell humidifiers. It includes safety definitions, installation requirements, and operational procedures.
Safety Definitions and Precautions
The document emphasizes the importance of understanding safety terms before installation. It distinguishes between 'Caution' for potential product damage or minor injuries and 'Warning' for risks of severe injuries or death. Key precautions include disconnecting power sources to avoid electrical hazards and ensuring proper handling to prevent water damage.
Installation Requirements
Critical installation requirements include selecting a suitable location that provides access to water supply, drainage, and electrical outlets. The ambient temperature should be between 1.1°C and 40°C. The document also highlights the importance of adhering to local plumbing and electrical codes.
Mounting Methods
The document outlines two main types of humidifiers: bypass and fan-powered. Bypass humidifiers require access to both supply and return ducts, while fan-powered models can be installed directly on the supply duct. Detailed steps for mounting each type are provided, including template installation and duct cutting.
Plumbing Connections
Instructions for connecting water supply and drainage are provided, with emphasis on using appropriate fittings and adhering to local plumbing codes. The document suggests using either hot or cold water for the humidifier.
Wiring Instructions
Before wiring, the document advises removing the humidifier cover and understanding the wiring terminals and DIP switches. Specific wiring configurations are provided for advanced and basic models, along with instructions for installing the transformer in bypass models.
Operation and Maintenance
The document includes procedures for starting and verifying the humidifier's operation, routine maintenance tips, and troubleshooting advice. It stresses the importance of regular cleaning and pad replacement to ensure optimal performance.
Appendices
The appendices provide additional technical specifications, advanced wiring diagrams, drainage concepts, and a parts list. These sections offer detailed information for more complex installations and maintenance tasks.
Catalog excerpts

TrueEASE™ Humidification System professional installation guide INCLUDED IN THIS HUMIDIFIER BOX M32930 Tools needed to install humidifier ^ Wire cutter/stripper ^ Tin snips or sheet metal cutter ^ #8 hex nut driver ^ Standard screwdriver ^ 18-gauge wire (up to 5 conductor) Other Requirements ^ If floor drain is not available, refer to Appendix C for additional plumbing parts consideration. ^ If installed in or above a finished space, Honeywell recommends installing a drip pan with water sensor shut-off. Cross Reference Table Humidifier E Humidifier Bypass [aJHumidifier Fan Saddle valve Water supply line Drain hose (10 feet) [eJOwner’s manual Mounting template HumidiPRO Digital humidity control Hardware (not pictured) Additional accessories included in select models GETTING OPERATION MOUNTING PLUMBING WIRING APPENDICES
Open the catalog to page 1
WIRING Before Wiring Humidifier. . . . . . . . . . . . . . . . . . . . . . STEP ONE: Remove the Humidifier Cover . . . . . STEP TWO: Understand the Wiring Terminals. . . STEP THREE: Understand the DIP Switches . . . STEP FOUR: Install the Transformer (Bypass Models Only). . . . . . . . . . . . . . . . . . . STEP FIVE: Wiring Humidifier. . . . . . . . . . . . . . . APPENDICES A: Specifications . . . . . . . . . . . . . . . . . . . . . . . . . . . . B: Advanced Wiring. . . . . . . . . . . . . . . . . . . . . . . . . . C: Advanced Draining. . . . . . . . . . . . . . . . . . . . . . . . D: Parts...
Open the catalog to page 3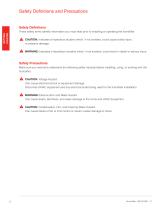
Safety Definitions and Precautions Safety Definitions GETTING STARTED These safety terms identify information you must read prior to installing or operating the humidifier. CAUTION: Indicates a hazardous situation which, if not avoided, could cause bodily injury or property damage. WARNING: Indicates a hazardous situation which, if not avoided, could result in death or serious injury. Safety Precautions Make sure you read and understand the following safety hazards before installing, using, or working with the humidifier: CAUTION: Voltage Hazard. Can cause electrical shock or equipment damage....
Open the catalog to page 4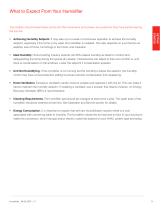
What to Expect From Your Humidifier The installer should review these points with the homeowner and answer any questions they have before leaving the job site. GETTING STARTED • Achieving Humidity Setpoint. It may take up to a week of continuous operation to achieve the humidity setpoint, especially if the home is dry when the humidifier is installed. This also depends on such factors as weather, size of home, furnishings in the home, and insulation. • Ideal Humidity. Home building industry experts cite 35% relative humidity as ideal for comfort and safeguarding the home during the typical dry...
Open the catalog to page 5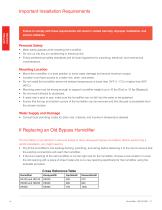
GETTING STARTED Failure to comply with these requirements will result in voided warranty, improper installation, and service callbacks. Personal Safety • Wear safety glasses while installing the humidifier. • Do not cut into any air conditioning or electrical line. • Follow professional safety standards and all local regulations for plumbing, electrical, and mechanical considerations. Mounting Location • Mount the humidifier in a level position to avoid water damage and ensure maximum output. • Location must have access to a water line, drain, and power. • Do not install the humidifier where...
Open the catalog to page 6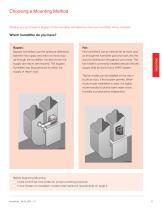
Choosing a Mounting Method Whether you purchased a Bypass or Fan humidifier will determine how your humidifier will be installed: Which humidifier do you have? Fan: Fan humidifiers use an internal fan to move duct air through the humidifier pad and back into the duct for distribution throughout your home. The fan model is commonly installed directly onto the supply (hot) air duct of your HVAC system. Bypass: Bypass humidifiers use the pressure difference between the supply and return to move duct air through the humidifier. Access to both the supply and return are required. The bypass humidifier...
Open the catalog to page 7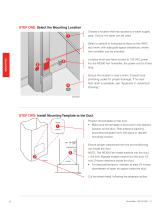
STEP ONE: Select the Mounting Location Choose a location that has access to a water supply pipe. Cold or hot water can be used. Select a vertical or horizontal surface on the HVAC duct work, with adequate space clearances, where the humidifier can be mounted. MOUNTING Location must also have access to 120 VAC power. For the HE300 Fan humidifier, the power cord is 6 feet long. Ensure the location is near a drain. Consult local plumbing codes for proper drainage. If no main floor drain is available, see “Appendix C: Advanced Draining.” STEP TWO: Install Mounting Template to the Duct Position the...
Open the catalog to page 8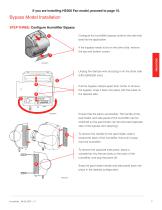
If you are installing HE300 Fan model, proceed to page 10. Bypass Model Installation STEP THREE: Configure Humidifier Bypass Configure the humidifier bypass outlet to the side that best fits the application. If the bypass needs to be on the other side, remove the top and bottom covers. Unplug the damper wire and plug in on the other side (HE150/HE250 only). Pull the bypass clamps apart from center to remove the bypass; snap it back into place with the outlet on the desired side. Ensure that the pad is accessible. The handle of the pad holder and side panel of the humidifier can be switched so...
Open the catalog to page 9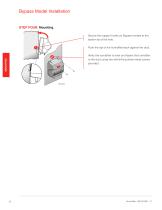
Bypass Model Installation STEP FOUR: Mounting Secure the support hooks on Bypass models to the bottom lip of the hole. Push the top of the humidifier back against the duct. Verify the humidifier is level and fasten the humidifier to the duct using two self-drilling sheet metal screws provided.
Open the catalog to page 10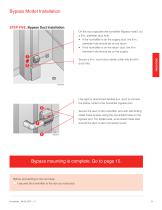
Bypass Model Installation STEP FIVE: Bypass Duct Installation On the duct opposite the humidifier Bypass install, cut a 6-in. diameter duct hole. • If the humidifier is on the supply duct, the 6-in. diameter hole should be on the return. • If the humidifier is on the return duct, the 6-in. diameter hole should be on the supply. Secure a 6-in. round duct starter collar into the 6-in. duct hole. Use rigid or aluminized flexible 6-in. duct to connect the starter collar to the humidifier bypass port. 2 Secure the duct to the humidifier port with self-drilling sheet metal screws using the pre-drilled...
Open the catalog to page 11All Honeywell catalogs and technical brochures
 T10 Pro Smart Thermostat
4 Pages
 VisionPRO® 8000 Intelligent
2 Pages
 VisionPRO® 8000 Smart
2 Pages
 DR90A3000
2 Pages
 HE360A
24 Pages
 C7189R
20 Pages
 DR120A3000
2 Pages
 DR65A3000
2 Pages
 Wi-Fi® Thermostat 9000
92 Pages
 RTH9585
76 Pages


Archived catalogs
 Honeywell Media Air Cleaners
20 Pages
 MN12CES / MN10CESWW
20 Pages
 AquaReset Brochure
2 Pages
- Industrial thermostat
- White thermostat
- Security camera
- Mechanical ventilation unit
- Programmable thermostat
- Heating thermostat
- Digital thermostat
- Ventilation controller
- Wall-mounted thermostat
- Industrial dehumidifier
- Wall-mounted ventilation controller
- Thermostat with digital display
- Surface-mounted security camera
- Room thermostat
- Ventilation unit
- Residential ventilation unit
- Industrial air purifier
- Home ventilation unit
- Residential dehumidifier
- Mobile dehumidifier