

RTH9585

RTH9585
This guide provides comprehensive instructions for the Honeywell RTH9585 Wi-Fi Color Touchscreen Programmable Thermostat, covering installation, operation, and features for remote monitoring and control of heating and cooling systems via the internet.
- Remote monitoring and control through internet connectivity.
- Customizable temperature and schedule settings.
- Email alerts and automatic software upgrades.
- Display of outdoor temperature and humidity (Wi-Fi setup required).
Includes a step-by-step guide with necessary tools and safety precautions, such as:
- Switching off power before installation.
- Removing the old thermostat and labeling wires.
- Mounting the new wallplate and connecting wires based on system type.
- Ensuring a C wire is present for power.
Covers setting time/date, fan options, system modes, and program schedules. It also includes viewing equipment status, setting vacation schedules, customizing screen color, and adjusting security settings.
Instructions for connecting to a Wi-Fi network and registering the thermostat online for remote access.
Details on Smart Response Technology, compressor protection, and auto changeover, which enhance system efficiency and user comfort.
Includes a troubleshooting section, FAQs, and contact information for further assistance.
Guidance on the proper disposal of old thermostats containing mercury to ensure environmental safety.
Outlines compliance with Industry Canada regulations, emphasizing antenna type and gain selection to ensure appropriate EIRP levels. The device must not cause interference and must accept any interference received.
Honeywell offers a 1-year limited warranty covering defects in workmanship or materials under normal use, excluding batteries. The warranty does not cover removal or reinstallation costs.
Introduces the Honeywell Wi-Fi Programmable Thermostat, highlighting features like internet connectivity, email alerts, and compatibility with 24V systems.
Resources for help, including a website and customer service contact, along with a troubleshooting section for common issues.
Includes a notice on the disposal of old thermostats containing mercury and warnings against operating the air conditioner below certain temperatures.
For warranty inquiries, contact Honeywell Customer Relations in the US or Canada.
Mentions trademarks of Apple Inc. and other respective owners.
Catalog excerpts
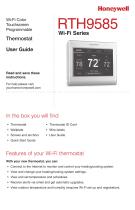
Wi-Fi Color Touchscreen Programmable Thermostat User Guide Read and save these instructions. For help please visit yourhome.honeywell.com • Thermostat • Thermostat ID Card • Wallplate • Wire labels • Screws and anchors • User Guide • Quick Start Guide Features of your Wi-Fi thermostat With your new thermostat, you can: • Connect to the Internet to monitor and control your heating/cooling system. • View and change your heating/cooling system settings. • View and set temperature and schedules. • Receive alerts via email and get automatic upgrades. • View outdoor temperature and humidity (requires Wi-Fi set up and registration).
Open the catalog to page 1
Welcome Congratulations on your purchase of a Honeywell Wi-Fi color touchscreen programmable thermostat. When registered to Honeywell’s Total Connect Comfort Solutions, you can remotely monitor and control the heating and cooling system in your home or business—you can stay connected to your comfort system wherever you go. Honeywell’s Total Connect Comfort is the perfect solution if you travel frequently, own a vacation home, a business, or manage an investment property or if you are simply looking for peace of mind. This thermostat works with common 24 volt systems such as forced air, hydronic,...
Open the catalog to page 2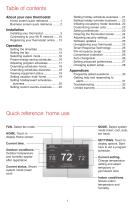
Table of contents About your new thermostat Quick reference: home use FAN. Select fan mode. HOME. Touch to display Home screen. Current time. Outdoor conditions. Outdoor temperature and humidity appear after registration. Current status. Shows system mode (heat/ cool). MODE. Select system mode (heat, cool, auto, em heat). SETTINGS. Touch to display options. Start here to set a program schedule. Current setting. Change temperature setting and select temporary or permanent hold. Indoor conditions. Shows indoor temperature and humidity.
Open the catalog to page 3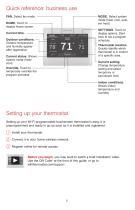
display Home screen. Current time. - Outdoor conditions. ' Outdoor temperature and humidity appear after registration. Current status. Shows — system mode (heat/ cool). Override. Touch to temporarily override the program schedule. HOME FAN MODE SETTINGS 78- 71 71 MODE. Select system mode (heat, cool, auto, em heat). SETTINGS. Touch to display options. Start here to set a program schedule. Thermostat location. Quickly identify which thermostat is in control of a specific area. Current setting. Change temperature setting and select temporary or permanent hold. Indoor conditions. Shows indoor temperature...
Open the catalog to page 4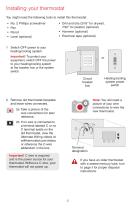
Installing your thermostat You might need the following tools to install this thermostat: • • • • N o. 2 Phillips screwdriver Pen Pencil Level (optional) • rill and bits (3/16” for drywall, D 7/32” for plaster) (optional) • Hammer (optional) • lectrical tape (optional) E 1 Switch OFF power to your heating/cooling system. Important! To protect your equipment, switch OFF the power to your heating/cooling system at the breaker box or the system switch. Note: You will need a picture of your wire connections to wire the new thermostat. 2 Remove old thermostat faceplate and leave wires connected. 2a...
Open the catalog to page 5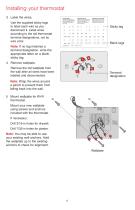
Installing your thermostat 3 Label the wires. Use the supplied sticky tags to label each wire as you disconnect it. Label wires according to the old thermostat terminal designations, not by wire color. Blank tags Note: If no tag matches a terminal designation, write the appropriate letter on a blank sticky tag. 4 Remove wallplate. Remove the old wallplate from the wall after all wires have been labeled and disconnected. Terminal designation Note: Wrap the wires around a pencil to prevent them from falling back into the wall. 5 Mount wallplate for Wi-Fi thermostat. Mount your new wallplate using...
Open the catalog to page 6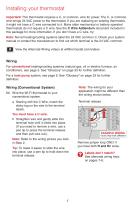
Installing your thermostat Important! This thermostat requires a C, or common, wire for power. The C, or common, wire brings 24 VAC power to the thermostat. If you are replacing an existing thermostat, it might not have a C wire connected to it. Many older mechanical or battery operated thermostats do not require a C wire. See the C Wire Addendum document included in this package for more information. If you don’t have a C wire, try: Note: Not all heating/cooling systems label the 24 VAC common C. Check your system manual or contact the manufacturer to find out which terminal is the 24 VAC common....
Open the catalog to page 7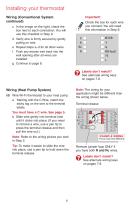
Installing your thermostat Wiring (Conventional System continued) Important! Check the box for each wire you connect. You will need this information in Step 9. c In the image on the right, check the box next to each connection. You will use this checklist in Step 9. d Verify wire is firmly secured by gently pulling on wire. e Repeat steps a–d for all other wires. f Push any excess wire back into the wall opening after all wires are installed. g Continue to page 8. Labels don’t match? See alternate wiring keys on pages 7-8. Note: Refer to the wiring picture you took in Step 2. Tip: To make it...
Open the catalog to page 8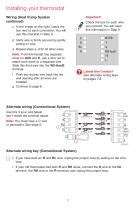
Installing your thermostat Wiring (Heat Pump System continued) Important! Check the box for each wire you connect. You will need this information in Step 9. c In the image on the right, check the box next to each connection. You will use this checklist in Step 9. d Verify wire is firmly secured by gently pulling on wire. e Repeat steps a–d for all other wires. Note: If old thermostat has separate wires on AUX and E, use a wire nut to attach both wires to a separate wire. Slide this third wire into the W2-Aux/E terminal. Labels don’t match? See alternate wiring keys on pages 7-8. f Push any excess...
Open the catalog to page 9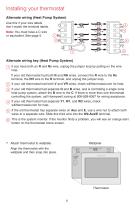
Installing your thermostat Alternate wiring (Heat Pump System) Use this if your wire labels don’t match the terminal labels. Note: You must have a C wire or equivalent. See page 5. Alternate wiring key (Heat Pump System) 1 If you have both an R and Rc wire, unplug the jumper loop by pulling on the wire loop. If your old thermostat had both R and RH wires, connect the R wire to the Rc terminal, the RH wire to the R terminal, and unplug the jumper loop. 2 If your old thermostat had both V and VR wires, check wifithermostat.com for help. 3 If your old thermostat had separate O and B wires, and is...
Open the catalog to page 10All Honeywell catalogs and technical brochures
 T10 Pro Smart Thermostat
4 Pages
 VisionPRO® 8000 Intelligent
2 Pages
 VisionPRO® 8000 Smart
2 Pages
 DR90A3000
2 Pages
 TrueEASE™ Humidification System
72 Pages
 HE360A
24 Pages
 C7189R
20 Pages
 DR120A3000
2 Pages
 DR65A3000
2 Pages
 Wi-Fi® Thermostat 9000
92 Pages


Archived catalogs
 Honeywell Media Air Cleaners
20 Pages
 MN12CES / MN10CESWW
20 Pages
 AquaReset Brochure
2 Pages
- White thermostat
- Security camera
- Mechanical ventilation unit
- Heating thermostat
- Digital thermostat
- Ventilation controller
- Wall-mounted thermostat
- Industrial dehumidifier
- Wall-mounted ventilation controller
- Thermostat with digital display
- Surface-mounted security camera
- Room thermostat
- Ventilation unit
- Residential ventilation unit
- Industrial air purifier
- Home ventilation unit
- Residential dehumidifier
- Mobile dehumidifier