C7189R
1 /20Pages

C7189R
1 /20Pages
Catalog excerpts

Installation Guide C7189R Wireless Indoor Sensor Capteur d’intérieur sans fil Sensor inalámbrico para interiores
Open the catalog to page 1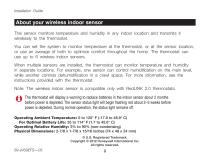
Installation Guide About your wireless indoor sensor This sensor monitors temperature and humidity in any indoor location and transmits it wirelessly to the thermostat. You can set the system to monitor temperature at the thermostat, or at the sensor location, or use an average of both to optimize comfort throughout the home. The thermostat can use up to 6 wireless indoor sensors. When multiple sensors are installed, the thermostat can monitor temperature and humidity in separate locations. For example, one sensor can control humidification on the main level, while another controls dehumidification...
Open the catalog to page 2
Wireless Indoor Sensor Install batteries and link sensor to thermostat Install batteries, then enter Wireless Setup mode at the thermostat. Press and release the CONNECT button to link the wireless sensor to the thermostat. Press and release CONNECT. After a short delay, the status light will glow green for 15 seconds. If the status light is red, the sensor did not link with the thermostat. See Note. Install 2 fresh AAA alkaline batteries. Status light will briefly flash green. If it flashes red, batteries are not good. Verify the thermostat is in the Wireless Setup mode and the indoor sensor...
Open the catalog to page 3
Installation Guide Mount sensor in suitable location Install sensor on an interior wall, about 4 to 6 feet above the floor. To ensure accurate temperature readings, choose a location away from air vents and not exposed to direct sunlight. 1 Remove the wallplate and mount it 4 to 6 feet above the floor on an interior wall. Drill 3/16-inch holes for drywall, 7/32-inch for plaster. 2 Attach sensor securely to wallplate as shown. If you replace a thermostat or Equipment Interface Module: You must disconnect the indoor sensor from the old device. To disconnect, press and hold the CONNECT button on...
Open the catalog to page 4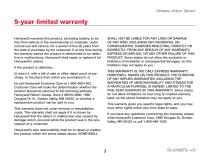
Wireless Indoor Sensor 5-year limited warranty Honeywell warrants this product, excluding battery, to be free from defects in the workmanship or materials, under normal use and service, for a period of five (5) years from the date of purchase by the consumer. If at any time during the warranty period the product is determined to be defective or malfunctions, Honeywell shall repair or replace it (at Honeywell’s option). If the product is defective, (i) return it, with a bill of sale or other dated proof of purchase, to the place from which you purchased it; or (ii) call Honeywell Customer Care...
Open the catalog to page 5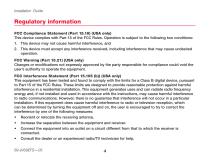
Installation Guide Regulatory information FCC Compliance Statement (Part 15.19) (USA only) This device complies with Part 15 of the FCC Rules. Operation is subject to the following two conditions: 1. This device may not cause harmful interference, and 2. This device must accept any interference received, including interference that may cause undesired operation. FCC Warning (Part 15.21) (USA only) Changes or modifications not expressly approved by the party responsible for compliance could void the user’s authority to operate the equipment. FCC Interference Statement (Part 15.105 (b)) (USA only)...
Open the catalog to page 6
Wireless Indoor Sensor Regulatory information Equipment interface module, thermostats and indoor sensor To comply with FCC and Industry Canada RF exposure limits for general population/ uncontrolled exposure, the antenna(s) used for these transmitters must be installed to provide a separation distance of at least 20 cm from all persons and must not be co-located or operating in conjunction with any other antenna or transmitter. Section 7.1.2 of RSS-GEN Under Industry Canada regulations, this radio transmitter may only operate using an antenna of type and maximum (or lesser) gain approved for...
Open the catalog to page 7
Guide d’installation À propos du capteur d’intérieur sans fil Ce capteur contrôle la température et l’humidité dans tout espace intérieur et la transmet sans fil au thermostat. Le système peut être réglé pour contrôler la température au thermostat ou à l’emplacement du capteur, ou pour utiliser une moyenne des deux pour maximiser le confort dans toute la maison. Le thermostat peut utiliser jusqu’à 6 capteurs intérieurs sans fil. Lorsque plusieurs capteurs sont installés, le thermostat peut contrôler la température et l’humidité dans des endroits différents. Par exemple, un capteur peut contrôler...
Open the catalog to page 8
Capteur d’intérieur sans fil 1 Installation des piles et connexion du capteur au thermostat Installer les piles et mettre le thermostat en mode de configuration sans fil. Appuyer sur le bouton CONNECT (Connexion) puis le relâcher pour connecter le capteur sans fil au thermostat. Appuyer sur le bouton CONNECT Si le voyant de statut est rouge, (Connexion) et le relâcher. Après le capteur n’est pas connecté au un court délai, le voyant de statut thermostat. Voir la remarque. s’allume en vert pendant 15 secondes. MCR32933 Vérifier que le thermostat est en mode Insérer 2 piles alcalines AAA neuves....
Open the catalog to page 9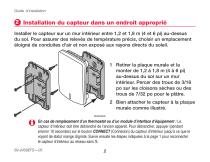
Guide d’installation 2 Installation du capteur dans un endroit approprié Installer le capteur sur un mur intérieur entre 1,2 et 1,8 m (4 et 6 pi) au-dessus du sol. Pour assurer des relevés de température précis, choisir un emplacement éloigné de conduites d’air et non exposé aux rayons directs du soleil. 1 Retirer la plaque murale et la monter de 1,2 à 1,8 m (4 à 6 pi) au-dessus du sol sur un mur intérieur. Percer des trous de 3/16 po sur les cloisons sèches ou des trous de 7/32 po pour le plâtre. 2 Bien attacher le capteur à la plaque murale comme illustré. M32936A En cas de remplacement d’un...
Open the catalog to page 10
Capteur d’intérieur sans fil Garantie limitée à 5 ans Honeywell garantit ce produit, à l’exception de la pile, contre tout vice de fabrication ou de matière dans la mesure où il en est fait une utilisation et un entretien convenables, et ce, pour cinq (5) ans à partir de la date d’achat par le consommateur. En cas de défectuosité ou de mauvais fonctionnement pendant la période de garantie, Honeywell remplacera ou réparera le produit (au gré de Honeywell) dans un délai raisonnable. Y COMPRIS LES DOMMAGES INDIRECTS OU ACCESSOIRES DÉCOULANT DIRECTEMENT OU INDIRECTEMENT D’UNE VIOLATION QUELCONQUE...
Open the catalog to page 11All Honeywell catalogs and technical brochures
 T10 Pro Smart Thermostat
4 Pages
 VisionPRO® 8000 Intelligent
2 Pages
 VisionPRO® 8000 Smart
2 Pages
 DR90A3000
2 Pages
 TrueEASE™ Humidification System
72 Pages
 HE360A
24 Pages
 DR120A3000
2 Pages
 DR65A3000
2 Pages
 Wi-Fi® Thermostat 9000
92 Pages
 RTH9585
76 Pages


Archived catalogs
 Honeywell Media Air Cleaners
20 Pages
 MN12CES / MN10CESWW
20 Pages
 AquaReset Brochure
2 Pages
- White thermostat
- Security camera
- Mechanical ventilation unit
- Programmable thermostat
- Heating thermostat
- Ventilation controller
- Digital thermostat
- Wall-mounted thermostat
- Wall-mounted ventilation controller
- Industrial dehumidifier
- Thermostat with digital display
- Surface-mounted security camera
- Room thermostat
- Ventilation unit
- Residential ventilation unit
- Industrial air purifier
- Home ventilation unit
- Mobile dehumidifier
- Residential dehumidifier