Installation manuel GW07 05 01 00
1 /16Pages
Installation manuel GW07 05 01 00
1 /16Pages
Catalog excerpts

Instruccions cambiador pañales.indd 1 GENWEC BABY Español Manual de instalación Installation manual Installation manue
Open the catalog to page 1
Instruccions cambiador pañales.indd 2
Open the catalog to page 2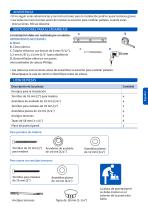
ADVERTENCIA • El no seguir estas advertencias y las instrucciones para la instalación podría causar lesiones graves • Lea todas las instrucciones antes de instalar la estación para cambiar pañales. Guarde estas instrucciones. NO las deseche. INSTRUCCIONES PARA EL ENSAMBLAJE La instalación debe ser realizada por un adulto. HERRAMIENTAS NECESARIAS: A. Nivel B. Cinta métrica C. Taladro eléctrico con brocas de 6 mm (7/32”), 3.2 mm (1/8”) y 13 mm (1/2”) para albañilería D. Destornillador eléctrico con punta intercambiable de cabeza Phillips • Lea todas las instrucciones antes de ensamblar la estación...
Open the catalog to page 3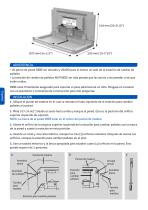
ADVERTENCIA • Un perno de pared DEBE ser ubicado y USADO para al menos un lado de la estación de cambio de pañales. • La estación de cambio de pañales NO PUEDE ser más pesada que las anclas o las paredes a las que están unidas. DEBE estar firmemente asegurado para soportar el peso adicional de un niño. Póngase en contacto con un arquitecto o contratista de construcción para más preguntas. INSTALACIÓN 1. Ubique el puntal de madera en el cual se montará el lado izquierdo de la estación para cambiar pañales a la pared. 2. Mida 107 cm (42”) desde el suelo hacia arriba y marque la pared. Ésta es la...
Open the catalog to page 4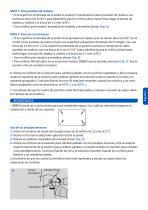
NOTA 1: Para puntales de madera: • Si la superficie terminada de la pared es azulejo o mampostería sobre puntales de madera, use una broca de 6 mm (7/32”) para albañilería para el orificio piloto hasta hasta llegar al puntal de madera, y cambie a la broca de 3.2 mm (1/8”). • Use tornillos para madera, arandelas de acabado y arandelas planas (Fig. A). NOTA 2: Para uso con tensores: • Si la superficie terminada de la pared tiene puntales de madera que no tienen 404 mm (16”) en el centro, tiene puntales de metal o tiene una superficie subyacente de bloque de hormigón, use una broca de 13 mm (1/2”)....
Open the catalog to page 5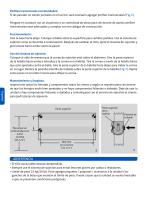
Perfiles transversales recomendados: Si las paredes no tienen puntales en el centro, será necesario agregar perfiles transversales (Fig. E). Póngase en contacto con un arquitecto o un contratista de obras para cerciorarse de quelos perfiles transversales sean adecuados y cumplan con los códigos de construcción. Funcionamiento: Gire la base hacia abajo. Coloque al bebé sobre la superficie para cambiar pañales. Use el sistema de sujeción como se describe a continuación. Después de cambiar al niño, quite el sistema de sujeción y gire la base hacia arriba contra la pared. Uso del sistema de sujeción:...
Open the catalog to page 6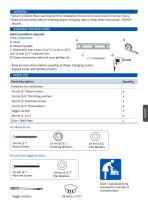
• Failure to follow these warnings and the installation instructions could result in serious injury • Read all instructions before installing diaper changing station. Keep these instructions. DO NOT discard. Adult installation required. TOOLS REQUIRED: C. Power drill with 6 mm (7/32"), 3.2 mm (1/8") and 13 mm (1/2") masonry bits D. Power screwdriver with bull nose phillips bit • Read all instructions before assembly of diaper changing station. • Unpack carton and identify all parts. Door / wall plate to be mounted on outside of restroom door.
Open the catalog to page 7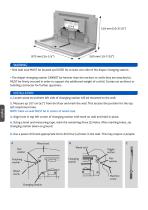
WARNING • One wall stud MUST be located and USED for at least one side of the diaper changing station. • The diaper changing station CANNOT be heavier than the anchors or walls they are attached to. MUST be firmly secured in order to support the additional weight of a child. Contact an architect or building contractor for further questions. INSTALLATION 1. Locate wood stud where left side of changing station will be mounted to the wall. 2. Measure up 107 cm (42”) from the floor and mark the wall. This locates the position for the top left attachment hole. NOTE: Mark on wall MUST be in center...
Open the catalog to page 8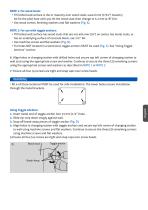
NOTE 1: For wood studs: • If finished wall surface is tile or masonry over wood studs, usea 6 mm (7/32”) masonry bit for the pilot hole until you hit the wood stud, then change to 3.2 mm (1/8”) bit. • Use wood screws, finishing washers and flat washers (Fig. A). NOTE 2: For use with toggle anchors: • If finished wall surface has wood studs that are not 404 mm (16”) on center, has metal studs, or has an underlying surface of concrete block, use 1/2’’ bit. • Use machine screws and flat washers (Fig. B). • For holes NOT located in a wood stud, toggle anchors MUST be used (Fig. C). See “Using Toggle...
Open the catalog to page 9
Recommended blocking: If the walls do not have studs on center, then additional blocking is necessary (Fig. E). Contact an architect or building contractor to make sure the blocking is adequate and complies with building codes. Operation: Rotate base downward. Place infant on top of the changing surface. Use restraint system as described below. After child has been changed, remove restraint system and rotate base back up against the wall. Use of restraint system: Place child so restraint strap is located at abdomen. Rotate top of buckle upward and insert strap in buckle. Pull strap through buckle...
Open the catalog to page 10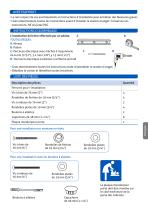
• Le non respect de ces avertissements et instructions d'installation peut entrainer des blessures graves • Lisez attentivement toutes les instructions avant d'installer la station a langer. Conservez ces instructions. NE les jetez PAS. L'installation doit etre effectuee par un adulte. TOUTILS REQUIS: C. Perceuse electrique avec meches a ma^onnerie de 6 mm (7/32"), 3.2 mm (1/8") y 13 mm (1/2") D. Tournevis electrique a embout cruciforme arrondi Lisez attentivement toutes les instructions avant d'assembler la station a langer. Deballez le carton et identifiez toutes les pieces. Pour une installation...
Open the catalog to page 11All Genwec catalogs and technical brochures
 CATALOG 4.0
198 Pages
 BATHROOM ACCESORIES BROCHURE
24 Pages
 GW13 01 06 02
1 Page
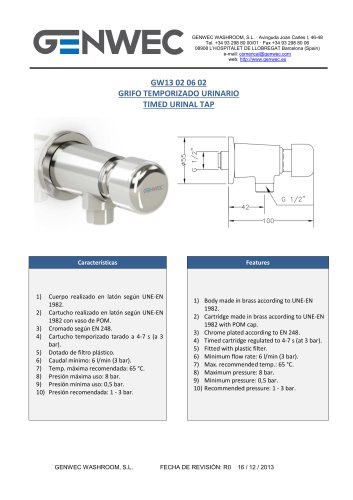 GW13 02 06 02
1 Page
 GW13 03 06 02
1 Page
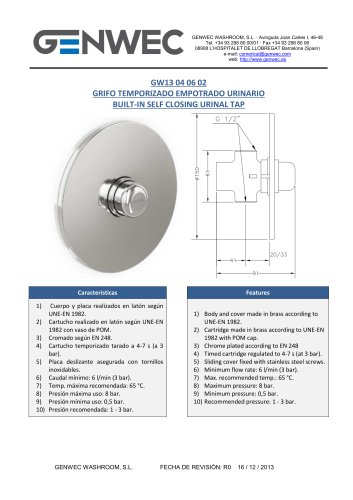 GW13 04 06 02
1 Page
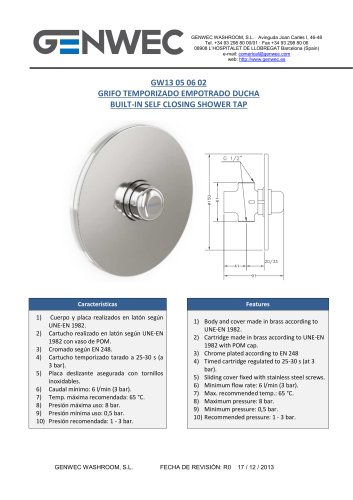 GW13 05 06 02
1 Page
 GW13 06 06 02
1 Page
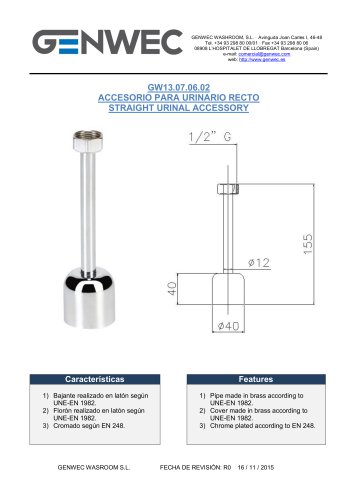
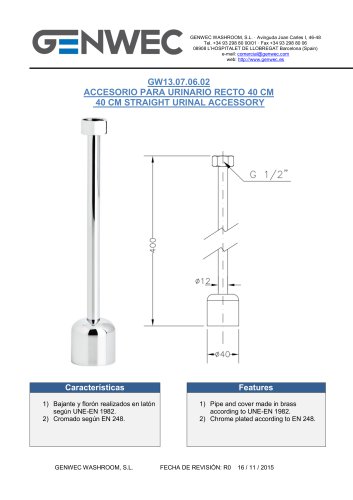 GW13 07 06 02
1 Page
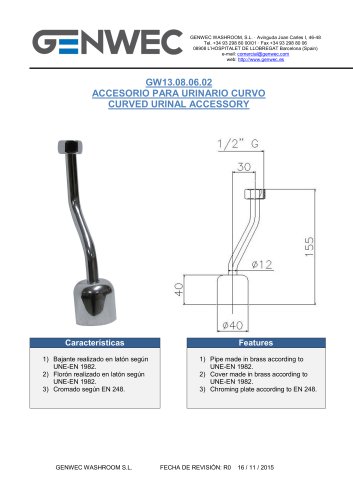 GW13 08 06 02
1 Page
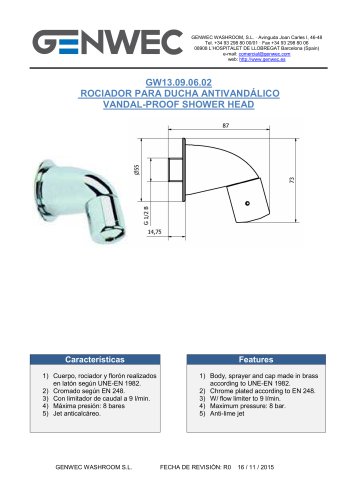 GW13 09 06 02
1 Page
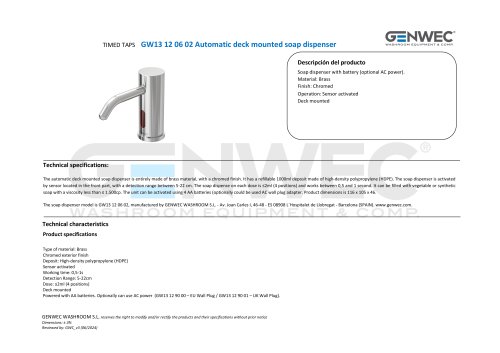
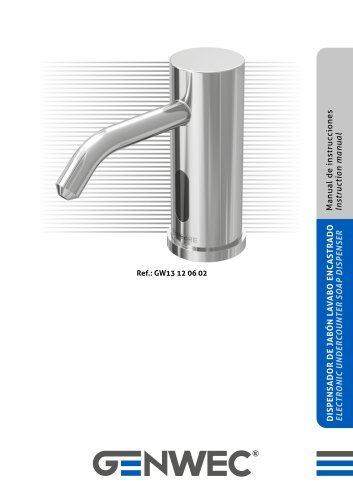 GW13 12 06 02
16 Pages
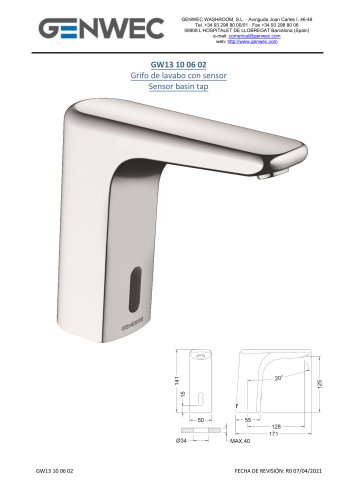 GW13 10 06 02
5 Pages
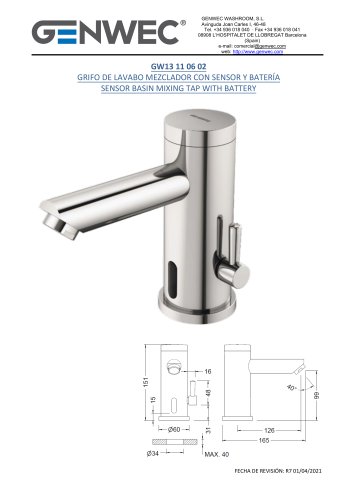 GW13 11 06 02
7 Pages
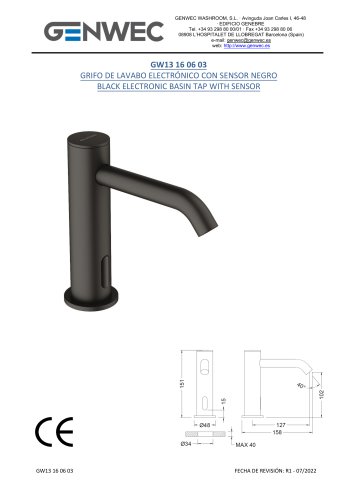 GW13 16 06 03
6 Pages
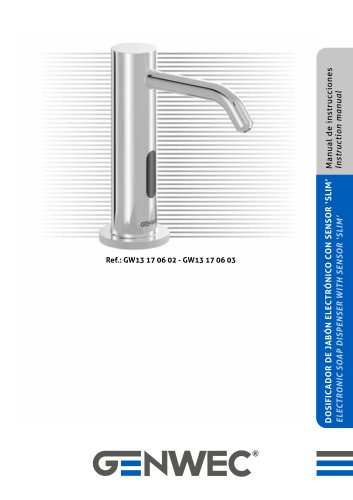
 GW13 17 06 02
1 Page
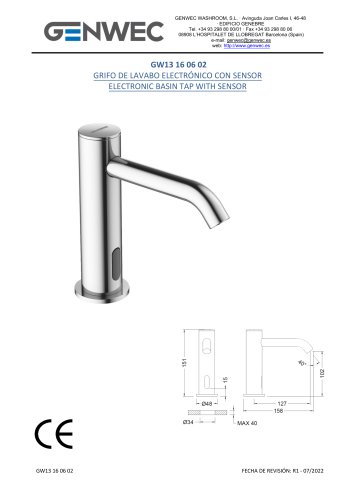 GW13 16 06 02
6 Pages
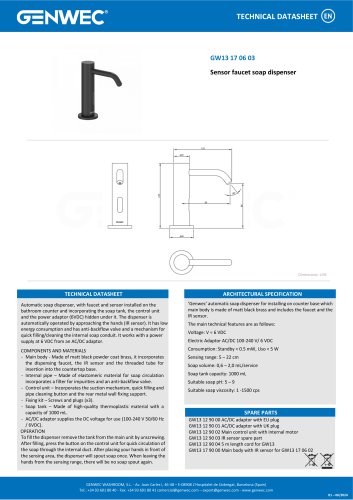 GW13 17 06 03
1 Page
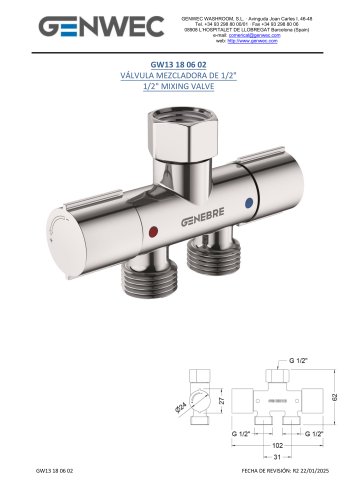 GW13 18 06 02
5 Pages
 nstruction manual GW13 19 06 02
12 Pages
 GW13 19 06 02
1 Page
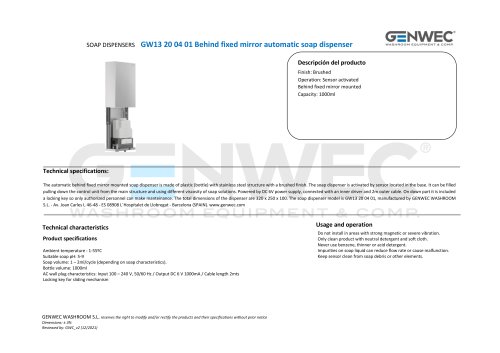
 GW13 20 04 01
12 Pages
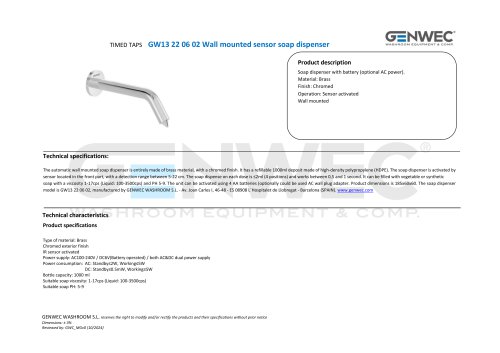
 GW13 20 06 02
8 Pages
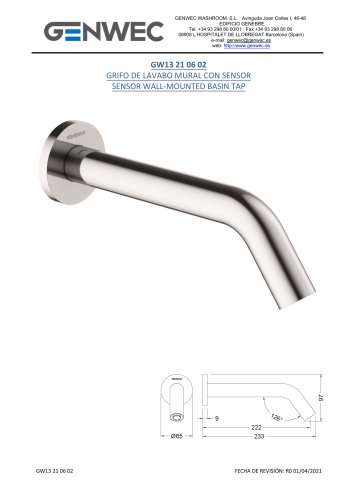 GW13 21 06 02
6 Pages
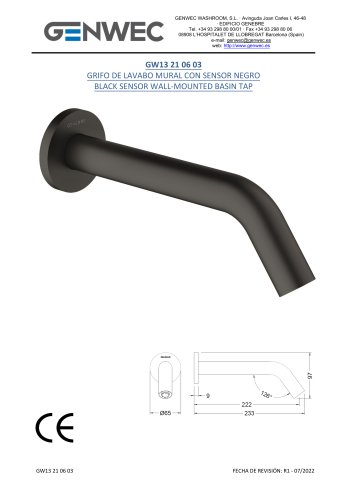 GW13 21 06 03
6 Pages
 GW12 01 04 05
8 Pages
 GW12 02 04 05
8 Pages
 GW12 02 03 05
8 Pages
 GW12 03 03 05
8 Pages
 GW12 03 04 05
8 Pages
 GW12 04 03 05
12 Pages
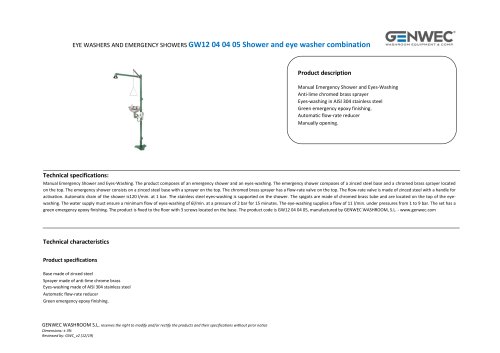
 GW12 04 04 05
12 Pages
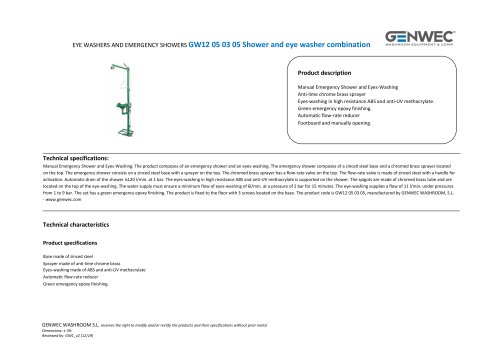
 GW12 05 03 05
12 Pages
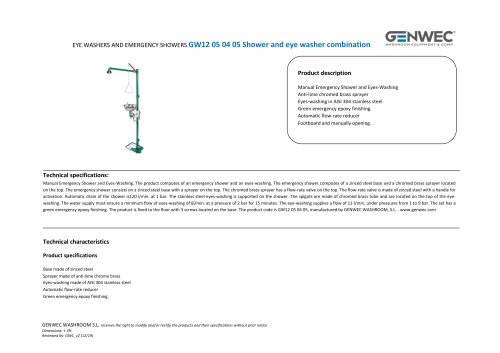
 nstruction manual GW12 05 04 05
12 Pages
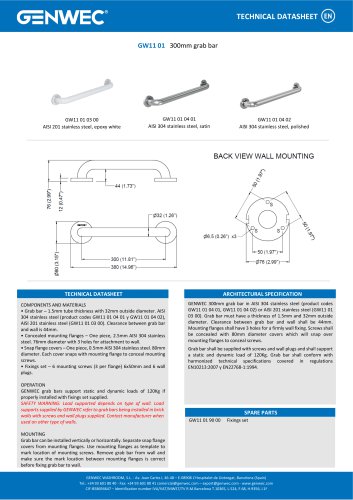 GW11 01 300mm grab bar
1 Page
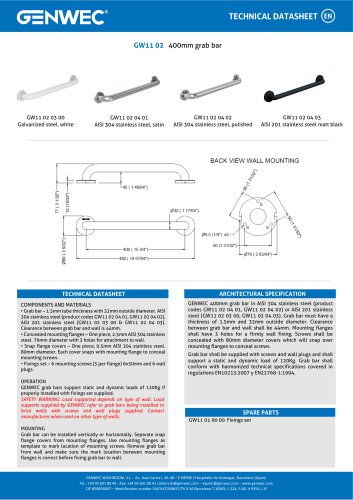 GW11 02 400mm grab bar
1 Page
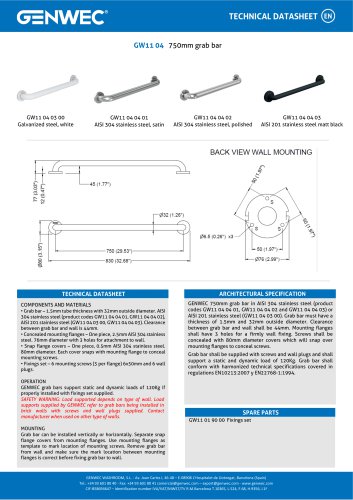 GW11 04 04 03
1 Page
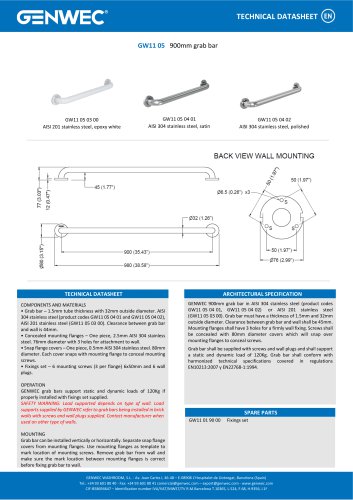 GW11 05 900mm grab bar
1 Page
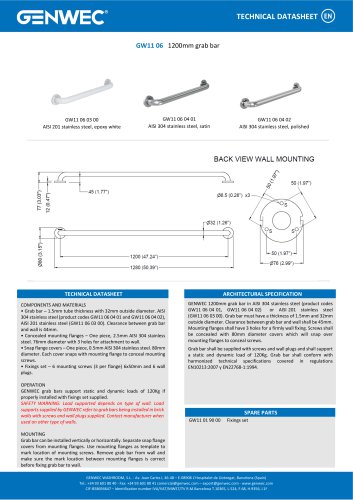 GW11 06 03 00
1 Page
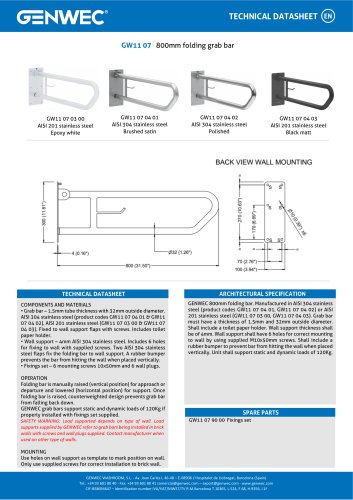 GW11 07 04 02
1 Page
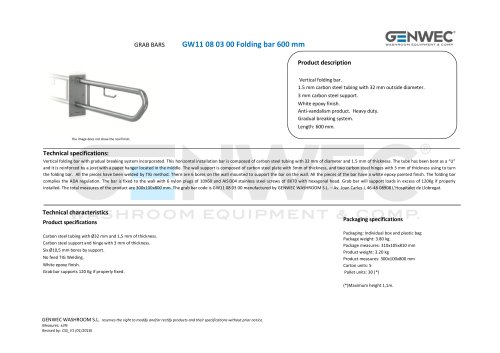 GW11 08 03 00
3 Pages
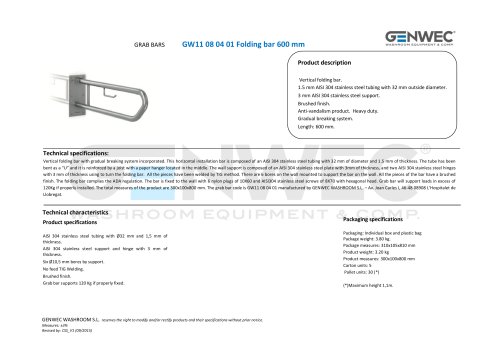 GW11 08 04 01
3 Pages
 GW11 08 04 02
3 Pages
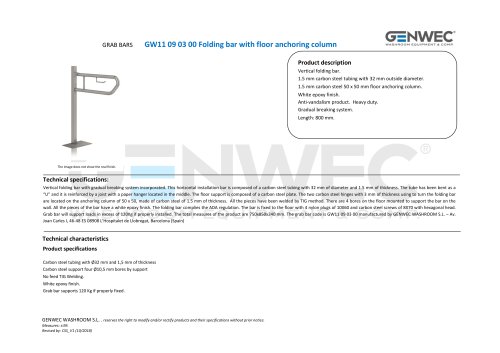 GW11 09 03 00
3 Pages
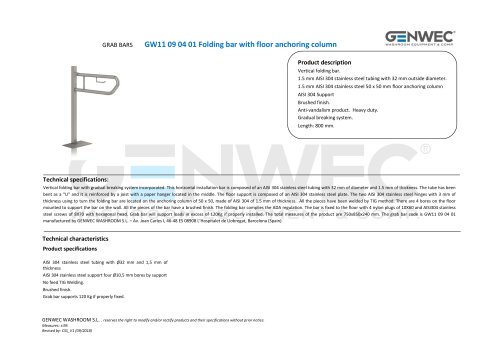 GW11 09 04 01
3 Pages
 GW11 09 04 02
3 Pages
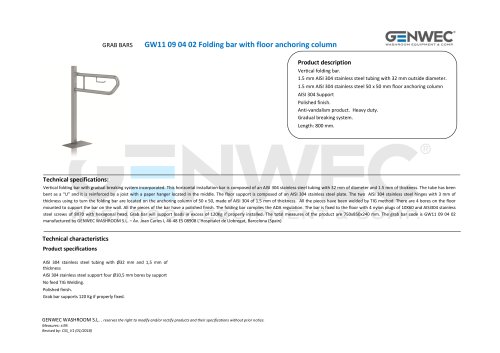
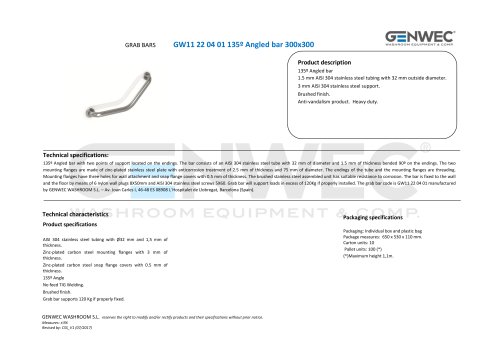 GW11 22 04 01
2 Pages
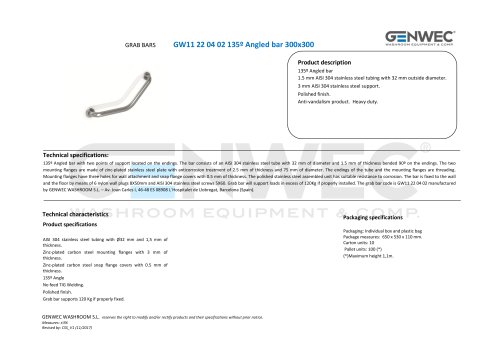 GW11 22 04 02
2 Pages
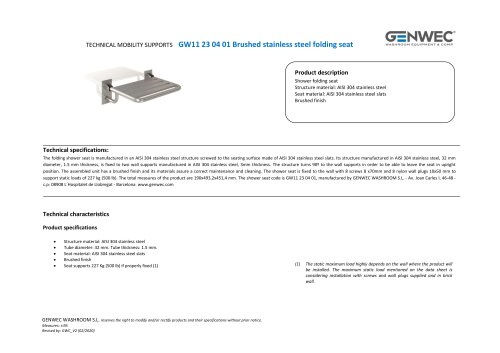 GW11 23 04 01
3 Pages
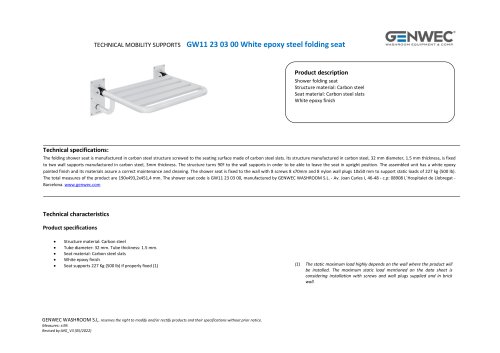 GW11 23 03 00
3 Pages
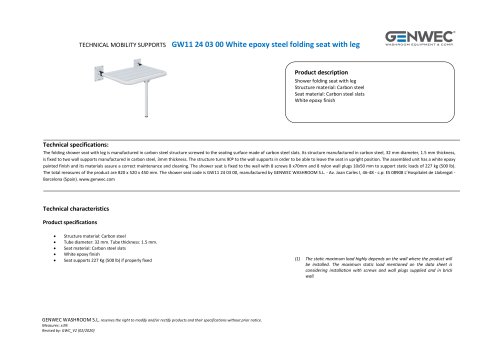 GW11 24 03 00
3 Pages
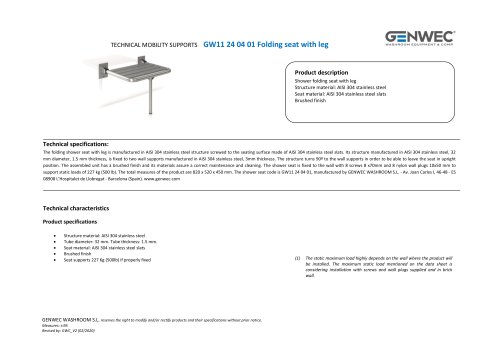 GW11 24 04 01
3 Pages
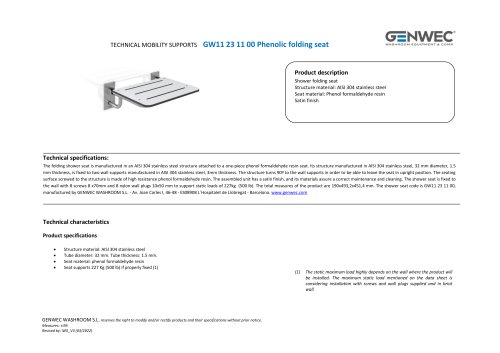
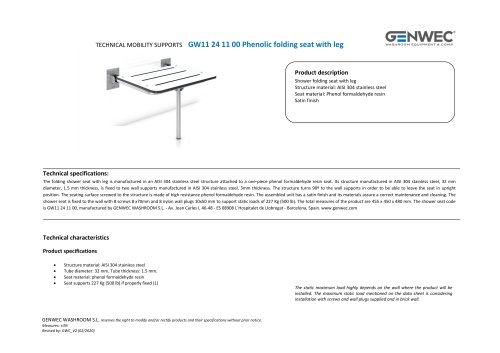 GW11 24 11 00
3 Pages
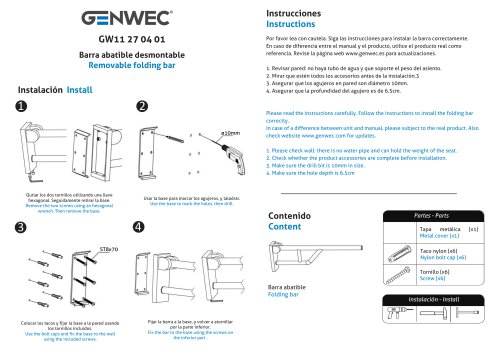
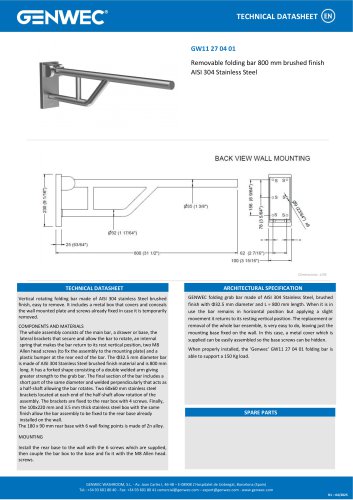 GW11 27 04 01
1 Page
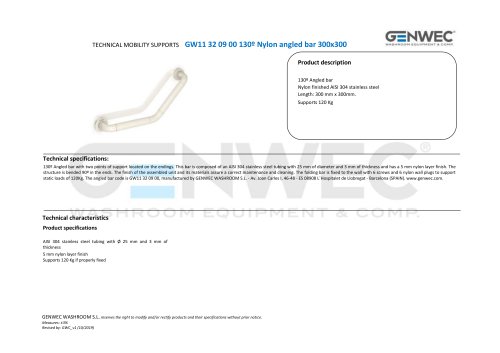 GW11 32 09 00
2 Pages
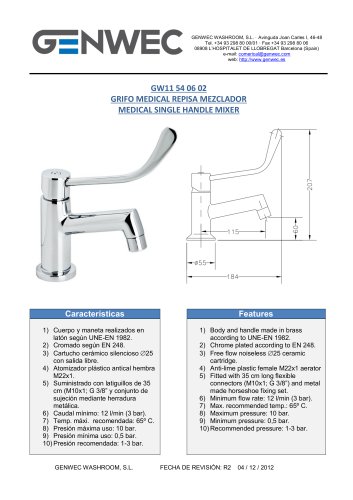 GW11 54 06 02
1 Page
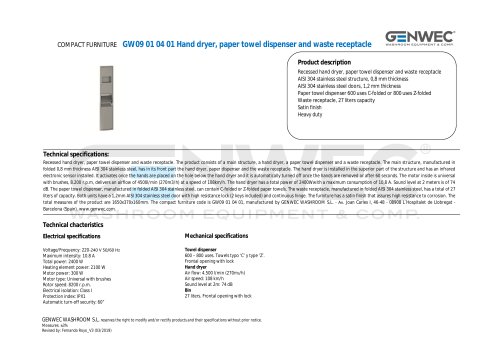
 GW09 01 04 01
8 Pages
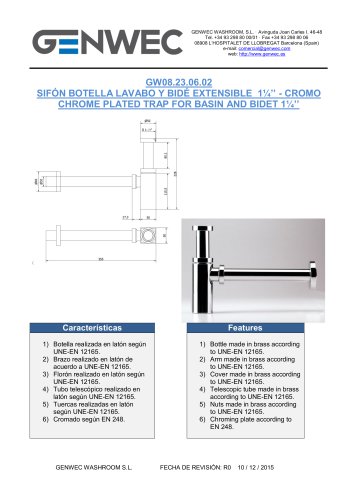 GW08 23 06 02
1 Page
 GW08 24 06 02
1 Page
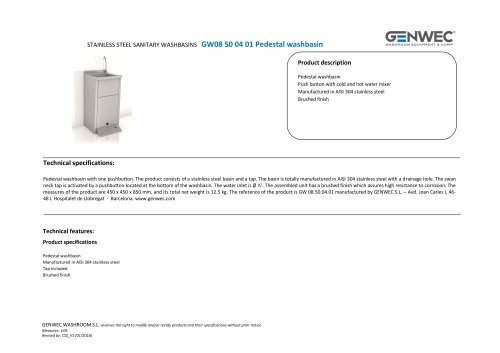
 GW08 50 04 01
12 Pages
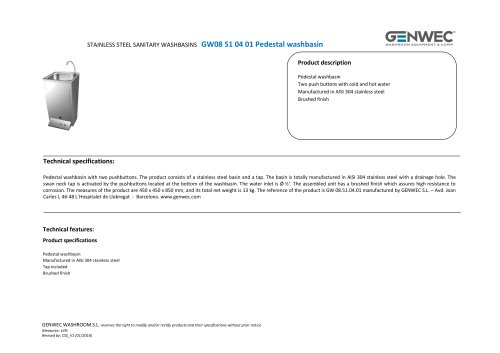
 GW08 51 04 01
12 Pages
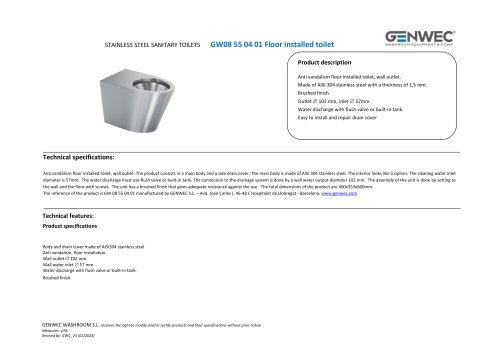 GW08 55 04 01
2 Pages
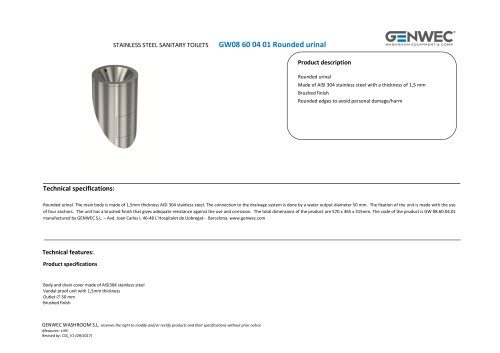 GW08 60 04 01 Rounded urinal
2 Pages
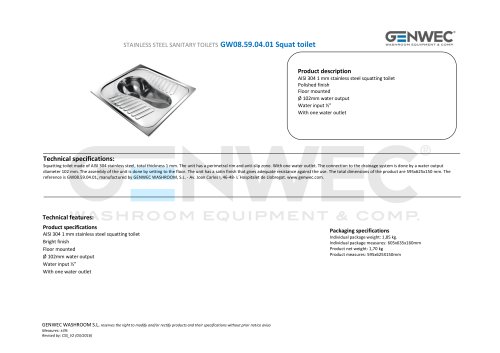 GW08.59.04.01 Squat toilet
2 Pages
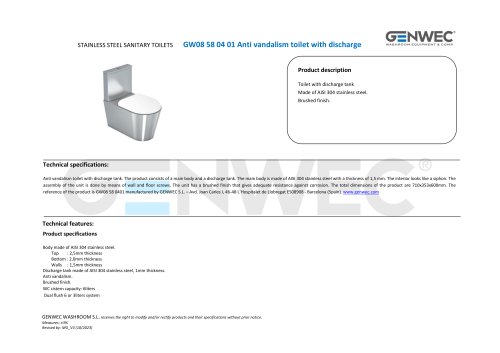 GW08 58 04 01
2 Pages
 GW07 05 04 01
1 Page
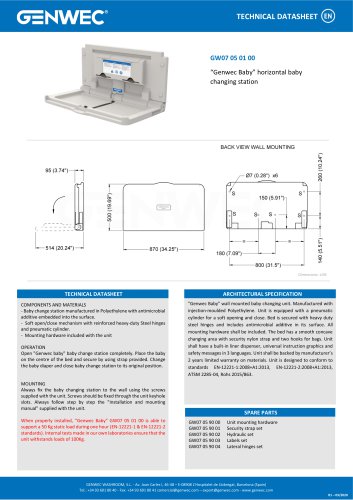 GW07 05 01 00
1 Page
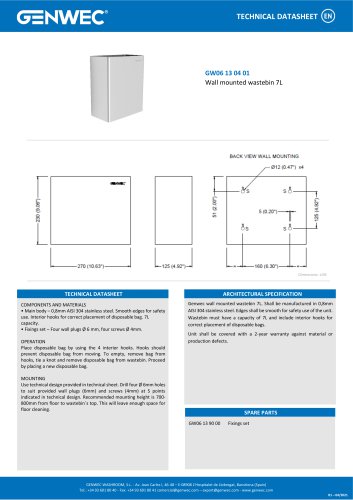 GW06 13 04 01
1 Page
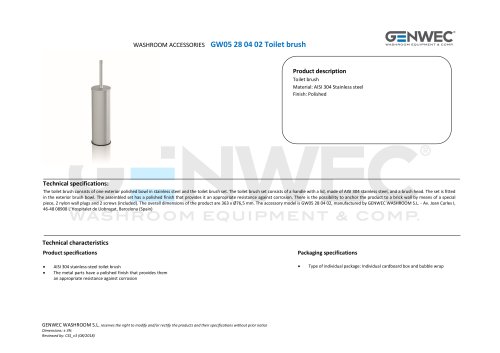 GW05 28 04 02 Toilet brush
2 Pages
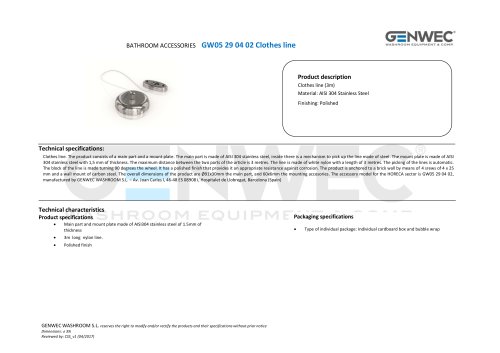 GW05 29 04 02 Clothes line
2 Pages
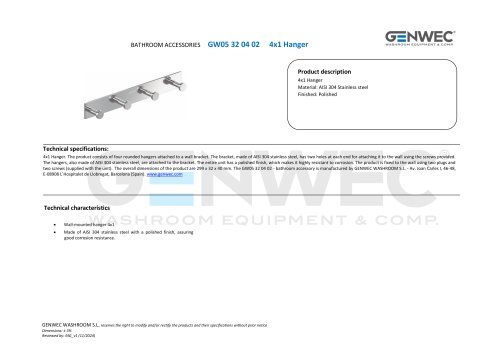 GW05 32 04 02
2 Pages
 GW04 20 04 01
8 Pages
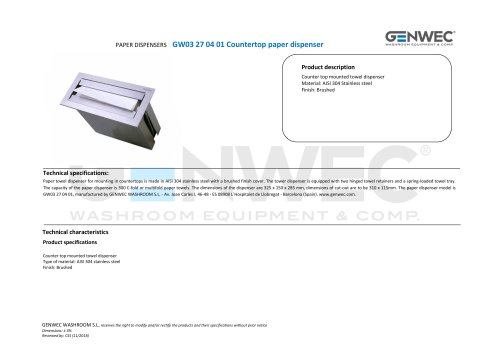 GW03 27 04 01
2 Pages
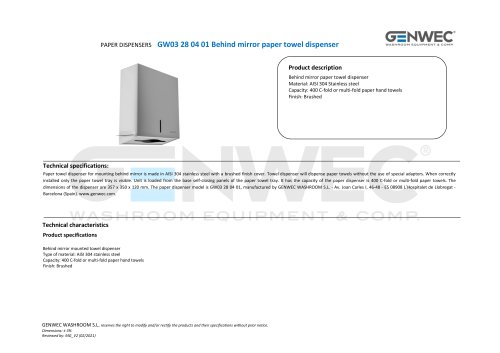 GW03 28 04 01
2 Pages
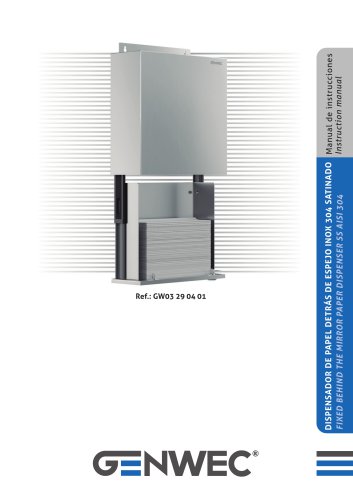
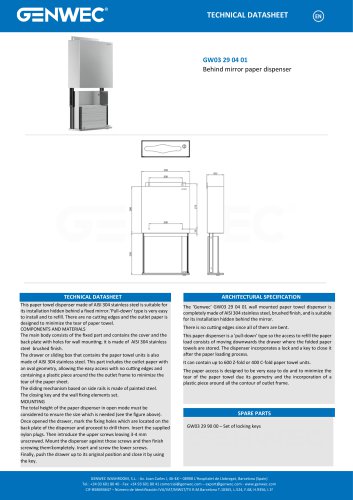 GW03 29 04 01
1 Page
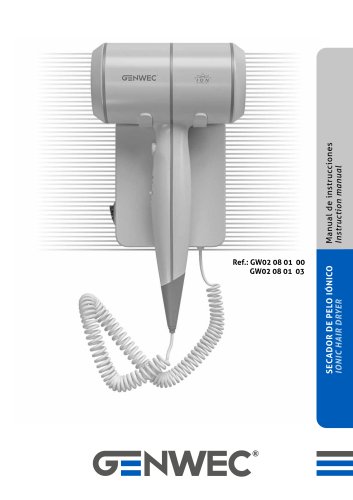 GW02 08 01 03
8 Pages
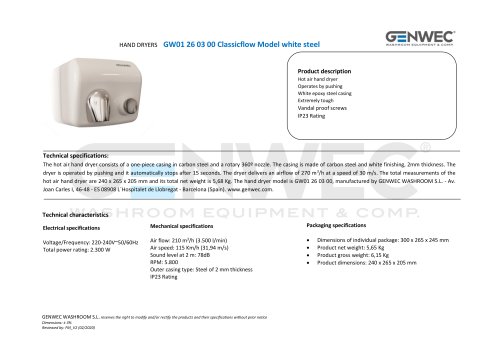 GW01 26 03 00
2 Pages
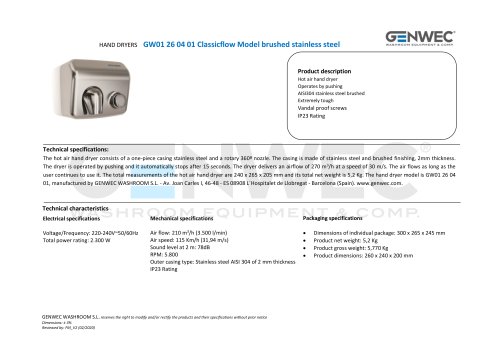 GW01 26 04 01
2 Pages
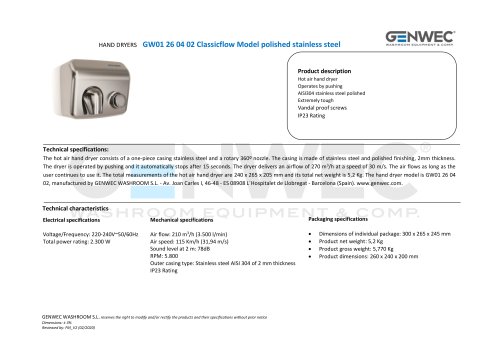 GW01 26 04 02
2 Pages
 GW01 17 Installation Manual
71 Pages
 GW01 16 01 00
20 Pages
 GW03 20 01 00 ABS
2 Pages
 GW03 19 01 04 ABS
2 Pages
 GW03 19 01 00 ABS
2 Pages
 GW03 19 01 00
2 Pages
 GW03 18 01 04
2 Pages
 GW03 18 01 00
2 Pages
 GW03 27 04 01
2 Pages
 GW03 16 04 02
2 Pages
 GW03 24 04 01
2 Pages
 GW03 04 04 02
2 Pages
 GW03 04 04 01
2 Pages
 GW03 11 04 02
2 Pages
 GW03 10 04 02
2 Pages
 GW03 13 04 01
2 Pages
 GW03 12 04 01
2 Pages
 GW03 10 04 01
2 Pages
 GW03 08 04 02
2 Pages
 GW03 28 04 01
2 Pages
 GW02 01 01 00 Hair dryer
1 Page
 GW01 40 FALCON series
2 Pages
 gw03 02
1 Page
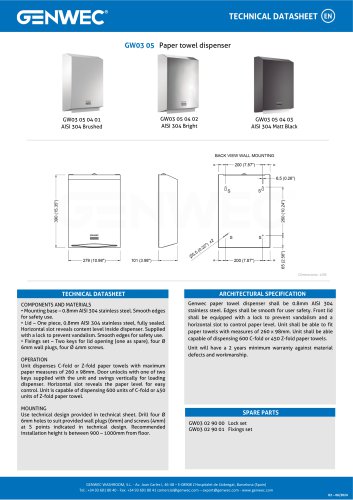
 gw03 05
1 Page
 GW04 16 01 00SM
1 Page


- Industrial tap
- Mixer faucet
- Indoor mixer tap
- Wash stand
- Contemporary wash basin
- Bathroom single-handle faucet
- Metal mixer tap
- 1-hole single-handle faucet
- Contemporary single-handle mixer tap
- Washbasin tap
- Countertop single-handle mixer tap
- Lavatory mixer tap
- Lever mixer tap
- Industrial dust-bin
- Shelves
- Contemporary litter bin
- Contemporary shelves
- Rectangular wash basin
- Commercial bin
- Countertop wash basin