
- Catalogs
- Frigidaire
- All about the Use & Care of your Wall Oven

All about the Use & Care of your Wall Oven

All about the Use & Care of your Wall Oven
This section welcomes users to their new appliance, emphasizing the importance of reading and saving the instructions for future reference. It advises attaching the sales receipt and recording the model and serial numbers.
This section provides critical safety warnings and instructions for the installation, operation, and maintenance of the wall oven. It includes warnings about potential hazards such as tipping, flammable materials, and proper installation. It advises against using the oven for storage and provides guidelines for safe operation and cleaning.
This section highlights the main features of the Frigidaire Pro and Gallery models, including the oven vent, broil element, adjustable oven racks, convection fan, and self-cleaning capabilities. It describes the electronic oven controls and design elements like the stainless steel door and large window opening.
This section explains the importance of proper air circulation in the oven and provides instructions on arranging oven racks for optimal cooking results. It describes the types of oven racks available and their specific uses.
This section introduces the control pad features and provides an overview of the various functions available, such as the pizza pad, chicken nuggets pad, and convection convert pad. Detailed instructions for each feature are provided later in the manual.
This section provides instructions for using the self-cleaning feature of the oven, emphasizing safety precautions and the importance of removing all utensils before starting the cycle.
This section offers guidelines for regular cleaning to prevent grease buildup and maintain the appliance's performance. It advises against using oven cleaners and emphasizes the importance of keeping the oven door gasket intact.
This section provides troubleshooting tips for common issues that may arise with the wall oven, helping users resolve problems before contacting customer service.
This section outlines the warranty terms for the appliance, including coverage details and the process for making a warranty claim.
This document provides detailed instructions on the operation and settings of an oven with various cooking features. It includes descriptions of control pads, temperature settings, and specific cooking modes such as bake, broil, and convection.
The oven features several control pads for different functions, including setting the clock, timer, and cooking modes. Key pads include the Delay Start Pad for scheduling cooking times, Bake Time Pad for setting baking durations, and Oven Lockout Pad for securing the oven door and control panel.
The document outlines the minimum and maximum temperature and time settings for various cooking modes. For example, the bake and convection bake modes range from 170°F to 550°F, while the self-cleaning cycle ranges from 2 to 4 hours.
The oven supports multiple cooking features, including Bake, Broil, Convection Bake, and Convection Roast, each with specific temperature ranges and uses.
The oven includes a Quick Preheat feature for rapid heating, a Keep Warm function to maintain food temperature, and a Silent Control operation for quiet use. The oven can display temperatures in Fahrenheit or Celsius.
The oven has a 6 Hour Energy Saving feature that automatically turns off the oven if left on for more than 6 hours. The Oven Lockout feature prevents accidental operation by locking the door and control panel.
The document provides tips for optimal baking, such as preheating the oven, using appropriate rack positions, and ensuring proper air circulation around cooking utensils.
Convection roasting uses multiple heating elements and a fan to circulate heat evenly, allowing for browning and sealing in juices. It can be set between 170°F to 550°F, with a default of 350°F. Tips include using a broiler pan and grid, no preheating, and ensuring proper rack placement.
This feature automatically adjusts standard baking recipes for convection baking, displaying the reduced temperature. It is used with Convection Bake mode and can be combined with Delay Start and Bake Time features.
Suitable for thicker cuts of meat, fish, and poultry, this mode uses the broil element and a fan for even heat distribution. It can be set between 300°F to 550°F, with a default of 550°F. Preheating is recommended for optimal browning.
These features allow the oven to cook for a specified time and shut off automatically. Delay Start can be set up to 12 hours in advance. Caution is advised when using these features with perishable foods.
Best for meats, fish, and poultry up to 1" thick, broiling uses direct heat for quick cooking and browning. The oven can be set between 400°F to 550°F, with a default of 550°F. Preheating is recommended, and the use of a broiler pan and insert is advised to prevent grease fires.
These preset modes optimize cooking for chicken nuggets and pizza. The Chicken Nuggets mode uses Convection Bake at 400°F for 18 minutes, while the Pizza mode offers presets for frozen (425°F) and fresh pizza (400°F). Adjustments to temperature and time can be made as needed.
For frozen pizza, use the PIZZA pad, set the temperature (default 425°F), and press START. For fresh pizza, press the PIZZA pad twice, set the temperature (default 400°F), and press START. Only bake one pizza at a time on rack position 2 for optimal results.
Allows saving frequently used cooking sequences including mode, temperature, and bake time. To save, set the desired cooking parameters and hold the MY FAVORITE pad for 3 seconds. To recall, press MY FAVORITE and START.
Maintains an oven temperature of 170°F for up to 3 hours. Can be set to turn on automatically after a bake time or delayed bake time.
Used for the Jewish Sabbath and Holidays, allows the oven to remain on continuously. Set using the BAKE, BAKE TIME, and DELAY START pads. Once activated, only specific keypads function, and the oven will not display changes.
Adjust the oven temperature by pressing BAKE for 6 seconds and entering the desired change. Temperature can be adjusted up to 35°F higher or lower.
Uses high temperatures to clean the oven, reducing soils to ash. Remove all racks and accessories before starting. Set the self-clean cycle for 2, 3, or 4 hours depending on soil level.
After completion, "HOT" will display until the oven cools down for approximately 1 hour, after which "door OPn" will appear, allowing the door to be opened. To stop or interrupt due to smoke or fire, press CANCEL. The door can be opened after cooling down for 1 hour.
Ensure the clock is set correctly and the oven door is closed. Press SELF CLEAN to set a 3-hour cycle, then START. Use DELAY START to set the desired start time, then press START. The door will lock automatically, and the cycle will begin at the set time.
Use hot, soapy water for aluminum and vinyl surfaces. Clean painted and plastic parts with mild detergent or a vinegar solution. For stainless steel, use warm soapy water; avoid abrasive cleaners. Clean porcelain enamel with a soapy scouring pad and ammonia solution. Remove oven racks for cleaning with a mild abrasive cleaner. Clean the oven door with soap and water; avoid immersing or spraying directly.
Open the door fully and pull down the hinge locks. Close to the broil stop position and lift off. To replace, align the hinge arms over the roller pins and lock the hinges.
Ensure preheating is complete before baking. Use proper rack positions and pan sizes. Adjust oven temperature if cakes are too dark or not done.
For error codes, press CANCEL and reprogram the oven. Ensure proper installation and electrical connections. For excessive smoke during broiling, adjust rack positions and prepare meat properly. Clean spills and residue before starting a self-clean cycle to avoid incomplete cleaning.
The document outlines a one-year limited warranty provided by Electrolux for appliances purchased in the USA and Canada. This warranty covers the repair or replacement of defective parts due to materials or workmanship issues, provided the appliance is used and maintained according to the instructions.
The warranty does not cover products purchased "as-is," food loss due to appliance failure, commercial use, non-defective service calls, installation corrections, accessibility expenses for servicing, consumable parts, surcharges for remote service calls, installation damages, and damages from unauthorized services or external causes.
The warranty limits remedies to repair or replacement and excludes liability for consequential or incidental damages. Implied warranties are limited to one year or the shortest period allowed by law. Some regions may have different legal rights.
Customers are advised to keep purchase receipts to establish the warranty period. Service must be obtained through Electrolux or authorized service companies, with contact information provided for both USA and Canada.
Catalog excerpts
WELCOME & CONGRATULATIONS Product Registration Register Your Product REGISTRATION CARD should be filled in completely, Electrolux Home Products. Serial Plate Location Please record your model and serial numbers below for future reference. Model Number:_ Serial Number:_ Purchase Date:_ Congratulations on your purchase of a new appliance! At Electrolux Home Products, we are very proud of our product and are completely committed to providing you with the best service possible. Your satisfaction is our We know you'll enjoy your new appliance and Thank You for choosing our product. We hope you consider...
Open the catalog to page 2
IMPORTANT SAFETY INSTRUCTIONS Read all instructions before using this appliance. Save these instructions for future reference. A This is the safety alert symbol. It is used to alert you to potential personal injury hazards. Obey all safety messages that follow this symbol to avoid possible injury This symbol will help alert you to situations that may cause serious bodily harm, death or property This symbol will help alert you to situations that may cause bodily injury or property damage. IMPORTANT indicates installation, operation or maintenance information which is important but not • Remove...
Open the catalog to page 3
IMPORTANT SAFETY INSTRUCTIONS Do not store items of interest to children in the cabinets above the appliance. Children climbing on I the cooktop to reach items could be seriously injured. • Do not leave children alone. Children should not be left alone or unattended in the area where an appliance is in use. They should never be allowed to sit or stand on any part of the appliance. • DO NOT TOUCH INTERIOR OVEN ELEMENTS OR INTERIOR SURFACES OF THE OVEN UNTIL THEY HAVE COOLED. The oven heating elements may be hot even though the elements are dark in color. Areas near the elements may become hot...
Open the catalog to page 4
IMPORTANT SAFETY INSTRUCTIONS IMPORTANT SAFETY INSTRUCTIONS FOR CLEANING YOUR OVEN • Clean the appliance regularly to keep all parts free of grease that could catch fire. Exhaust fan ventilation hoods and grease filters should be kept clean. Do not allow grease to accumulate. Greasy deposits in the fan could catch fire. Refer to the hood manufacturer's instructions for cleaning. • Cleaners/Aerosols—Always follow the manufacturer's recommended directions for use. Be aware that excess residue from cleaners and aerosols may ignite causing damage and/or injury. • Clean in the self-cleaning cycle...
Open the catalog to page 5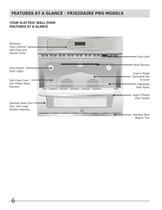
FEATURES AT A GLANCE - FRIGIDAIRE PRO MODELS YOUR ELECTRIC WALL OVEN Oven Controls Kitchen Timer Dual Interior Oven Lights Self-Clean Oven with Hidden Bake Stainless Steel Oven Door with Large Window Opening Oven Vent Broil Element Oven Racks Door Handle Stainless Steel Bottom Trim
Open the catalog to page 6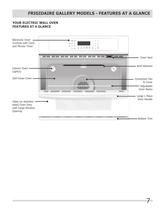
FRIGIDAIRE GALLERY MODELS - FEATURES AT A GLANCE YOUR ELECTRIC WALL OVEN Electronic Oven Controls with Clock Interior Oven Self-Clean Oven steel) Oven Door with Large Window Oven Vent Broil Element Oven Racks Door Handle Bottom Trim
Open the catalog to page 7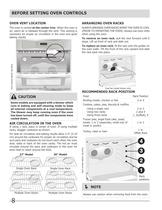
BEFORE SETTING OVEN CONTROLS OVEN VENT LOCATION The oven is vented at the center trim. When the oven is on, warm air is released through the vent. This venting is necessary for proper air circulation in the oven and good baking results. Some models are equipped with a blower which runs in baking and self-cleaning mode to keep all internal components at a cool temperature. The blower may keep running even if the oven has been turned off, until the components have If using 1 rack, place in center of oven. If using multiple racks, stagger cookware as shown. For best air circulation and baking results...
Open the catalog to page 8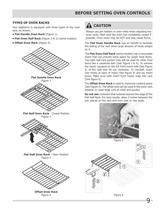
BEFORE SETTING OVEN CONTROLS TYPES OF OVEN RACKS Your appliance is equipped with three types of the oven • Flat Handle Oven Rack (Figure 1). • Flat Oven Half Rack (Figure 2 & 3) (some models). • Offset Oven Rack (Figure 4). Flat Handle Oven Rack Flat Half Oven Rack - Closed Position Flat Half Oven Rack - Open Position Offset Oven Rack Always use pot holders or oven mitts when adjusting the oven racks. Wait until the oven has completely cooled if possible. Oven racks may be HOT and may cause burns. The Flat Oven Handle Rack has an handle to facilitate the sliding of the rack when large amount...
Open the catalog to page 9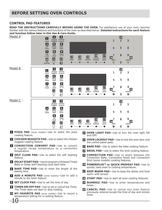
BEFORE SETTING OVEN CONTROLS READ THE INSTRUCTIONS CAREFULLY BEFORE USING THE OVEN. For satisfactory use of your oven, become familiar with the various features and functions of the oven as described below. Detailed instructions for each feature and function follow later in this Use & Care Guide. pizza nuggets convert self delay clean start powerpLus keep convert preheat warm pizza nuggets convert convert preheat warm chicken convert nuggets convert self delay clean start Clock °n-off convert preheat warm start D PIZZA PAD (some models)—Use to select the pizza cooking feature. B CHICKEN NUGGETS...
Open the catalog to page 10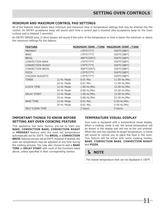
SETTING OVEN CONTROLS MINIMUM AND MAXIMUM CONTROL PAD SETTINGS All of the features listed below have minimum and maximum time or temperature settings that may be entered into the control. An ENTRY acceptance beep will sound each time a control pad is touched (the acceptance beep on the Oven Lockout pad is delayed 3 seconds). An ENTRY ERROR tone (3 short beeps) will sound if the entry of the temperature or time is below the minimum or above the maximum settings for the feature. CONVECTION BAKE CONVECTION ROAST CONVECTION BROIL CHICKEN NUGGETS CLOCK TIME DELAY START BAKE TIME SELF CLEAN TIME MINIMUM...
Open the catalog to page 11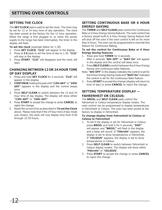
SETTING OVEN CONTROLS The SET CLOCK pad is used to set the clock. The clock may be set for 12 or 24 hour time of day operation. The clock has been preset at the factory for the 12 hour operation. When the range is first plugged in, or when the power supply to the range has been interrupted, the timer in the display will flash. To set the clock (example below for 1:30) 1. Press SET CLOCK. "CLO" will appear in the display. 2. Press 13 0 pads to set the time of day to 1:30. "CLO" will stay in the display. 3. Press START. "CLO" will disappear and the clock will CHANGING BETWEEN 12OR24 HOURTIME 1....
Open the catalog to page 12All Frigidaire catalogs and technical brochures


- Electric oven
- Extractor hood
- Range hood with built-in lighting
- Industrial range cooker
- Hob with front controls
- Built-in hob
- Industrial dishwasher
- Built-in oven
- Gas range cooker
- Industrial refrigerator
- Electric range cooker
- Ducted range hood
- Induction cooktop
- Standalone refrigerator
- Cooktop with touch controls
- Black cooktop
- Industrial freezer
- Refrigerator-freezer