
- Catalogs
- Frigidaire
- All about the Use & Care of your Refrigerator

All about the Use & Care of your Refrigerator

All about the Use & Care of your Refrigerator
This section highlights the critical safety measures for using the refrigerator, including warnings about flammable liquids, electrical shock, and child safety. Users are advised to adhere to all safety messages to prevent injury or death. Specific instructions for electrical safety include using a dedicated outlet and proper grounding.
The refrigerator features SpillSafe® adjustable shelves, with additional features available for purchase. Proper placement is advised to ensure doors can open fully.
Guidelines cover location considerations and necessary clearances for air circulation. Instructions for installing/removing the toe grille and leveling the refrigerator using front rollers are included.
Steps for removing and reinstalling refrigerator and freezer doors to fit through narrow spaces are provided, along with a list of necessary tools.
Instructions for connecting the refrigerator to a water supply include recommendations for water line materials and compliance with local plumbing codes. Priming the water supply system is emphasized for proper dispenser operation.
Sections on operating refrigerator controls and utilizing storage features effectively are included, though specific details are not provided in the excerpt.
Instructions for using and maintaining the ice and water dispenser are included, though specific details are not provided in the excerpt.
Guidance on changing the refrigerator's water filter is provided, though specific details are not included in the excerpt.
This section likely describes typical sounds and visual indicators of normal refrigerator operation, though specific details are not provided in the excerpt.
Instructions for maintaining and cleaning the refrigerator are included, though specific details are not provided in the excerpt.
Troubleshooting tips for common issues are likely provided in this section, though specific details are not included in the excerpt.
Information on the warranty coverage for the refrigerator is included, though specific details are not provided in the excerpt.
- Basic tools: adjustable wrench, flat-blade screwdriver, and Phillips screwdriver.
- Access to a household cold water line with water pressure between 30 and 100 psi.
- A water supply line made of ¼ inch (6.4mm) OD, copper or stainless steel tubing.
- A shutoff valve to connect the water supply line to your household water system (avoid self-piercing type).
- A compression nut and ferrule for connecting a copper water supply line to the ice maker inlet valve.
- Disconnect refrigerator from electric power source.
- Flush the water supply line until water is clear, then turn off the water supply.
- Remove the plastic cap from the water valve inlet.
- For copper tubing: Slide brass compression nut and ferrule onto the line, insert into valve inlet, and tighten.
- For stainless steel tubing: Slide compression nut onto valve inlet and tighten.
- Secure water supply line to the refrigerator's rear panel.
- Coil excess water supply line behind the refrigerator.
- Turn on the water supply and check for leaks.
- Reconnect refrigerator to electrical power source and turn on the ice maker.
- Allow the refrigerator to operate with doors closed for 8-12 hours before loading with food.
- Adjust temperatures gradually; use the control knobs or digital display for adjustments.
- Ensure good air circulation by not blocking cold air vents.
- Adjust Fresh Food and Freezer controls as needed for desired temperature.
- Use the digital control panel for precise temperature settings.
- If temperature displays flash, contact service representative.
- Adjustable cantilever glass shelves and SpillSafe glass shelves for easy access and cleaning.
- Door bins for convenient storage of jars, bottles, and cans.
- Fresh drawers with humidity control for storing fruits and vegetables.
- Chill Drawer for short-term storage of bulk meat items.
- Features include Extreme Freeze, Extra Ice, Cube, Crush, Light, Filter Status, and Lock functions.
- Priming the water supply system is necessary for initial setup.
- Ensure proper function by connecting the water supply immediately or turning off the ice maker if not in use.
To prime the water supply system, begin by pressing a drinking glass against the water dispenser paddle until water flows, which may take about 1½ minutes. Continue dispensing water for four minutes to flush impurities.
The ice maker is located in the freezer compartment and can produce ice within 24 hours after installation. Ensure the water supply system is primed to avoid discolored or odd-flavored ice cubes. The water dispenser has a shutoff device that activates after three minutes of continuous use.
For side-mounted ice makers, lower the wire signal arm to start ice production and raise it to stop. For rear-mounted ice makers, use the ON/OFF power switch.
Side-mounted ice makers produce 4 to 4.5 pounds of ice every 24 hours, while rear-mounted ones produce 3 to 4 pounds. Small ice cubes or chips may indicate a need to change the water filter.
Regularly clean the ice maker and bin, especially before vacations. Remove the ice bin to clean and dry it thoroughly before replacing it.
The water filter is located in the fresh food compartment. Replace it every six months or after 200 gallons of water have been filtered. Follow the steps to replace the filter without turning off the water supply.
Various sounds such as boiling, hissing, or clicking are normal and indicate proper operation.
Regular cleaning of the refrigerator maintains its appearance and prevents odors. Use appropriate cleaning agents for different parts and avoid abrasive materials.
If the ice maker is not producing ice, check the wire signal arm position, power switch, and water supply valve.
- Insufficient Ice Production: Check if the water dispenser is slow, replace the filter cartridge if clogged, and ensure the household water line valve is open.
- Ice Maker Overproduction: Ensure no items are obstructing the wire signal arm.
- Ice Cubes Freezing Together: Use ice more frequently, replace clogged filter cartridges, and adjust freezer settings to colder.
- Non-Dispensing Ice: Ensure the ice storage container is filled, the freezer is cold enough, and the water line valve is open.
- Jammed Dispenser: Thaw and clean the ice container if ice has melted and refrozen.
- Doors Not Closing: Ensure the refrigerator is level and not touching walls or cabinets.
- Drawers Difficult to Move: Remove excess items and clean the drawer tracks.
- Compressor Not Running: Check freezer control settings, ensure the plug is connected, and verify power supply.
- Excessive Running: Minimize door openings, clean gaskets, and ensure the condenser is clean.
- Non-Dispensing Water: Open the water line valve and ensure the filter is properly installed.
- Odd Taste or Odor: Flush the water tank and ensure proper connection to the cold water line.
- Moisture Inside Refrigerator: Ensure doors are fully closed and adjust humidity settings if available.
- Moisture Outside Refrigerator: Normal in humid weather; ensure doors are properly closed.
- One-year limited warranty covering defects in materials or workmanship.
- Exclusions include rust, commercial use, and improper installation or use.
- Service must be obtained through Electrolux or authorized service companies.
Catalog excerpts
IMPORTANT SAFETY INSTRUCTIONS Please read all instructions before using this • DO NOT store or use gasoline, or other flammable liquids in the vicinity of this or any other appliance. Read product labels for warnings regarding flammability and other hazards. • DO NOT operate the refrigerator in the presence of explosive fumes. • Avoid contact with any moving parts of automatic • Remove all staples from the carton. Staples can cause severe cuts, and also destroy finishes if they come in contact with other appliances or furniture. A This is the safety alert symbol. It is used to alert you to potential...
Open the catalog to page 2
IMPORTANT SAFETY INSTRUCTIONS Child Safety Destroy or recycle the carton, plastic bags, and any exterior wrapping material immediately after the refrigerator is unpacked. Children should NEVER use these items to play. Cartons covered with rugs, bedspreads, plastic sheets or stretch wrap may become airtight chambers, and can quickly cause suffocation. Proper Disposal of your Refrigerator or Risk of child entrapment Child entrapment and suffocation are not problems of the past. Junked or abandoned refrigerators or freezers are still dangerous - even if they will sit for "just a few days". If you...
Open the catalog to page 3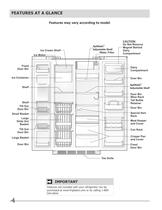
Features may vary according to model Small Basket - Large Basket - Adjustable Shelf Water Filter Adjustable Shelf Wine Rack Tall Bottle Special Item Meat Keeper Features not included with your refrigerator can be purchased at www.frigidaire.com or by calling 1-800-
Open the catalog to page 4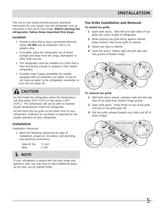
This Use & Care Guide provides general operating instructions for your model. Use the refrigerator only as instructed in this Use & Care Guide. Before starting the refrigerator, follow these important first steps. • Choose a place that is near a grounded electrical outlet. Do Not use an extension cord or an adapter plug. • If possible, place the refrigerator out of direct sunlight and away from the range, dishwasher or other heat sources. • The refrigerator must be installed on a floor that is level and strong enough to support a fully loaded • Consider water supply availability for models equipped...
Open the catalog to page 5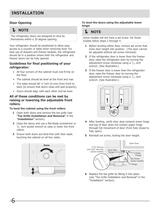
Door Opening I The refrigerator doors are designed to shut by themselves within a 20 degree opening. Your refrigerator should be positioned to allow easy access to a counter or table when removing food. For best use of drawers and freezer baskets, the refrigerator should be in a position where both the refrigerator and freezer doors can be fully opened. Guidelines for final positioning of your • All four corners of the cabinet must rest firmly on • The cabinet should be level at the front and rear. • The sides should tilt 1A inch (6 mm) from front to back (to ensure that doors close and seal...
Open the catalog to page 6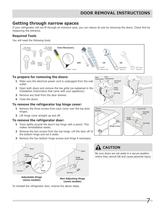
DOOR REMOVAL INSTRUCTIONS Getting through narrow spaces If your refrigerator will not fit through an entrance area, you can reduce its size by removing the doors. Check first by Required Tools You will need the following tools: Cover Front Tools Necessary: -Hinge Bottom Screw Hinge- Phillips Head To prepare for removing the doors: 1 Make sure the electrical power cord is unplugged from the wall 2 Open both doors and remove the toe grille (as explained in the Installation Instructions that came with your appliance). 3 Remove any food from the door shelves. To remove the refrigerator top hinge...
Open the catalog to page 7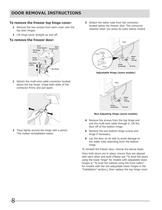
DOOR REMOVAL INSTRUCTIONS To remove the freezer top hinge cover: 1 Remove the two screws from each cover over the 2 Lift hinge cover straight up and off. To remove the freezer door: 1 Detach the multi-wire cable connector located above the top hinge. Grasp both sides of the connector firmly and pull apart. 2 Trace lightly around the hinge with a pencil. This makes reinstallation easier. 3 Detach the water tube from the connector located below the freezer door. The connector releases when you press its outer sleeve inward. Adjustable Hinge (some models) Assembly Screws Non-Adjusting Hinge (some...
Open the catalog to page 8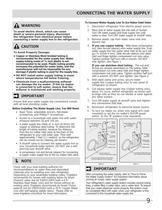
CONNECTING THE WATER SUPPLY To avoid electric shock, which can cause death or severe personal injury, disconnect the refrigerator from electrical power before connecting a water supply line to the refrigerator. To Avoid Property Damage: • Copper or Stainless Steel braided tubing is recommended for the water supply line. Water supply tubing made of 1A inch plastic is not recommended to be used. Plastic tubing greatly increases the potential for water leaks, and the manufacturer will not be responsible for any damage if plastic tubing is used for the supply line. • DO NOT install water supply tubing...
Open the catalog to page 9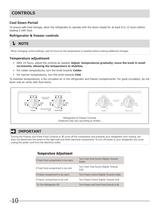
Cool Down Period To ensure safe food storage, allow the refrigerator to operate with the doors closed for at least 8 to 12 hours before loading it with food. Refrigerator & freezer controls When changing control settings, wait 24 hours for the temperature to stabilize before making additional changes. Temperature adjustment • After 24 hours, adjust the controls as needed. Adjust temperatures gradually; move the knob in small increments, allowing the temperature to stabilize. • For colder temperatures, turn the knob towards Colder. • For warmer temperatures, turn the knob towards Cold. To maintain...
Open the catalog to page 10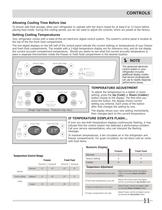
Allowing Cooling Time Before Use To ensure safe food storage, allow your refrigerator to operate with the doors closed for at least 8 to 12 hours before placing food inside. During this cooling period, you do not need to adjust the controls, which are preset at the factory. Setting Cooling Temperatures Your refrigerator comes with a state-of-the-art electronic digital control system. The system's control panel is located at the top of the the fresh food compartment. The two digital displays on the left half of the control panel indicate the current settings or temperatures of your freezer and...
Open the catalog to page 11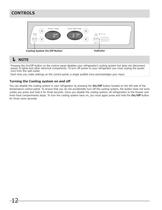
Cooling System On/Off Button Indicator Pressing the On/Off button on the control panel disables your refrigerator's cooling system but does not disconnect power to lights and other electrical components. To turn off power to your refrigerator you must unplug the power cord from the wall outlet. Each time you make settings on the control panel, a single audible tone acknowledges your input. Turning the Cooling system on and off You can disable the cooling system in your refrigerator by pressing the On/Off button located on the left side of the temperature control panel. To ensure that you do not...
Open the catalog to page 12All Frigidaire catalogs and technical brochures


- Oven
- Electric oven
- Extractor hood
- Range hood with built-in lighting
- Industrial hob
- Industrial range cooker
- Hob with front controls
- Built-in hob
- Built-in oven
- Gas range cooker
- Electric range cooker
- Ducted range hood
- Standalone refrigerator
- Cooktop with touch controls
- Induction cooktop
- Refrigerator-freezer
- Front-loading dishwasher