Catalog excerpts
Connecting Water Supply to Freezer. www.frigidaire.com USA 1-800-944-9044 www.frigidaire.ca Canada 1-800-265-8352
Open the catalog to page 1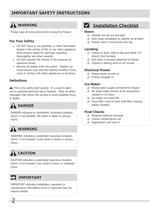
IMPORTANT SAFETY INSTRUCTIONS Please read all instructions before using this freezer. • DO NOT store or use gasoline, or other flammable liquids in the vicinity of this or any other appliance. Read product labels for warnings regarding flammability and other hazards. • DO NOT operate the freezer in the presence of explosive fumes. • Remove all staples from the carton. Staples can cause severe cuts, and also destroy finishes if they come in contact with other appliances or furniture. A This is the safety alert symbol. It is used to alert you to potential personal injury hazards. Obey all...
Open the catalog to page 2
IMPORTANT SAFETY INSTRUCTIONS Child Safety Destroy or recycle the carton, plastic bags, and any exterior wrapping material immediately after the freezer is unpacked. Children should NEVER use these items to play. Cartons covered with rugs, bedspreads, plastic sheets or stretch wrap may become airtight chambers, and can quickly cause suffocation. Proper Disposal of your Freezer Risk of child entrapment Child entrapment and suffocation are not problems of the past. Junked or abandoned freezers or freezers are still dangerous - even if they will sit for "just a few days". If you are getting...
Open the catalog to page 3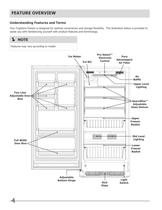
FEATURE OVERVIEW Understanding Features and Terms Your Frigidaire freezer is designed for optimal convenience and storage flexibility. The illustration below is provided to assist you with familiarizing yourself with product features and terminology. Features may vary according to model. Adjustable Door Full Width Door Bins Control Advantage® Bottom Hinge Upper Level Glass Shelves
Open the catalog to page 4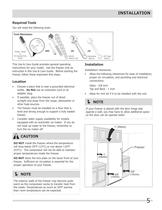
Required Tools You will need the following tools: Tools Necessary Phillips Head This Use & Care Guide provides general operating instructions for your model. Use the freezer only as instructed in this Use & Care Guide. Before starting the freezer, follow these important first steps. • Choose a place that is near a grounded electrical outlet. Do Not use an extension cord or an adapter plug. • If possible, place the freezer out of direct sunlight and away from the range, dishwasher or other heat sources. • The freezer must be installed on a floor that is level and strong enough to support a...
Open the catalog to page 5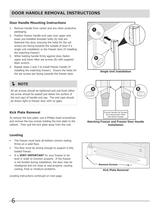
DOOR HANDLE REMOVAL INSTRUCTIONS Door Handle Mounting Instructions 1. Remove handle from carton and any other protective 2. Position freezer handle end caps over upper and lower pre-insta I led shoulder bolts (A) that are fastened into door, ensuring the holes for the set screws are facing towards the outside of door if a single unit installation or the freezer door (if installing 3. While holding handle firmly against door, fasten upper and lower Allen set screws (B) with supplied Allen wrench. 4. Repeat steps 2 and 3 to install freezer handle (if installing the matching freezer). Ensure...
Open the catalog to page 6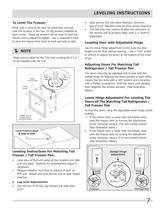
LEVELING INSTRUCTIONS While unit is lying on its back for wood skid removal, note the location of the four (4) leg levelers installed at each corner. These leg levelers will be used to level the freezer and to adjust the height. Use a carpenter's level to level the freezer from front to back and side to side. Make sure to allow for the Trim and Leveling Kit if it is to be installed with the unit. Crating Screws Level Front to Back Leveling Instructions For Matching Tall Freezer /Tall Freezer Pair: • Level door of first unit using all four levelers and slide unit into place. Recheck for...
Open the catalog to page 7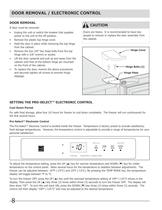
DOOR REMOVAL / ELECTRONIC CONTROL DOOR REMOVAL If door must be removed: • Unplug the unit or switch the breaker that supplies power to the unit to the off position. • Remove the plastic top hinge cover. • Hold the door in place while removing the top hinge • Remove the two 3/8" hex head bolts from the top hinge with a 3/8" wrench or socket. • Lift the door upwards and pull up and away from the cabinet until free of the bottom hinge pin mounted • To replace the door, reverse the above procedures and securely tighten all screws to prevent hinge Doors are heavy. It is recommended to have two...
Open the catalog to page 8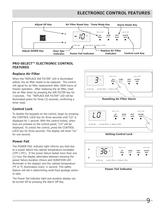
ELECTRONIC CONTROL FEATURES Air Filter Reset Key Temp Mode Key press & hold mode alert control F°-C° reset lock Ì • door ajar • power failure • replace air filter Door Ajar —f I '— Replace Air Filter Indicator Power Fail Indicator Indicator Control Lock Key PRO-SELECT™ ELECTRONIC CONTROL When the "REPLACE AIR FILTER" LED is illuminated yellow, the air filter needs to be replaced. The control will signal for air filter replacement after 3600 hours of freezer operation. After replacing the air filter, reset the air filter timer by pressing the AIR FILTER key for 3 seconds. The "REPLACE AIR...
Open the catalog to page 9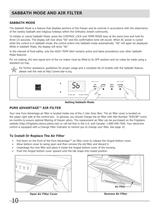
SABBATH MODE AND AIR FILTER SABBATH MODE The Sabbath Mode is a feature that disables portions of the freezer and its controls in accordance with the observance of the weekly Sabbath and religious holidays within the Orthodox Jewish community. To initiate or cancel Sabbath Mode, press the CONTROL LOCK and TEMP MODE keys at the same time and hold for three (3) seconds. The display will now show "Sb" and the confirmation tone will sound. When AC power is cycled while the control is in Sabbath mode, the control enters into Sabbath mode automatically. "Sb" will again be displayed. While in...
Open the catalog to page 10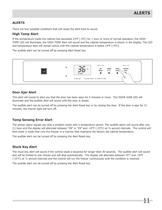
There are four possible conditions that will cause the alert tone to sound. High Temp Alert If the temperature inside the cabinet has exceeded 23°F (-5°C) for 1 hour or more of normal operation, the HIGH TEMP LED will illuminate, the HIGH TEMP Alert will sound and the cabinet temperature is shown in the display. The LED and temperature alert will remain active until the cabinet temperature is below 23°F (-5°C). The audible alert can be turned off by pressing Alert Reset key. Door Ajar Alert This alert will sound to alert you that the door has been open for 5 minutes or more. The DOOR AJAR...
Open the catalog to page 11
