BIRDIE+1X+Soffitto-Ceiling
1 /2Pages

BIRDIE+1X+Soffitto-Ceiling
1 /2Pages
Catalog excerpts
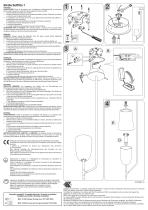
Birdie Soffitto 1 ITALIANO AVVERTENZE: Prima di procedere con l’installazione dell’apparecchio e comunque prima di ogni operazione di manutenzione togliere la tensione di rete. 1 Fissare la piastra al soffitto con i tasselli. 2 Montare il braccio e bloccarlo con la rondella dentellata e il dado. Utilizzare una chiave o una pinza per stringere a fondo i dadi. 3 A- Collegare i due morsetti di terra al cavo giallo/verde proveniente dal soffitto e a quello proveniente dal rosone. B- Collegare i cavi di alimentazione al morsetto e chiudere lo scatolino. C- Posizionare il rosone e bloccarlo con le viti. 4 D- Inserire la lampadina. E- Inserire il diffusore nella montatura come indicato in figura. ISTRUZIONI PER LA PULIZIA: Non utilizzare alcool o solventi. Per la pulizia della lampada utilizzare esclusivamente un panno morbido eventualmente inumidito con acqua e sapone o detersivo neutro per lo sporco più tenace. ENGLISH WARNING: Always unplug the appliance from the power socket before beginning installation or any sort of maintenance work. 1 Screw back plate to ceiling with elements. 2 Install arm and secure with washer and nut. Use a wrench or pliers to tighten nut. 3 A- Connect the two earth terminals to the yellow/green cable coming from the ceiling and to the cable coming from the canopy. B- Connect the wires using the terminal block and close the terminal block protection. C- Place the canopy and block it with the screws. 4 D- Plug in bulb. E- Install the lampshade on the structure as shown in the picture. CLEANING INSTRUCTIONS: Do not use alcohol or other solvents. Use only a soft cloth to clean the lamp, dampened with water and soap or mild cleanser if needed for resistant dirt. FRANÇAIS ATTENTION: Avant de procéder à l'installation de l'appareil, ainsi qu'avant toute opération d'entretien, il est nécessarie de couper le courant au disjoncteur. 1 Fixer le support au plafond avec les éléments. 2 Monter le bras et le bloquer au moyen de l'écrou et du contre-écrou dentelé. Serrer l'écrou à fond avec une clé. 3 A- Brancher les deux bornes de terre au câble jaune/vert provenant du plafond et au câble provenant du cache piton. B- Connecter le câble d'alimentation à la borne et fermez la boite. C- Placer la rosace et la bloquer avec les vis. 4 D- Insérer l'ampoule. E- Positionner le diffuseur sur la structure comme indiqué dans le croquis. INSTRUCTIONS POUR LE NETTOYAGE: Ne pas utiliser d’alcool ou solvents. Pour le nettoyage de la lampe utiliser exclusivement un chiffon doux, humectè si nécessaire, avec de l’eau et du savon ou avec un dédergent neutre pour les salissures les plus tenaces. DEUTSCH WICHTIGE HINWEISE: Vor Installation des Geräts und vor Durchführung von Wartungsarbeiten gleich welcher Art den Strom abschalten. 1 Befestigen Sie die Halterung an der Decke mit den Elementen. 2 Den Arm montieren und mit Unterlegscheibe und Mutter befestigen. Die Mutter mit einem Schraubschlüssel fest anziehen. 3 A- Die zwei Erdungsklemmen an das grüne-gelbe Kabel aus der Decke und an das Kabel aus dem Baldachin anschliessen. B-Verbinden Sie die Zuleitungskabel mit der Lüsterklemme uns schließend Sie die Schachtel. C-Den Baldachin einsetzen mit den Schrauben feststellen. 4 D- Die Glühlampe einsetzen. E- Den Schirm wie im Bild um das Leuchtmittel einlegen. REINIGUNGSVORSCHRIFTEN: Weder Alkohol noch Lösungsmittel verwenden. Bei der Reinigung der Leuchte darf man ausschließlich weiche Tücher verwenden. Eventuell kann man dies emit Wasser und Seife oder mit einem neutralen Reinigungsmittel anfeuchten. ESPAÑOL ADVERTENCIAS: Antes de proceder a la instalaciòn del aparato y en cualquier caso antes de efectuar cualquier operaciòn de mantenimiento, corte la tension de red. 1 Fijar la pletina al techo con los elementos. 2 Montar el brazo y fijarlo con la arandela dentada y la tuerca, utlizando una llave para apretar a fondo la tuerca. 3 A- Conectar las dos regletas de tierra con el cable amarillo/verde del techo y con el del florón. B- Connectar el cable de alimentación a la regleta y cerrar el cajoncito. C- Posicionar el rosetón bloqueandolo con los tornillos. 4 D- Colocar la bombilla. E- Meter el difusor sobre la montura como indicada en figura. INSTRUCCIONES PARA LIMPIAR LA LÁMPARA: No emplear alcohol ni disolventes. Para la limpieza de la lámpara, utilizar exclusivamente un paño suave. En caso de suciedad más resistente, humedecer el paño con agua y jabón o un detergente neutro. Attesta la conformita' del prodotto alle disposizioni delle direttive comunitarie. It certifies the conformity of the product to the european community low voltage directive. Il atteste la conformité du produit aux dispositions des directives communautaires. Das Zeichen bestätigt die Übereinstimmung des Produkts mit den Bestimmungen der EU-Richtlinien. Esta certifica si el producto es conforme a las disposiciones de las normas de la comunidad economica europea. Apparecchio in Classe I°: e' obbligatoria la connessione al conduttore di protezione giallo/verde (messa a terra). Class I luminaire: it' s necessary to connect the device to the yellow/green protective conductor (earthing). Il est obligatoire la connexion au conducteur de protection jaune/vert (mise à la terre) Alle berûhrbaren Metallteile sind elektrisch leitend miteinander verbunden und werden mit dem Netz-Schutzleiter verbunden. Aparato en clase I: es obligatoria la conexiòn al conductor de protecctiòn Amarillo/verde (toma de tierra). Apparecchi progettati esclusivamente per lampade ad alogeni autoprotette. Luminaires designed for use with self-shielded tungsten halogen lamps only. Systèmes conçus exclusivement pour lampes halogènes autoprotégées. Eigens für gesicherte Halogenglühbirnen konzipierte Lampen Aparatos diseñados exclusivamente para bombillas halógenas autoprotegidas. Lampadine compatibili / Compatible light bulbs / Ampoules compatibles / Verträgliche leuchtmittel / Bombillas compatibles MAX 1x70W Halogen Energy Saver E27 250V 50Hz MAX 1x25W Fluorescent Energy Saving E27 250V 50Hz Certifica la conformità di un prodotto rispetto alle norme EN. I paesi che hanno sottoscritto l'accordo riconoscono il marchio ENEC allo stesso modo che il proprio marchio nazionale. It certifies the compliance of a product with the EN standards. ENEC is considered by the countries that signed the agreement as valid as their own national mark. ENEC est le gage de la conformité d’un produit aux normes EN. La marque ENEC peut être délivrée dans le monde entier, à l'exception des luminaires, où elle ne peut être attribuée qu'à des fabricants européens. Mit diesem Prüfzeichen wird die Übereinstimmung eines Produktes mit EN-Normen zertifiziert. Das ENEC-Prüfzeichen wird von den Ländern, die das Abkommen unterzeichneten, wie ein eigenes nationales Prüfzeichen akzeptiert. La marca ENEC certifica la conformidad de un producto con las normas EN. Los países firmantes del acuer
Open the catalog to page 1All FOSCARINI catalogs and technical brochures
 eu-en-sos-caboche
8 Pages
 eu-en-pa-caboche
7 Pages
 eu-en-pa-bahia-mini
4 Pages
 eu-en-sof-twiggy
4 Pages
 eu-en-sof-caboche
6 Pages
 eu-en-out-gregg-terra
5 Pages
 eu-en-out-havana-terra
5 Pages
 eu-en-sos-le-soleil
5 Pages
 eu-en-sos-gregg
8 Pages
 eu-en-sos-spokes-1
5 Pages
 eu-en-te-twiggy
5 Pages
 eu-en-out-gregg-sospensione
5 Pages
 eu-en-out-solar
4 Pages
 News April 2019
52 Pages
 Mix&Match, News September 2019
29 Pages
 MyLight
16 Pages
 Outdoor, News January 2018
84 Pages
 Twiggy Grid XL
4 Pages
 Superficie
4 Pages
 KURAGE
3 Pages
 BUDS TAVOLO
3 Pages
 Caiigo
3 Pages
 Twice as Twiggy, suspension
3 Pages
 Lumiere XXL+XXS
3 Pages
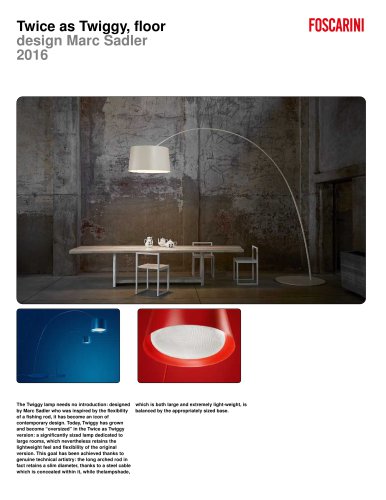 Twice as Twiggy
3 Pages
 Buds
Buds3 Pages
 outdoor libretto
36 Pages
 FOSCARINI NEWS SEPT 2015
27 Pages
 NEWS APRILE
27 Pages
 AMBIENTI
117 Pages
 NEWS SETTEMBRE 2016
17 Pages
 PANORAMICA
73 Pages
 NUOVO idee du luce
27 Pages
 BLOB
BLOB2 Pages
 BIT
BIT2 Pages
 Foscarini-COLLEZIONI
199 Pages
 Foscarini_News_2016
27 Pages
 Tartan
3 Pages
 Bahia mini wall
3 Pages
 tite
tite4 Pages
 Chouchin
5 Pages
 Plass media
3 Pages
 Spokes
3 Pages
 New Buds
4 Pages
 BIG BANG
8 Pages
 LUMIERE
8 Pages
 BEHIVE
8 Pages
 MITE
MITE12 Pages
 STEWIE
8 Pages
 OSPACE
8 Pages
 ALLEGRO
8 Pages
 SUPERNOVA
8 Pages
 GREGG
GREGG8 Pages
 CABOCHE
12 Pages
 TWIGGY
12 Pages
 TROPICO
12 Pages
 HAVANA
8 Pages
 UTO
UTO8 Pages
 MAGNETO
8 Pages
 YOKO
YOKO8 Pages
 PLASS
PLASS12 Pages
 DOLL
DOLL12 Pages
 BOOK 2014
340 Pages
 RITUALS
8 Pages
 LED COLLECTION
21 Pages
 ANISHA
8 Pages
 JAMAICA
8 Pages
 BINIC
BINIC12 Pages
 NEWS 04 2014
52 Pages


Archived catalogs
 YOKO TABLE
3 Pages
 STEWIE FLOOR
3 Pages
 DOLL
DOLL16 Pages
 NEWS 01- 2013
28 Pages
 NEWS 04- 2013
36 Pages
 WORKS 2013
106 Pages
 BOOK 2013
165 Pages
 COMPANY PROFILE
27 Pages
 NEWS 04 - 2012
28 Pages
 APLOMB
5 Pages
 BINIC
BINIC9 Pages
 WORKS 11
80 Pages
 NEWS 01 - 2011
11 Pages
 NEWS 04 - 2011
33 Pages
 BOOK 11
219 Pages
 NEWS 09 - 2011
15 Pages
 NEWS 01 - 2012
21 Pages
 FOSCARINI EVOLUTION
2 Pages
 FARLEGGERO
100 Pages
 TRASPARENZA
106 Pages
 LIGHT & SOUND
130 Pages
 LUX
LUX130 Pages
 COLORE
111 Pages
 LAMPADE E LAMPADINE
100 Pages
 MATERIA E NON MATERIA
39 Pages
 VISIBILE E INVISIBILE
68 Pages
 ANISHA
2 Pages