

L2

L2
- Fingerprint Verification Issues: Ensure correct pressure during scanning to avoid recognition failures.
- Motor and Door Opening Issues: Check for loose connections or motor faults if the motor does not work after verification.
- Keypad and Power Issues: Check battery installation or replace batteries if the keypad is unresponsive. Use an external power supply or mechanical key if necessary.
- Fingerprint Reader Issues: If unresponsive, the reader may need professional inspection and replacement.
- Lock Operation Issues: If the lock remains open, it may be due to clutch component faults or remaining open mode.
- Main Bolt Issues: Misalignment due to door deformation may require professional inspection.
Catalog excerpts
COPYRIGHT © Hangzhou EZVIZ Software Co., Ltd.. ALL RIGHTS RESERVED. Any and all information, including, among others, wordings, pictures, graphs are the properties of Hangzhou EZVIZ Software Co., Ltd. (hereinafter referred to as “EZVIZ”). This user manual (hereinafter referred to as “the Manual”) cannot be reproduced, changed, translated, or distributed, partially or wholly, by any means, without the prior written permission of EZVIZ. Unless otherwise stipulated, EZVIZ does not make any warranties, guarantees or representations, express or implied, regarding to the Manual. About this Manual The Manual includes instructions for using and managing the product. Pictures, charts, images and all other information hereinafter are for description and explanation only. The information contained in the Manual is subject to change, without notice, due to firmware updates or other reasons. Please find the latest version in the ™ website (http://www.ezvizlife.com). Revision Record New release – January, 2019 Trademarks Acknowledgement ™, ™, and other EZVIZ’s trademarks and logos are the properties of EZVIZ in various jurisdictions. Other trademarks and logos mentioned below are the properties of their respective owners. Legal Disclaimer TO THE MAXIMUM EXTENT PERMITTED BY APPLICABLE LAW, THE PRODUCT DESCRIBED, WITH ITS HARDWARE, SOFTWARE AND FIRMWARE, IS PROVIDED “AS IS”, WITH ALL FAULTS AND ERRORS, AND EZVIZ MAKES NO WARRANTIES, EXPRESS OR IMPLIED, INCLUDING WITHOUT LIMITATION, MERCHANTABILITY, SATISFACTORY QUALITY, FITNESS FOR A PARTICULAR PURPOSE, AND NON-INFRINGEMENT OF THIRD PARTY. IN NO EVENT WILL EZVIZ, ITS DIRECTORS, OFFICERS, EMPLOYEES, OR AGENTS BE LIABLE TO YOU FOR ANY SPECIAL, CONSEQUENTIAL, INCIDENTAL, OR INDIRECT DAMAGES, INCLUDING, AMONG OTHERS, DAMAGES FOR LOSS OF BUSINESS PROFITS, BUSINESS INTERRUPTION, OR LOSS OF DATA OR DOCUMENTATION, IN CONNECTION WITH THE USE OF THIS PRODUCT, EVEN IF EZVIZ HAS BEEN ADVISED OF THE POSSIBILITY OF SUCH DAMAGES. TO THE MAXIMUM EXTENT PERMITTED BY APPLICABLE LAW, IN NO EVENT SHALL EZVIZ’S TOTAL LIABILITY FOR ALL DAMAGES EXCEED THE ORIGINAL PURCHASE PRICE OF THE PRODUCT. EZVIZ DOES NOT UNDERTAKE ANY LIABILITY FOR PERSONAL INJURY OR PROPERTY DAMAGE AS THE RESULT OF PRODUCT INTERRUPTION OR SERVICE TERMINATION CAUSED BY: A) IMPROPER INSTALLATION OR USAGE OTHER THAN AS REQUESTED; B) THE PROTECTION OF NATIONAL OR PUBLIC INTERESTS; C) FORCE MAJEURE; D) YOURSELF OR THE THIRD PARTY, INCLUDING WITHOUT LIMITATION, USING ANY THIRD PARTY’S PRODUCTS, SOFTWARE, APPLICATIONS, AND AMONG OTHERS. REGARDING TO THE PRODUCT WITH INTERNET ACCESS, THE USE OF PRODUCT SHALL BE WHOLLY AT YOUR OWN RISKS. EZVIZ SHALL NOT TAKE ANY RESPONSIBILITES FOR ABNORMAL OPERATION, PRIVACY LEAKAGE OR OTHER DAMAGES RESULTING FROM CYBER ATTACK, HACKER ATTACK, VIRUS INSPECTION, OR OTHER INTERNET SECURITY RISKS; HOWEVER, EZVIZ WILL PROVIDE TIMELY TECHNICAL SUPPORT IF REQUIRED.SURVEILLANCE LAWS AND DATA PROTECTION LAWS VARY BY JURISDICTION. PLEASE CHECK ALL RELEVANT LAWS IN YOUR JURISDICTION BEFORE USING THIS PRODUCT IN ORDER TO ENSURE THAT YOUR USE CONFORMS TO THE APPLICABLE LAW. EZVIZ SHALL NOT BE LIABLE IN THE EVENT THAT THIS PRODUCT IS USED WITH ILLEGITIMATE PURPOSES. IN THE EVENT OF ANY CONFLICTS BETWEEN THE ABOVE AND THE APPLICABLE L
Open the catalog to page 1
Quick Setup Instruction Lock Installation Lock Settings Lock Using
Open the catalog to page 2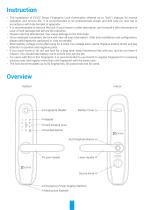
Instruction • The installation of EZVIZ Smart Fingerprint Lock (hereinafter referred as to "lock") impacts its normal operation and service life. It is recommended to let professionals install, and drill hole for lock set in accordance with hole templet in appendix. • It is recommended to remove the lock if your house is under decoration, and reinstall it after decoration in case of lock damage and service life reduction. • Please note that disinfectant may cause damage to the lock body. • Once initialized completed, the lock will clear all user information. After lock installation and configuration,...
Open the catalog to page 3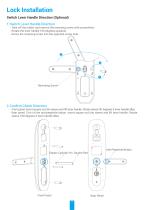
Lock Installation Switch Lever Handle Direction (Optional) 1. witch Lever Handle Direction S - Take off the rubber and remove the reversing screw with screwdriver. - Rotate the lever handle 180 degrees upwards. - Screw the reversing screw into the opposite screw hole. Reversing Screw 2. onfirm Clutch Direction C - Front panel: Insert square rod into sleeve and lift lever handle. Rotate sleeve 90 degrees if lever handle idles. - Rear panel: Turn on the anti-peephole button. Insert square rod into sleeve and lift lever handle. Rotate sleeve 180 degrees if lever handle idles. Anti-Peephole Button...
Open the catalog to page 4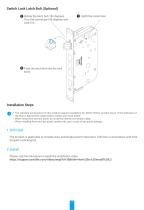
Switch Lock Latch Bolt (Optional) 1 Uplift the metal here. 2 Rotate the latch bolt 180 degrees. Turn the central part 90 degrees and tuck it in. 3 Push the latch bolt into the lock Installation Steps • The standard accessories for this product support installation for 40mm-50mm wooden doors. If the thickness of the door is beyond this range, please contact your local dealer. • When fixing front and rear panel, do not press internal connection cable. • When installing front and rear panel, handle with care in case of any panel damage. 1. rill Hole D The product is applicable to wooden door and...
Open the catalog to page 5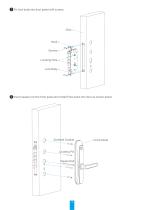
1 Fix lock body into door panel with screws. Hook Screws Locating Hole Lock Body 2 Insert square rod into front panel and install front panel into door as shown below. Screwed Conduit Front Panel
Open the catalog to page 6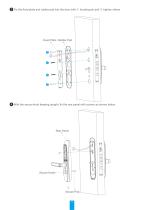
3 Fix the fixed plate and rubber pad into the door with ① locating pin and ② tighten sleeve. Fixed Plate Rubber Pad 4 With the secure knob keeping upright, fix the rear panel with screws as shown below. Rear Panel Secure Knob Secure Pick
Open the catalog to page 7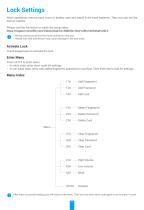
Lock Settings After installation, remove back cover of battery seat and install 4*AA-sized batteries. Then you can set the lock as needed. Please visit the link below to watch the setup video. https://support.ezvizlife.com/videos/map?id=39&title=How%20to%20Setup%20L2 • Please remove protective film from lock before first use. • Please note that disinfectant may cause damage to the lock body. Activate Lock Touch keypad area to activate the lock. Enter Menu Press 3571# to enter menu. • In initial state, enter short code for settings. • In non-initial state, verify with added fingerprint, password...
Open the catalog to page 8All EZVIZ catalogs and technical brochures
 C3N
C3N60 Pages
 C1C-B
C1C-B9 Pages
 T30-EU
5 Pages
 UV-C Air Purifier
8 Pages
- Door intercom
- Surface-mounted detector
- Security camera
- White detector
- Surface-mounted security camera
- Outdoor security camera
- Metal door intercom
- IP security camera
- Infrared detector
- Bulb
- Industrial motion detector
- Industrial air purifier
- Dome security camera
- LED bulb
- Door intercom with screen
- Door station
- Exterior door station
- Color security camera
- Metal door station
- Free-standing air purifier