- Catalogs
- EUROVENT - EUROSYSTEM POLSKA
- Eurovent Classic
Eurovent Classic
1 /1Page

Eurovent Classic
1 /1Page
Catalog excerpts

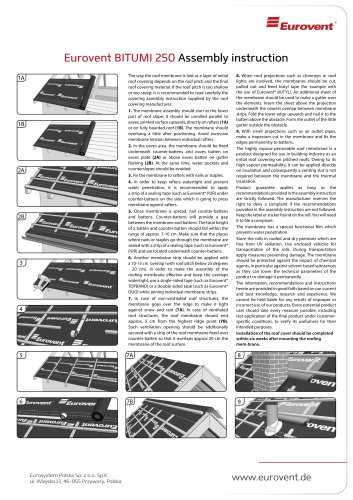
Eurovent CLASSIC Assembly instruction T he way the roof membrane is laid as a layer of initial roof covering depends on the roof pitch and the final roof covering material. If the roof pitch is too shallow or too steep, it is recommended to read carefully the covering assembly instruction supplied by the roof covering manufacturer. 1. The membrane assembly should start at the lower part of roof slope; it should be unrolled parallel to eaves, printed surface upwards, directly on rafters (1A) or on fully boarded roof (1B). The membrane should overhang a little after positioning. Avoid excessive membrane tension between individual rafters. 2. In the eaves area, the membrane should be fixed underneath counter-battens and eaves batten on eaves plate (2A) or above eaves batten on gutter flashing (2B). At the same time, water pockets and counterslopes should be avoided. 3. Fix the membrane to rafters with nails or staples. 4. In order to keep rafters watertight and prevent water penetration, it is recommended to apply a strip of a sealing tape (such as Eurovent® PUR) under counter-battens on the side which is going to press membrane against rafters. 5. Once membrane is spread, nail counter-battens and battens. Counter-battens will provide a gap between the membrane and battens. The total height of a batten and counter-batten should fall within the range of approx. 7-10 cm. Make sure that the places where nails or staples go through the membrane are sealed with a strip of a sealing tape (such as Eurovent® PUR) and are located underneath counter-battens. 6. Another membrane strip should be applied with a 10-15 cm overlap (with roof pitch below 25 degrees - 20 cm). In order to make the assembly of the roofing membrane effective and keep the overlaps watertight, use a single-sided tape (such as Eurovent® TOPBAND) or a double-sided tape (such as Eurovent® DUO) while joining individual membrane strips. 7. In case of non-ventilated roof structures, the membrane goes over the ridge to make it tight against snow and rain (7A). In case of ventilated roof structures, the roof membrane should end approx. 5 cm from the highest ridge point (7B). Such ventilation opening should be additionally secured with a strip of the roof membrane fixed over counter-batten so that it overlaps approx 20 cm the membrane of the roof surface. 8. When roof projections such as chimneys or roof lights are involved, the membranes should be cut, pulled out and fixed butyl tape (for example with the use of Eurovent® BUTYL). An additional sheet of the membrane should be used to make a gutter over the elements. Insert the sheet above the projection underneath the nearest overlap between membrane strips. Fold the lower edge upwards and nail it to the batten above the obstacle. Form the outlet of the little gutter outside the obstacle. 9. With small projections such as air outlet pipes, make a trapezium cut in the membrane and fix the edges permanently to battens. The highly vapour-permeable roof membrane is a product designed for use in building industry as an initial roof covering on pitched roofs. Owing to its high vapour permeability, it can be applied directly on insulation and consequently a venting slot is not required between the membrane and the thermal insulation. Product guarantee applies as long as the recommendations provided in the assembly instruction are strictly followed. The manufacturer reserves the right to deny a complaint if the recommendations provided in the assembly instruction are not followed. Keep the label or sticker found on the roll. You will need it to file a complaint. The membrane has a special functional film which prevents water penetration. Store the rolls in roofed and dry premises which are free from UV radiation. Use enclosed vehicles for transportation of the rolls. During transportation apply measures preventing damage. The membrane should be protected against the impact of chemical agents, in particular against solvent-based substances as they can lower the technical parameters of the product or damage it permanently. The information, recommendations and instructions herein are provided in good faith based on our current and best knowledge, research and experience. We cannot be held liable for any results of improper or incorrect use of our products. Every potential product user should take every measure possible, including test application of the final product under customerspecific conditions, to verify its usefulness for their intended purposes. Installation of the roof cover should be completed within six weeks after mounting the roofing mem-brane. Eurosystem Polska Sp. z o.o. Sp.K. ul. Wiejska 13, 46-055 Przywory, Polska
Open the catalog to page 1All EUROVENT - EUROSYSTEM POLSKA catalogs and technical brochures
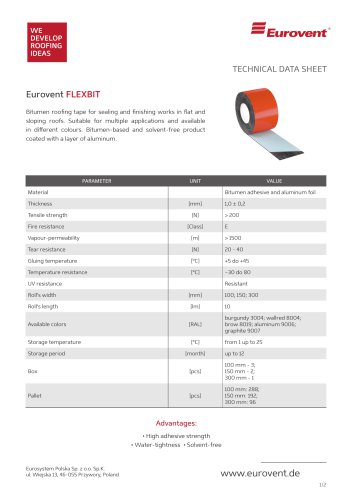 EUROVENT® FLEXBIT
2 Pages
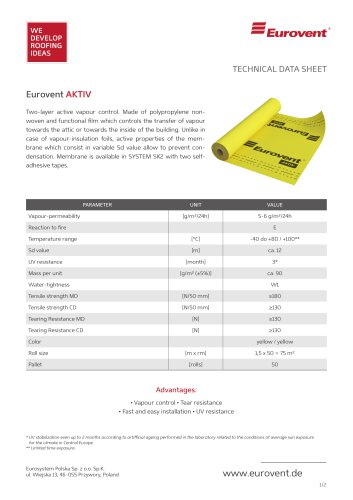 EUROVENT® AKTIV
2 Pages
 Roof accessories
52 Pages
 Roof membranes
20 Pages
 Eurovent Bitumi
1 Page
 Eurovent Stratos
1 Page
 Eurovent BASIC
2 Pages
 SK2 system
5 Pages
- Waterproofing membrane
- Profile
- Synthetic insulation
- Roll waterproofing membrane
- Metal profile
- Plastic waterproofing membrane
- Protection waterproofing membrane
- Roof waterproofing membrane
- Metal roofing
- Roll insulation
- Asphalt waterproofing membrane
- Insulation with vapor barrier
- Edge profile
- Industrial vapor barrier
- Polyester waterproofing membrane
- Adhesive waterproofing membrane
- Industrial geotextile