Semi-Automatic Dough Divider/Rounder

Semi-Automatic Dough Divider/Rounder
1. Insert the ram into the head and align it properly. Ensure hands are kept away from the head and trip plate during this process.
2. Rotate the head assembly ¼ turn clockwise to engage the alignment pin.
3. Raise the handle to its uppermost position and tighten the hand knobs.
4. Align the ring with the head and lower the handle slowly, ensuring proper alignment with the arms.
5. Rotate the ring clockwise ¼ turn and raise the handle to its highest position.
6. Replace the canopies by aligning key holes with pins.
1. Wash the ring and pallets with hot soapy water, rinse, and dry. Avoid using solvents or metal scrapers.
2. Clean the head assembly with mild soap and water or place it in a dishwasher, ensuring no damage occurs.
3. For upper machine cleaning, remove canopies and clean with soap and water. Lubricate shafts and pivot points with USDA-approved oil.
1. Clean the head assembly daily and wash pallets regularly.
2. Tighten or replace motor belts as needed.
3. Establish a regular lubrication schedule using USDA-approved oil and grease.
1. If rounding does not occur, check drive belts, motor operation, and ensure proper lubrication.
2. For dough size inconsistencies, adjust pressure and ensure even dough distribution.
3. If dough sticks, dust with flour and ensure the head assembly is clean.
Catalog excerpts

SINCE1886 Semi-Automatic Dough Divider/Rounder Expandable Pocket Design > NSF, USDA, ULListed > 4 Machines in 1 Capability36, 18, 9 &6-Part Divisions1-ounce up to 26-ounces each piece Dutchess . . . Proven Leadership through Research &DevelopmentӔ size="-3">
Open the catalog to page 1
Semi-Automatic Dough Divider/Rounder NSF, USDA, ULLIsted- Patented -TABLE OF CONTENTS Page No.General Rules II - III Machine SpecificationsIVUncrating1 Installation1 - 2 Operating Instructions2 - 5 Adjustments5 Head Removal5 - 7 Head Replacement7 Head Cleaning8 - 9 Machine Cleaning9 Maintenance9 - 10 Lubrication10 - 11 Troubleshooting11 - 12 DoughScaling Charts (English &Metric)13 - 14 Assembly Drawing / Parts Listings15 - 26 Head Assemblies27 - 30 Electrical Schematic31 - 32 Safety Labels33 >
Open the catalog to page 2
1. Equipment should not be operated with safety devices or guards removed.2. Only qualified personnel should operate this machine. 3. Machines should not be started until all personnel are clear. 4. Service and maintenance procedures should never be performed on a machine in motion. 5. To avoid shock or serious injury, only qualified personnel should perform maintenanceon the electrical system.6. The electric power MUSTbe OFF before servicing the machine. > 1. DO NOToperate this machine until you read and understand the operating instructionsand become familiar with the machine and its controls.2....
Open the catalog to page 3
1. DO NOTservice a machine until you are thoroughly qualified, trained and familiar with the tasks to be performed.2. Never operate any controls while other persons are performing maintenance on the machine. 3. DO NOTbypass a safety device. 4. Always use the proper tool for the job. 5. Never open covers with power on. 6. Electrical power switch is to be turned off, and machine disconnected from the power source, unless absolutely required for a specific service being performed. > 1. All electrical maintenance and service should be performed only by trained and authorized electrician's.2. Always...
Open the catalog to page 4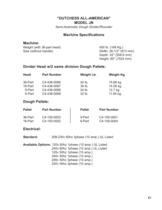
Semi-Automatic Dough Divider/Rounder > Weight (with 36-part head) 450 lb. (168 Kg.)Size (without handle) Width: 26-1/2" (673 mm)Depth: 22" (558.8 mm) Height: 60" (1524 mm) > Pallet Part Number Pallet Part Number 36-Part C4-150-0003 9-Part C4-150-000118-Part C4-150-0002 6-Part C4-150-0004 >
Open the catalog to page 5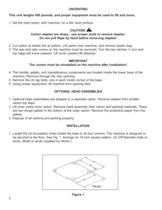
UNCRATINGThis unit weighs 450 pounds, and proper equipment must be used to lift and move. 1. Set the total carton, with machine, on a flat, level surface. CAUTION!Carton staples are sharp - use proper tools to remove staples. Do not pull flaps by hand before removing staples! 2. Cut carton at dotted line at bottom. Lift carton over machine, and remove plastic bag.3. The rear and side covers on the machine must be removed. Turn the two latches turn and top edge will move outward. Lift cover upward off retainers. IMPORTANTThe covers must be reinstalled on the machine after installation! 4. The...
Open the catalog to page 6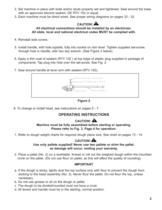
2. Set machine in place with bolts and/or studs properly set and tightened. Seal around the basewith an approved silicone sealant, GE RTV 102 or equal.3. Each machine must be direct wired. See proper wiring diagrams on pages 33 - 32. CAUTION!All electrical connections should be installed by an electrician. All state, local and national electrical codes MUST be complied with. 4. Reinstall side covers. 5. Install handle, with hole topside, fully into socket on ram lever. Tighten supplied set-screw,through hole in handle, with hex key wrench. (See Figure 2 below)6. Apply a thin coat of sealant (RTV...
Open the catalog to page 7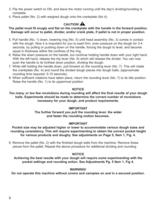
3. Flip the power switch to ON, and leave the motor running until the day's dividing/rounding iscomplete.4. Place pallet (No. 2) with weighed dough onto the crankplate (No 4). CAUTION!The pallet must fit snugly and flat on the crankplate with the handle in the forward position.Damage will occur to pallet, divider, and/or crank plate, if pallet is not in proper position. 5. Pull handle (No. 1) down, lowering ring (No. 5) until head assembly (No. 3) comes in contactwith the dough. Now it is important for you to exert firm, even pressure on the dough for 3-4 seconds, by pulling or pushing down on...
Open the catalog to page 8
WARNING!NEVER DOUBLE PALLET TO DIVIDE DOUGH AS DAMAGE TO MACHINE MAYOCCUR DUE TO THE EXTREME PRESURE APPLIED. 1. Place pallet with dough to be divided onto Crankplate (No. 4), then press dough in the same manner as described on Page 3, Item 5. After pressing and dividing dough, pull Rounding Lever (No. 7) forward slightly just enough to start the Crankplate motion, then return the Rounding Lever to idle position immediately. This small motion will tear the thin membrane left between each divided piece and make removal from Pallet (No. 2) much easier. 4 Handle1 >
Open the catalog to page 9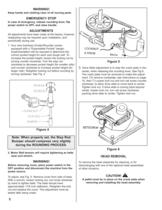
WARNING! > Keep hands and clothing clear of all moving parts. EMERGENCYSTOP > In case of emergency, release rounding lever, flippower switch to OFF, and raise handle. ADJUSTMENTS > All adjustments have been made at the factory, however, readjusting may be required upon installation, and periodically during use. 1. Your new Dutchess Divider/Rounder comes equipped with a "Expandable Pocket" design. Experimentation will be required to determine the correct pocket height for each size dough ball. To increase the pocket height, loosen the locking nut by turning counter clockwise. Turn the stop rod...
Open the catalog to page 10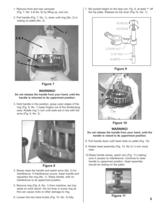
1. Remove front and rear canopies (Fig. 7, No. 5 & No. 6) by lifting up, and out.2. Pull handle (Fig. 7, No. 1), down until ring (No. 2) is resting on pallet (No. 3). 7. Set pocket height on the stop rod, Fig. 9, at least 1" off the trip plate. Release he trip lever (Fig 10, No. 1). 1 5&6 > 3 Figure 9 Figure 7 WARNING! > Do not release the handle from your hand, until thehandle is returned to its uppermost position. 3. Hold handle in this position, grasp outer edges of the ring (Fig. 8, No. 1) keep fingers out of the divider/plug area. Rotate ring turn until slots are in line with the arms (Fig....
Open the catalog to page 11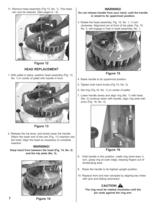
11. Remove head assembly (Fig 12, No. 1). This head can now be cleaned. (See pages 8 - 9). WARNING! > Do not release handle from your hand, until the handleis raised to its uppermost position. 3. Rotate the head assembly, Fig. 15, No. 1, turn clockwise. Alignment pin at front of trip plate, Fig. 15, No. 2, will engage in hole in head assembly, No. 1. Figure 12HEAD REPLACEMENT > 1. With pallet in place, position head assembly (Fig. 13, No. 1) in center of pallet with handle in front. Figure 15 > 4. Raise handle to its uppermost position.5. Tighten both hand knobs (Fig 15, No. 3). 6. Set ring (Fig...
Open the catalog to page 12All DUTCHESS catalogs and technical brochures
 Model DUT/V-80EL
2 Pages
 DUT/TXM-20
1 Page
 DUT/M140-W
2 Pages
 DUT/S-100
2 Pages
 DUT/AV-01
2 Pages
 DUT/TXM-15
2 Pages
 DUT/DM-18
2 Pages
 DUT/DMS-18
2 Pages
 Model 270
2 Pages
 Model JN
2 Pages
 DUT/DXM-SS
2 Pages
 Model JN
39 Pages
 Model 270C/270CE
2 Pages
 Model 260
18 Pages
Archived catalogs
 Model LD-626
6 Pages
 FRENCH BREAD/BUN & BAGEL SLICER
20 Pages