
- Catalogs
- Clearwater Baths
- Patinato Petite

Patinato Petite

Patinato Petite
- Adjust the feet to level the bath.
- Position the bath against the wall and mark the tap ledge position. Secure a 100x20mm treated timber batten horizontally to support the tap ledge.
- Attach the feet using double-sided tape, ensuring correct positioning.
- Use a torque wrench to tighten the waste between 25 Nm and 50 Nm to avoid damage.
- Inspect the bath for damage upon unwrapping.
- Assemble on a protective mat.
- Installation should be performed by a qualified tradesman familiar with local plumbing regulations.
- Waste connection details are not included and should be determined by a qualified person.
- For fine scratches, use 1500 grade sandpaper with water, followed by a neutral polishing compound.
- Avoid abrasive cleaners and certain chemicals like bleach and caustic soda.
- Hair dye may stain the basin; avoid using strong dyes near it.
- Place the bath on wooden blocks to connect the waste and check for leaks.
- If installing an external overflow or taps, drill according to the provided template.
- Dispose of wedges after use.
Catalog excerpts
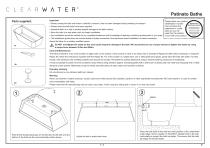
Patinato Baths Parts supplied: Important • Please unwrap the bath and check it carefully to ensure it has not been damaged during handling or transport. • Please check that all parts have been supplied. • Assemble bath on a mat to protect against damage to the bath surface. • Store the bath in a safe place until you begin installation. • Any installation should be carried out by a qualified tradesman with knowledge of statutory plumbing requirements in your area. • This installation guide does not include details of waste connection; final decisions about installation of waste connection should be taken by a suitably qualified person. Please place your product Manufacturers identification number Identification Number here and keep this XXXXXXXXXXX paperwork in a safe In the event of after place as you will sales requirements need this if a problem please quote this number. occurs with your product. Do NOT overtighten the waste as this may cause long term damage to the bath. We recommend to use a torque wrench to tighten the waste by using a torque force between 25 Nm and 50Nm. Care and Maintenance The below instruction is for a fine scratch or slight mark on the surface. If the scratch or mark is too deep, then a Clearstone Repair Kit CRK will be necessary. If using the Repair Kit, follow the instructions supplied with the Repair Kit. For a fine scratch or a slight mark, use a 1500 grade sand paper, gently sand the area with water. For best results, limit sanding to the smallest possible area around the scratch. Re-polish the surface afterwards using a neutral polishing compound or toothpaste. It may be possible to polish very fine scratches away without using abrasive papers: scrubbing gently with a soft brush or plastic pad (not metal scouring pad) and a mildly abrasive cream cleaner. Afterwards scrub the whole area with plenty of clean water and re-polish as before. Everyday cleaning We recommend a non-abrasive bathroom cleaner. Warning Never use cleaners / bleach products, caustic soda and or ethyl alcohol (for example Lysoform or other specifically manufactured WC bowl cleaners. In case of contact rinse immediately with water. Please note that hair dye/colouring may de-colour your basin. Avoid using any strong dye or colour in or near your basin. Peel off the double-sided tape on the feet and fix the feet onto the bottom of the bath per the recommended position above. Adjust the feet to make them level. Place the bath back to the wall and mark position of the underneath of tap ledge. Screw a batten of 100x20mm treated timer to the wall horizontally to support the bath tap ledge. This ensure that the bath tap ledge will remain
Open the catalog to page 1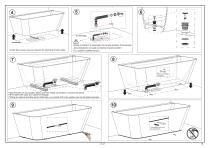
Under floor access may be required for plumbing of bath waste. Waste connection is dependant on the site situation; final decision about installation of waste connection should be taken by a suitably qualified person. 4x Place the wedges in position. Place the bath on two wooden blocks over the waste connections. Connect the waste. Fill the bath with water and check for leakage. If fitting an external overflow and/or bath taps, you should drill in the position per the template provided.
Open the catalog to page 2All Clearwater Baths catalogs and technical brochures
 Palermo Petite
2 Pages
 Palermo Grande
2 Pages
 N16PCS
1 Page
 Puro with plinth
2 Pages
 Puro
Puro2 Pages
 Nuvola
2 Pages
 Sontuoso
2 Pages
 Formoso Petite
2 Pages
 Formoso Grande
2 Pages
 Patinato Grande
2 Pages
 CTA5
CTA52 Pages
 CTA7
CTA72 Pages
 CTA6
CTA62 Pages
 DUO
DUO2 Pages
 brochure
42 Pages
 Vicenza natural stone bath
2 Pages
 Vigore
2 Pages
 Lacrima natural stone bath
2 Pages
 Nebbia natural stone bath
2 Pages
 Lonio
Lonio2 Pages
 Formoso
2 Pages
 Armonia
2 Pages
 Kensington Regent
2 Pages
 Clearwater brochure
100 Pages
 Crystal basin
1 Page
 Palermo Bacino
1 Page
 Formoso Bacino
1 Page
 EcoCurve Bathscreen
1 Page
 EcoRound Bathscreen
1 Page
 Reuse
Reuse1 Page
 Sustain
1 Page
 Verde
Verde1 Page
 Emperor
1 Page
 Boat 1650
1 Page
 Classic 1500
1 Page
 Arctic
1 Page
 Saturn
1 Page
 Nouveau Petite
1 Page
 Vicenza
1 Page
 Lacrima
1 Page
 Ninfea
1 Page
 Formoso Piccolo
1 Page



Archived catalogs
 Clearwater Baths 2011
100 Pages
- Mixer faucet
- Indoor mixer tap
- Wash stand
- Contemporary wash basin
- Bathroom single-handle faucet
- Metal mixer tap
- Washbasin tap
- 1-hole single-handle faucet
- Countertop single-handle mixer tap
- Lavatory mixer tap
- Industrial bath-tub
- Rectangular sink
- Countertop sink
- Brass mixer faucet
- White bathtub
- Self-supporting bathtub
- Composite material washbasin
- Oval bathtub
- Composite bathtub