Catalog excerpts
Perspective Straightening Entzerren von Fotografien Raddrizzamento Prospettico Redressement d’images photographiques Corrección de imágenes fotográficas Cigraph S.r.l. Via Orsato, 38 - 30175 VE/Marghera Tel. ++39(0)41932388 Fax ++39(0)41920031
Open the catalog to page 1
User Guide
Open the catalog to page 2
ArchiFaçade ArchiFaçade “User Guide” Version 1.0 for Microsoft Windows and Apple Macintosh © 2001 Cigraph S.r.l. Copyright The contents of this manual and the software described therein are the sole property of Cigraph S.r.l. with all rights reserved. As per copyright laws, this manual and the software programs cannot be copied either fully or in part without the written consent of Cigraph S.r.l., except during normal use of the software to create a back-up copy. This exception does not allow the buyer to make copies for others, even if the software is sold, traded or given away. Written by...
Open the catalog to page 3
User Guide ArchiFaçade Plug-In for correcting images What is an ArchiCAD plug-in? A Plug-in is a software component that allows ArchiCAD to provide new functions in addition to the standard characteristics. ArchiCAD allows you to manage the plug-ins automatically, starting them up and closing them through the menu bar. Indeed, once the Plug-in has been installed, a new menu will appear in the menu bar. This menu will behave completely like any other ArchiCAD menu. It will allow you to access the ArchiFaçade palette and therefore to access all of its tools. In fact, you will not even realise...
Open the catalog to page 4
• Mac OS: the Add-Ons folder can be found in the same folder as the ArchiCAD application, or within the Graphisoft folder present in the System folder. • Windows: the Add-Ons folder must be in the same folder as the ArchiCAD application. If positioned elsewhere, ArchiCAD will not be able to access it. ArchiCAD verifies the presence of Plug-ins when booting up. If the Plugins are not found in the correct place, you must quit the program and place them in the correct location and then restart ArchiCAD. For temporary use, you may run the Plug-in requested via the Load Add-On… command present...
Open the catalog to page 5
User Guide Introduction ArchiFaçade is a simple and powerful program that allows you to modify a foreshortened photograph to make it look like the result of an orthogonal projection. This is based on the principles of projective geometry: through the appropriate mathematical transformations, the points that make up the image distorted by the perspective can be modified to the point that the corrected image can be created. In the past this procedure was performed manually through a laborious procedure of graphic projections. With ArchiFaçade you can correct the image by inserting the known...
Open the catalog to page 6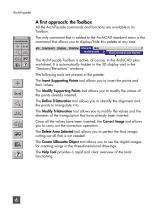
A first approach: the Toolbox All the ArchiFaçade commands and functions are available in its Toolbox. The only command that is added to the ArchiCAD standard menu is the command that allows you to display/hide this palette at any time. The ArchiFaçade Toolbox is active, of course, in the ArchiCAD plan worksheet. It is automatically hidden in the 3D display and in the “Sections/Elevations” windows. The following tools are present in the palette: The Insert Supporting Points tool allows you to insert the points and their values. The Modify Supporting Points tool allows you to modify the...
Open the catalog to page 7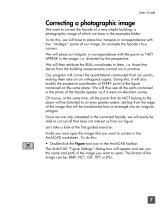
User Guide Correcting a photographic image We want to correct the façade of a very simple building, a photographic image of which we have in the examples folder. To do this, we will have to place four hotspots in correspondence with four “strategic” points of our image; for example the façade’s four corners. We will place our hotspots in correspondence with the points as THEY APPEAR in the image, i.e. distorted by the perspective. We will then attribute the REAL coordinates to them, i.e. those that derive from the building measurements carried out in practise. Our program will correct the...
Open the catalog to page 8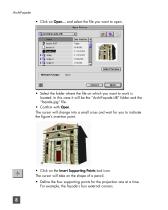
• Click on Open... and select the file you want to open. ! Open Picture! Date Modified Memory Usage: • Select the folder where the file on which you want to work is located. In this case it will be the "ArchiFacade.LIB" folder and the "facade.jpg" file. • Confirm with Open. The cursor will change into a small cross and wait for you to indicate the figure's insertion point. • Click on the Insert Supporting Points tool icon. The cursor will take on the shape of a pencil. • Define the four supporting points for the projection one at a time. For example, the facade's four external corners.
Open the catalog to page 9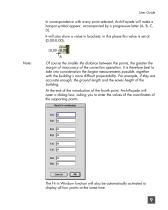
User Guide In correspondence with every point selected, ArchiFacade will make a hotspot symbol appear, accompanied by a progressive letter (A, B, C, It will also show a value in brackets; in this phase this value is set at Note: Of course the smaller the distance between the points, the greater the margin of inaccuracy of the correction operation. It is therefore best to take into consideration the largest measurements possible, together with the building's more difficult projectability. For example, if they are accurate enough, the ground length and the eaves height of the At the end of...
Open the catalog to page 10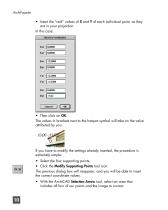
• Insert the "real" values of X and Y of each individual point, as they The values in brackets next to the hotspot symbol will take on the value If you have to modify the settings already inserted, the procedure is extremely simple: • Select the four supporting points. • Click the Modify Supporting Points tool icon. The previous dialog box will reappear, and you will be able to insert the correct coordinate values. • With the ArchiCAD Selection Arrow tool, select an area that includes all four of our points and the image to correct.
Open the catalog to page 11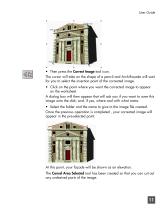
User Guide • Then press the Correct Image tool icon. The cursor will take on the shape of a pencil and ArchiFaçade will wait for you to select the insertion point of the corrected image. • Click on the point where you want the corrected image to appear on the worksheet. A dialog box will then appear that will ask you if you want to save this image onto the disk; and, if yes, where and with what name. • Select the folder and the name to give to the image file created. Once the previous operation is completed , your corrected image will appear in the pre-selected point. At this point, your...
Open the catalog to page 12All CIGRAPH catalogs and technical brochures
-
Archisuite Flyer
2 Pages

