20i
1 /16Pages

20i
1 /16Pages
Catalog excerpts

Operating & Installation Instructions
Open the catalog to page 1
OPERATING INSTRUCTIONS Running the Fire with the Doors Open 5 Throat Plate and Flueway Cleaning 6 INSTALLATION INSTRUCTIONS Health & Safety Precautions 9 Fitting the Optional Add-In Boiler 11 Flue Connection and Infilling 11
Open the catalog to page 3
OPERATING INSTRUCTIONS GENERAL POINTS Before lighting the fire check with the installer that the work and checks described in the installation instructions have been carried out correctly and that the chimney has been swept, is sound, and free from any obstructions. WARNING There must not be an extractor fan fitted in the same room as this appliance as this can cause the appliance to emit smoke and fumes into the room. If the appliance is fitted in place of an open fire then the chimney should be swept one month after installation to clear any soot falls which may have occurred due to the difference...
Open the catalog to page 4
OPERATING INSTRUCTIONS Flap (shown RUNNING THE FIRE WITH THE DOORS OPEN The fire may be run with the doors open. This will result in a reduction in efficiency and hence heat output. The more reactive fuels, like homefire, will burn better when the doors are open than fuels like phurnacite, sunbrite and ancit. For safety reasons, if the fire is to be left unattended with the doors open then use a spark guard which complies with BS The ashpan should be emptied regularly before it becomes too full. The most convenient time to remove the ash is just before riddling the fire since the ash will then...
Open the catalog to page 5
OPERATING INSTRUCTIONS When Riddling position (the tool should be horizontal). Keep the firebox well filled (the fuel may be sloped up from the front firebars), but do not allow fuel to spill over the top of the front fire bars. Take care that fuel does not project over the front fire bars or damage to the glass may be caused when OVERNIGHT BURNING Empty the ashpan, if necessary, and then riddle the fire. If the fire is very low then it may be necessary to add a little fuel and turn the thermostat control up for a brief period until the fire is burning well before filling with fuel. Some experimentation...
Open the catalog to page 6
OPERATING INSTRUCTIONS maximum setting and the main doors left ajar. It is also advisable to sweep the chimney and clean out the fire. Spraying the inside of the doors and firebox with a light oil, such as WD40, will also help to keep all internal parts working After long periods where the fire has been out of use, the chimney and appliance flueways should be cleaned before Door Seals For the fire to operate correctly it is important that the door seals are in good condition. Check that they do not become worn or frayed and replace them when necessary. It is recommended that the fire is serviced...
Open the catalog to page 7
OPERATING INSTRUCTIONS must not be tolerated. If fume emission does persist then the following immediate actions should be taken: A) Open doors and windows to ventilate the room. B) Let the fire out and safely dispose of fuel from the C) Check for flue or chimney blockage, and clean if required. D) Do not attempt to relight fire until cause of fume has been identified, if necessary seek professional advice. The most common cause of fume emission is flueway or chimney blockage. For your own safety these must be kept If a boiler is fitted do not light the fire if there is any possibility that any...
Open the catalog to page 8
charnwood INSTALLATION INSTRUCTIONS ® HEALTH AND SAFETY PRECAUTIONS chimney height must not be less than 4 metres measured vertically from the outlet of the fire to the top of the chimney. WARNING The chimney should preferably be 175 mm (7 inches) or Please take care when installing the appliance that the 200mm (8 inches) internal diameter or square with sides of requirements of the Health and Safety at Work Act 1974 are 175mm or 200mm internally and MUST NOT BE LESS met. THAN 150mm (6 INCHES) INTERNAL DIAMETER OR 150 Some types of fire cement are caustic and should not be x 150mm INTERNAL SQUARE....
Open the catalog to page 9
charnwood INSTALLATION INSTRUCTIONS ® PREPARATION OF FIREPLACE Apply fire cement to the rear face of the sealing flange on the appliance. Fit the appliance into the opening ensuring that it is Before fitting the appliance into an existing fireplace remove central and that a good seal is made between the sealing the fireback and any loose in-fill material. flange and the face of the surround. The hearth, surround and opening for the appliance must Remove any excess fire cement from around the sealing conform with Figs. 4 and 5. The flat area around the opening flange. must be a minimum of 750...
Open the catalog to page 10
INSTALLATION INSTRUCTIONS FITTING THE OPTIONAL ADD-IN BOILER The boiler replaces the rear firebrick and is reversible so that the 1 " B.S.P. male tappings may come on either the left or the right hand side of the boiler. The boiler tappings protrude from the sides of the appliance and it will therefore be necessary to fit the boiler into the appliance after positioning the appliance in the fireplace if the fire surround is already fitted. Before fitting the boiler, remove the front firebars, the side and back fire plates and the firebricks. Knock out the knock- outs for the boiler tappings on...
Open the catalog to page 11
INSTALLATION INSTRUCTIONS In most installations it will be possible to sweep the chimney through the appliance. If this is not possible then some alternative means (such as a soot door), must be provided. The free inset method of installation may be used instead of infilling. Details are available on request. Before lighting the fire check the cold setting distance of the With the control knob at the maximum setting the flap should be 18 mm from the air inlet as shown in Fig. 8. To adjust the distance slacken the locking nut and adjust as necessary. When set correctly re-tighten the locking nut....
Open the catalog to page 12
charnwood LA20i PARTS LIST ® Issue J 41 50 41a 49 40a 51 40a 44 31 17 33 39 30 47 48 39 Freestanding Kit 39 19 43 36 26 18 20 25 12 16 7 5 35 32a 32 45 29 0 5 4 3 2 15 1 42 27 28 14 22 13 18 24 23 23 9 8 34 11 10 Item Part Description Item Part Description 3* 4* 5 6* 7 8 9 10 11 12 13 14 15 16 17 18 19 20 21 22 23 24 25 008/RW35/S 008/FW29 006/RW18 008/RW44/S 004/EW23 008/FW27 008/BW39/S 008/RW43/A 002/HV12 002/CG06 002/BW20 002/BW26 008/BW50 002/FW07 002/AV31 002/HW15 002/HW16 002/CG01 002/CG01S7 004/EW17 002/HW30 012/HW33 012/FW14 Door Seal Set Incl. Adhesive Door Seal Adhesive Glass Inc Glass...
Open the catalog to page 14All CHARNWOOD catalogs and technical brochures
 HAVEN - RANGE COOKER
4 Pages
 CHARNWOOD BROCHURE 2023
104 Pages
 The Bembridge
1 Page
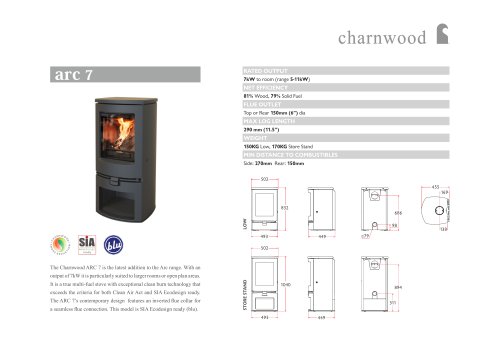 Arc 7
Arc 71 Page
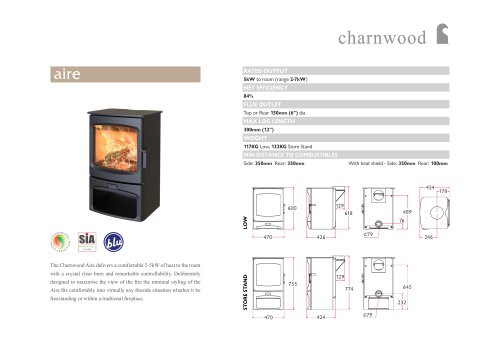 Aire
Aire1 Page
 Charnwood multi-fuel stoves
116 Pages
 Country 4
1 Page
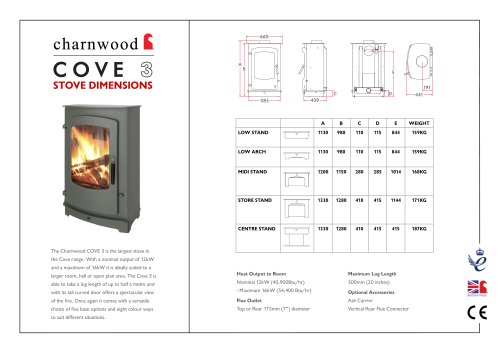 cove 3
1 Page
 All New Island
4 Pages
 Charnwood Skye 7
2 Pages
 Charnwood Ecodesign
4 Pages
 C-EIGHT
1 Page
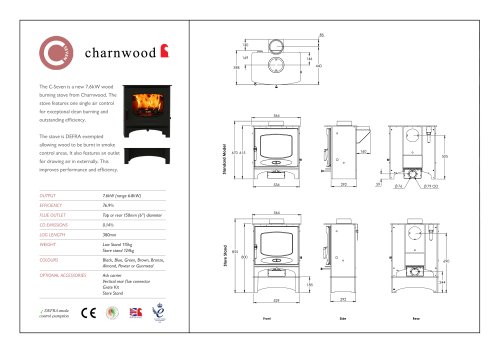 C-SEVEN
1 Page
 C-FIVE
1 Page
 ISLAND II
1 Page
 ISLAND I
1 Page
 C series:C-SIX
1 Page

Archived catalogs
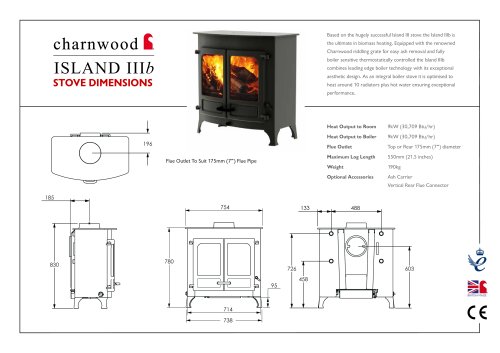 ISLAND IIIB (BOILER)
1 Page
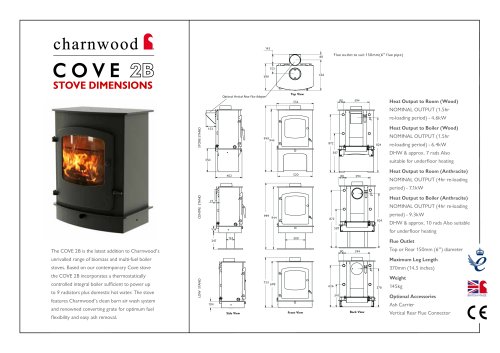 COVE 2B (BOILER)
1 Page
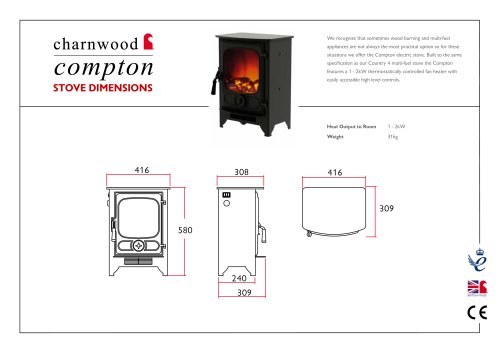 compton
1 Page

- Charnwood contemporary heating stove
- Charnwood metal heating stove
- Charnwood wood heating stove
- Charnwood black heating stove
- Charnwood free-standing heating stove
- Charnwood steel heating stove
- Charnwood vented heating stove
- Charnwood cast iron heating stove
- Charnwood Class A+ heating stove
- Charnwood glass heating stove
- Charnwood gray heating stove
- Ceramic heating stove
- Charnwood white heating stove
- Multi-fuel heating stove
- Charnwood traditional heating stove
- Heating stove with vertical outlet
- Charnwood class A heating stove
- Industrial griddle
- Boiler stove
- Charnwood brown heating stove