
- Catalogs
- Carl Stahl ARC GmbH
- X-TEND® CX / CXE

X-TEND® CX / CXE

X-TEND® CX / CXE
The document provides comprehensive installation instructions for the X-TEND CX and CXE mesh systems by Carl Stahl Architektur. It includes guidance on identifying the correct mesh type using the delivery note and outlines the components included in the package: X-TEND mesh, installation cable, ferrules, and plastic cable ties.
X-TEND CX uses tin-plated copper ferrules for cable diameters ranging from 1.0mm to 3.0mm, while X-TEND CXE uses stainless steel ferrules (AISI316Ti) for the same range of diameters. Specific item numbers are provided for reference.
The manual emphasizes the importance of using original components for secure connections, referencing the European Technical Approval ETA-13/0650 for cable tensile strength. It warns that warranty claims are void if installation is incorrect or incomplete.
The mesh should be centered in the frame using plastic cable ties, with adjustments made as necessary. The installation cable is spirally wrapped around the frame, and ends are inserted into connecting ferrules, pre-positioned with a plier wrench, and then swaged using the correct pressing tool.
The document lists various tools needed for installation, including cable cutters, plier wrenches, manual crimping pliers, and battery-operated presses. Specific item numbers are provided for each tool.
Different mesh panel shapes are described, including rectangular, rhomboid, and transition shapes. The document details various border constructions, specifying when loose ferrules are needed for tensioning and adaptation.
Details on the materials and sizes of ferrules are provided, along with the appropriate tools for installation. The document distinguishes between ferrules for interior and exterior use, noting potential discoloration in outdoor environments.
Recommendations include using installation cable lengths of 6-8 meters for ease of handling and positioning mesh adaptations along the mesh's level.
Mesh panels can be rectangular or diagonal, with open sides for adaptation during installation. Standard distance to the border is up to 1 mesh diamond, with specific instructions for up to 1/2 mesh diamond in certain cases.
- Mesh Installation: Use plastic cable ties for provisional fixation and centering. Ensure sufficient distance to the borders for ferrule insertion and loop closure.
- Mesh Shortening: Open pressed ferrules with a plier wrench to remove excess cable. Re-center and tension the mesh panel using cable ties.
- Combination of Mesh Panels: Temporarily fix panels with cable ties. Open ferrules, remove excess cable, and re-thread through loose ferrules in a zig-zag pattern for a stable connection.
- Flat pressing of loose ferrules every 30 cm enhances long-term safety.
- Use a gauge for uniform connection during ferrule pressing.
- Choice of tools and ferrules is detailed on pages 8/9.
- Optional Dremelix set for cutting is available.
Installation videos are available on YouTube and the Carl Stahl website for further guidance.
The mesh panel is centered within the frame using plastic cable ties, ensuring a uniform distance of approximately 0.5 to 1 mesh diamond from the frame's inner edge.
If necessary, adjust the mesh panel to fit the railing or frame size by carefully cutting at the outer edge of the crimped mesh ferrules. Open the ferrule with pliers, leaving two loose cable ends.
Place the eyelets on the loose cable ends, pre-fix with a plier wrench, and press with an accu press. Adjust cable ends according to the mesh panel plan, maintaining recommended distances between eyelets.
Begin in one corner, threading the assembly cable through eyelets and border ferrules, spirally around the frame. Install stop ferrules every 30-50 cm along the mesh border to prevent unlacing in case of cable breakage.
Direct the cable around the frame in each corner without threading through the ferrule, maintaining the threading direction.
Ensure the mesh panel is well-tensioned. Insert assembly cable ends into the CXEV ferrule, pre-fix with a side cutter, crimp with the HPE tool, and cut excess cable ends flush with the ferrule using a wire rope cutter or cutting device.
Certifies that all components were checked for quality, connections were verified for compliance, and installation conforms to European Technical Approval. The executing company confirms its qualification and experience for the installation.
Catalog excerpts
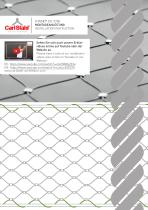
X-TEND® CX / CXE MONTAGEANLEITUNG INSTALLATION INSTRUCTION Sehen Sie sich auch unsere Erklärvideos online auf Youtube oder der Website an. Please have a look at our installation videos also online on Youtube or our Website. DE: https://www.youtube.com/watch?v=oGU58WgZEfw EN: https://www.youtube.com/watch?v=u2zUcEVYQ7A www.carlstahl-architektur.com
Open the catalog to page 1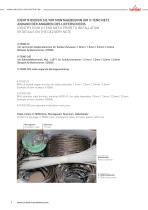
IDENTIFIZIEREN SIE VOR MONTAGEBEGINN IHR X-TEND NETZ ANHAND DER ANGABEN DES LIEFERSCHEINS IDENTIFY YOUR X-TEND MESH PRIOR TO INSTALLATION BY DETAILS ON THE DELIVERY NOTE X-TEND CX mit verzinnten Kupferklemmen für Seildurchmesser: 1,0mm / 1,5mm / 2,0mm / 3,0mm Beispiel Artikelnummer: X15060 X-TEND CXE mit Edelstahlklemmen, Mat. 1.4571, für Seildurchmesser: 1,0 mm / 1,5mm / 2,0mm / 3,0mm Beispiel Artikelnummer: X20040 X-TEND CXS siehe separate Montageanleitung X-TEND CX With tin-plated copper ferrules for cable diameters 1,0mm / 1,5mm / 2,0mm / 3,0mm Example of item number: X15060 X-TEND CXE With...
Open the catalog to page 2
ssssss INHALTSVERZEICHNIS_TABLE OF CONTENT SELBSTMONTAGE VOR ORT ON-SITE INSTALLATION Seiten_pages Ubersicht Auslieferzustand _Overview on delivery status 02 Netzformen_Mesh panel shapes 06-07 Klemmenubersicht+Werkzeuge_Overview on X-TEND ferrules+tools 08-09 Montage Rechtecknetze (I)_Installation of rectangular mesh panels 10-14 Montage Schragnetze (II)_Installation of diagonal mesh panels 15-22, 24-25 Ubergangsnetze_Transition shape mesh panels 23/26 Montageanleitung Osen Jnstadation instruction eyelets 30-37 Ubereinstimmungserklarung Montage_accordance explication of installation 38 Die X-TEND...
Open the catalog to page 3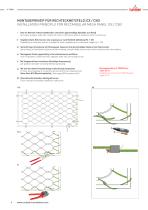
MONTAGEPRINZIP FÜR RECHTECKNETZFELD (CX / CXE) INSTALLATION PRINCIPLE FOR RECTANGULAR MESH PANEL (CX / CXE) I Netz im Rahmen mittels Kabelbindern zentrieren (gleichmäßige Abstände zum Rand) By means of plastic cable ties, center the mesh in the frame (uniform distances from the framing) Gegebenenfalls Netz kürzen, bzw. anpassen, je nach Netzfeld-Abbildung (Nr. 1-20) Depending on necessity shorten or adapt the mesh, depending on mesh panel image (no. 1-20) III Spiralförmige Umwicklung mit Montageseil, Spannen! Auf gleichmäßigen Abstand zum Rand achten Spiral lacing of installation cable around...
Open the catalog to page 4
MONTAGEPRINZIP UND WERKZEUGE_INSTALL ATION PRINCIPLE AND TOOLS MONTAGEWERKZEUGE_INSTALLATION TOOLS Hilfswerkzeuge_Auxiliary tools T1 0010 Zangenschlüssel_Plier wrench Verwendung auch zum Vorfixieren von Klemmen Use also for pre-fixation of ferrules T00001 Dremelix-Set, Trennschleifer mit Schutzblechhalter Dremelix-Set, cutting grinder with protecting blade handle (220V / 50Hz/ 250W) T00005 Drahtseilschere_Cable cutter bis Ø 4mm_ up to Ø 4mm T00008 Drahtseilschere_Cable cutter bis Ø 8mm_ up to Ø 8mm Aus dem Handwerkerbedarf Seitenschneider zum Vorfixieren von Klemmen To be procured from the tool...
Open the catalog to page 5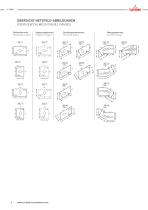
ÜBERSICHT NETZFELD-ABBILDUNGEN OVERVIEW ON MESH PANEL IMAGES Rechteckformen Rectangular shapes Anpassungsformen Adaptation shapes Parallelogrammformen Rhomboid shapes Übergangsformen Transition shapes
Open the catalog to page 6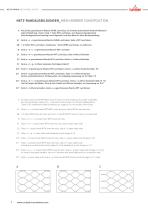
NETZFORMEN_MESH PANEL SHAPES NETZ-RANDAUSBILDUNGEN_MESH BORDER CONSTRUCTION A Alle Seiten geschlossene Masche OHNE Leerhülse, für direktes Aufschieben Randrohr/Randseil (aber Empfehlung: immer mind. 1 Seite MIT Leerhülsen, zum Spannen/Ausgleichen) Kein Montagematerial benötigt und mitgeliefert mit dem Netz für diese Randausbildung. A1 Seite b + c + d geschlossene Masche OHNE Leerhülsen, Seite a MIT Leerhülsen AB 1-3 Seiten MIT Leerhülsen, mindestens 1 Seite OHNE Leerhülsen, zu definieren. B Seite a + b + c + d geschlossene Masche MIT Leerhülse C1 Seite a + b + c geschlossene Masche MIT Leerhülse,...
Open the catalog to page 7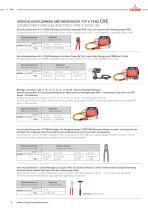
VERSCHLUSSKLEMMEN UND WERKZEUGE TYP X-TEND CXE CONNECTING FERRULES AND TOOLS TYPE X-TEND CXE Verschlussklemmen fur X-TEND-Montagen mit Handcrimpzange HPE, oder mit hydraulischer Montagezange HMZ Connecting ferrules for X-TEND installation with manual crimping pliers HPE, or with hydraulic installation pliers HMZ Klemmenmaterial Material of ferrules Verschlussklemmen fur X-TEND Montagen mit Akku-Presse API 60-2 oder Akku-Netzpresse CP850 mit C-Kopf Connecting ferrules for X-TEND installation with accu-press API 60-2 or accu-press CP850 with C-head Klemmenmaterial Material of ferrules Montage Losung...
Open the catalog to page 8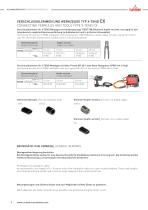
VERSCHLUSSKLEMMEN UND WERKZEUGE TYP X-TEND CX CONNECTING FERRULES AND TOOLS TYPE X-TEND CX Verschlussklemmen fur X-TEND Montagen mit Handpresszange T185/T188 (Klemmen Kupfer verzinkt, vorrangig fur den Innenbereich; mogliche Klemmenverfarbung im AuOenbereich und in kritischer Atmosphare) Connecting ferrules for X-TEND installation with crimping tool T185/T188 (zinc-coated copper ferrules, mainly for interior use; ferrules might change colour outdoors and in critical atmosphere) Klemmen Kupfer verzinnt_Ferrules: tin-plated copper CCKL0... Klemmen Kupfer verzinkt_Ferrules: zinc-coated copper TK......
Open the catalog to page 9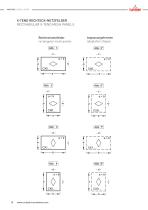
ssssss MONTAGE_INSTALLATION Carl Stahl X-TEND RECHTECK-NETZFELDER RECTANGULAR X-TEND MESH PANELS Rechtecknetzfelder Anpassungsformen rectangular mesh panels adaptation shapes
Open the catalog to page 10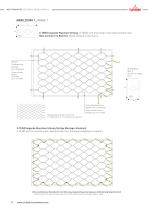
RECHTECKNETZE_RECTANGUL AR MESH PANELS X-TEND liegende Maschenrichtung_X-TEND with horizontal mesh diamond direction Netz zentriert im Rahmen_Mesh centred in the frame Abstand Randanbindung (Standard: bis zu 1/2 Masche) Analog dazu Abb. 2: Similar to image no.2 Distance border fixation (Standard: Up to 1/2 mesh) CX0... a Abstand Randanbindung (Standard: bis zu 1/2 Masche) Randausbildung_border construction C1 / Netz kürzen S. 15_shortening of mesh p.15 Distance border fixation (Standard: Up to 1/2 mesh) X-TEND liegende Maschenrichtung (fertige Montage-Situation) X-TEND with horizontal mesh diamond...
Open the catalog to page 11
X-TEND stehende Maschenrichtung_X-TEND vertical mesh diamond direction Netz zentriert im Rahmen_Mesh centred in the frame Analog dazu Abb. 4: Similar to image no.4 Abstand Randanbindung (Standard: bis zu 1/2 Masche) Distance border fixation (Standard: Up to 1/2 mesh) Distance border fixation (Standard: Up to 1/2 mesh) Abstand Randanbindung (Standard: bis zu 1/2 Masche) X-TEND stehende Maschenrichtung (fertige Montage-Situation) X-TEND vertical mesh diamond direction (finished installation situation) Die Leerhülsen am Rand alle 30 cm mit Hilfe eines Zangenschlüssels flachpressen erhöht die langfristige...
Open the catalog to page 12All Carl Stahl ARC GmbH catalogs and technical brochures
 Firmenbroschüre 2024
8 Pages
 PERIMESH ®
12 Pages
 X-TEND® - THE ORIGINAL
69 Pages
 X-TEND® ACCESSORIES
64 Pages
 X-TEND® CXS
10 Pages
 I-SYS
I-SYS108 Pages
 GREENCABLE
12 Pages
 X-LED MESH
17 Pages
 RAILINGS
64 Pages
 FACADE
48 Pages
 DESIGN
32 Pages
 WIRE ROPE SYSTEMS
28 Pages
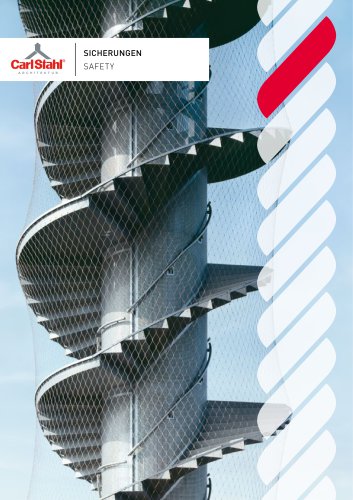 SAFETY
68 Pages
 ZOOLUTIONS
68 Pages
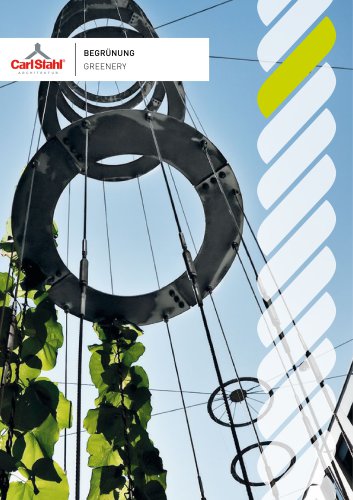 GREENERY
40 Pages


Archived catalogs
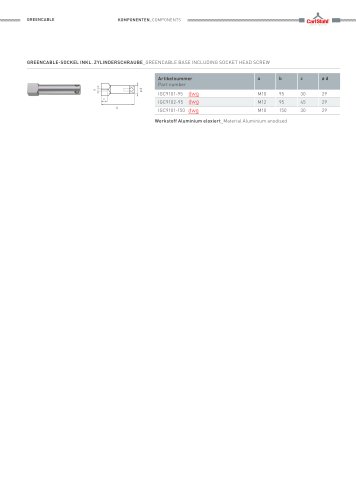 GREENCABLE SOCKEL
1 Page