- Catalogs
- Bromic Heating
- INSTALLATION, INSTRUCTION AND SERVICE MANUAL
INSTALLATION, INSTRUCTION AND SERVICE MANUAL
1 /26Pages

INSTALLATION, INSTRUCTION AND SERVICE MANUAL
1 /26Pages
Catalog excerpts

PLATINUM SMART-HEAT™ GAS HEATER BY BROMIC INSTALLATION, INSTRUCTION AND SERVICE MANUAL SUITABLE FOR GAS RADIANT HEATER MODELS: PLATINUM 300 - BURNER AND PLATINUM 500 - BURNER 2. Extinguish any open flame 3. If odor continues, keep away from the appliance and immediately call your gas supplier or fire department. WARNING: For Outdoor or Amply Ventilated area use and for NON RESIDENTIAL INDOOR APPLICATION Do not store or use petrol or other flamable vapor and liquids in the vicinity of this or any other appliance. This appliance to be connected only to reticulated gas & installed in accordance with AS/NZS 5601 A WARNING: Improper installation, adjustment, alteration, service or maintenance can cause property damage, injury or death. Read the installation, operating and maintenance instructions thoroughly before installing or servicing this equipment.
Open the catalog to page 1
This manual contains important information about the assembly, operation, and maintenance of Platinum Smart-Heat™ Heaters. Please pay close attention to the important safety information shown throughout this instruction manual. Any safety information will be accompanied by the following safety alert symbols: ! DANGER, ! WARNING, READ THIS MANUAL CAREFULLY before installing or servicing this product. Keep the instructions for future reference. Improper installation, operation, or maintenance can result in death, severe injury, or property damage. This appliance must be installed in accordance...
Open the catalog to page 2
IMPORTANT NOTES & WARNINGS 4 HEATER INSTALLATION INSTRUCTIONS 9 POWER SUPPLY INSTALLATION 13 HEAT DEFLECTOR INSTALLATION INSTRUCTIONS 14 COMMISSIONING INSTRUCTION - CHECK GAS PRESSURE 14 CEILING MOUNT POLE INSTALLATION INSTRUCTIONS 15 REGULAR SERVICE REQUIREMENTS 16 OPTIMUM MOUNTING DISTANCE 17
Open the catalog to page 3
• THIS APPLIANCE SHALL NOT BE INSTALLED OR USED IN RESIDENTIAL DOMESTIC INDOOR AREAS • CHILDREN AND ADULTS SHOULD BE ALERTED TO THE HAZARDS OF HIGH SURFACE TEMPERATURES AND SHOULD STAY AWAY TO AVOID BURNS OR CLOTHING IGNITION • YOUNG CHILDREN SHOULD BE CAREFULLY SUPERVISED WHEN THEY ARE IN THE AREA OF THE HEATER • DO NOT USE OR STORE FLAMMABLE MATERIALS NEAR THIS APPLIANCE • CLOTHING OR FLAMMABLE MATERIALS SHOULD NOT BE HUNG FROM THE HEATER OR PLACED ON OR NEAR THE HEATER • DO NOT SPRAY AEROSOLS OR FLAMMABLE MATERIALS IN THE VACINITY OF THIS APPLIANCE WHILE IT IS IN OPERATION • ANY GUARD OR OTHER...
Open the catalog to page 4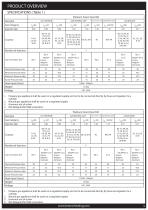
1. Propane gas appliance shall be used on a regulated supply and not to be connected directly by hose and regulator to a cylinder 2. Natural gas appliance shall be used on a regulated supply
Open the catalog to page 5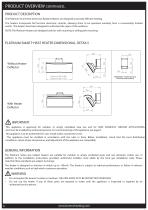
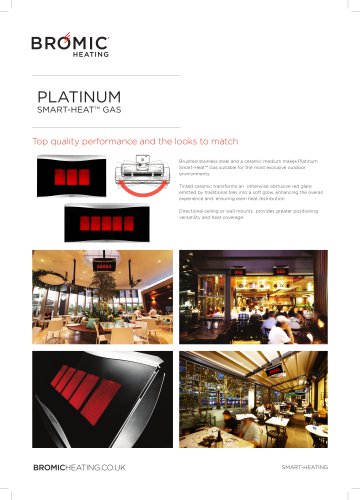
PRODUCT DESCRIPTION The Platinum Smart-Heat Series Gas Radiant Heaters are designed to provide effective heating. The heaters incorporate full function electronic controls, allowing them to be operated remotely from a conveniently located switch. The heaters have been designed to withstand the rigors of the outdoors. NOTE: The Platinum heaters are designed only for wall mounting or ceiling pole mounting With Heater Deflector Wall Bracket / Control Housing Mounting Hole Positions A IMPORTANT This appliance is approved for outdoor or amply ventilated area use and for NON DOMESTIC INDOOR APPLICATIONS,...
Open the catalog to page 6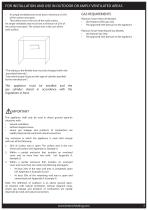
• An amply ventilated area must have a minimum of 25% of the surface area open. • The surface area is the sum of the walls surface An amply ventilated area must have a minimum of 25% of the surface area open. The surface area is the sum of the walls surface. GAS REQUIREMENTS Platinum Smart-Heat LPG Models: • Use Propane (LPG) gas only • The approved inlet pressure to the appliance Platinum Smart-Heat Natural Gas Models: • Use Natural Gas Only • The approved inlet pressure to the appliance "The tubing or the flexible hose must be changed within the prescribed intervals"; "Use only the type of...
Open the catalog to page 7
When selecting the installation location for the Platinum Smart-Heat Gas Heaters, the following mounting clearances should be followed. Care should be taken to ensure that the heater is not installed: • Where heat/ignition can cause damage to gas cylinders/ lines • Near other combustible materials • In open locations subject to rain • In indoor residential locations • In areas without sufficient clearances (refer below) Note: When Installing with No protective cover, the following installation clearances shall apply: Note: Heater should be installed in such a way so as to allow adequate; • Clearance...
Open the catalog to page 8
INSTALLATION INSTRUCTIONS HEATER INSTALLATION INSTRUCTIONS ! WARNING This appliance must be installed and used in accordance with local Gas installation standard and must meet all the requirements stipulated in the “Installation Requirements” section of this manual. Before installation, check that the location distribution conditions, nature of gas and pressure and adjustment of the appliance are compatible. 2. Connect an approved Flexible Gas Connector (as supplied) to the inlet fitting on the heater using 2 wrenches to tighten. Leak Test by applying compressed air 60mbar to open end of flexible...
Open the catalog to page 9
INSTALLATION INSTRUCTIONS CONTINUED... 4. Attach Heater to Wall Bracket/Control Housing • Remove Front Cover from Control Housing Attach Heater to Wall Bracket/Control Housing by inserting Mounting Arm into lower channel of Wall Bracket. Ensure that the Gas Hose and Wiring Harness slide through the groove on top side of the control Housings lower channel and remain undamaged by the metals edges during assembly. It may be necessary to manipulate the gas Hose so that the arm can slide into place. TIP: Do not install the mounting pin at this point. • Spray soapy water on the arm to ease the sliding....
Open the catalog to page 10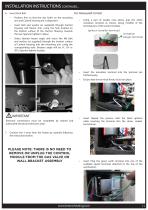
INSTALLATION INSTRUCTIONS CONTINUED... For Honeywell Control 6. Insert Pivot Bolt • Position Arm so that the rear hole’s on the mounting arm and Control Housing are in alignment Insert Bolt and washer (as supplied) through Control Housing and Mount Arm, using the hole located on the bottom surface of the Control Housing, towards the rear. Spanner tighten in place Using a pair of needle nose pliers, grip the white ionisation terminal as shown, being mindful of the terminal pins of the control module. Ignition (smaller terminal) Ionisation (larger terminal) Select desired heater angle and insert...
Open the catalog to page 11All Bromic Heating catalogs and technical brochures
 BROMIC DESIGN SERVICES
8 Pages
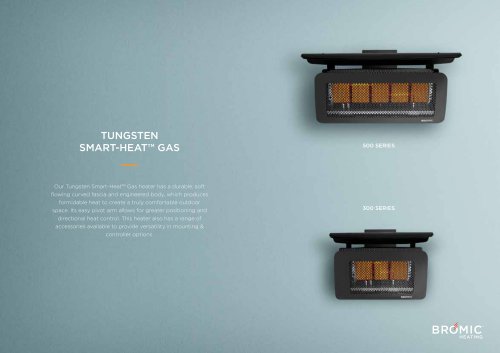 TUNGSTEN SMART-HEAT™ GAS
5 Pages
 500/300 series
5 Pages
 PLATINUM SMART-HEAT™ MARINE
8 Pages
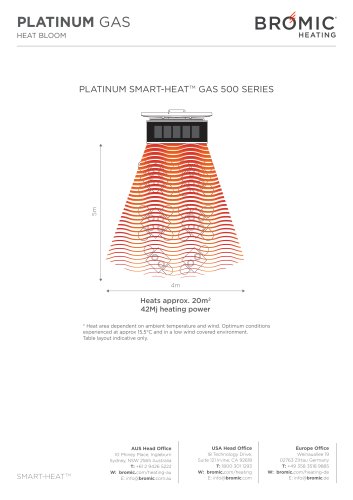 PLATINUM GAS HEAT BLOOM
1 Page
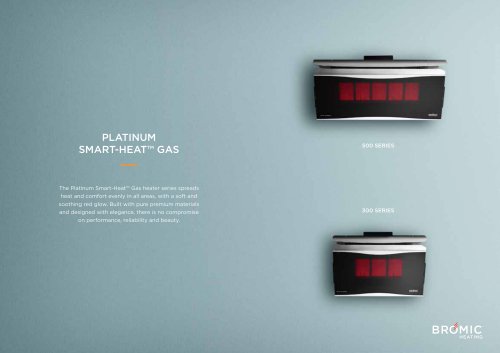
 PLATINUM SMART-HEAT™ GAS
2 Pages
 Bromic Heating Catalogue
19 Pages
 Tungsten Portable
2 Pages
 Tungsten Electric
2 Pages
 Tungsten Gas
2 Pages
 Platinum Electric SII
2 Pages
 Platinum Electric
2 Pages
 Platinum Gas
2 Pages
 Bromic Info Pack
16 Pages


- Infrared heater
- Electric infrared heater
- Commercial infrared heater
- Wall infrared heater
- Heating controller
- Ceiling-mounted infrared heater
- Infrared patio heater
- Hanging infrared heater
- Ceramic infrared heater
- Floor infrared patio heater
- Gas infrared heater
- Gas infrared patio heater
- Mobile infrared patio heater
- Free-standing infrared patio heater
- Parasol infrared heater