- Catalogs
- Breeze Controls
- Breeze BC507 Datasheet
Breeze BC507 Datasheet
1 /2Pages
Breeze BC507 Datasheet
1 /2Pages
Catalog excerpts
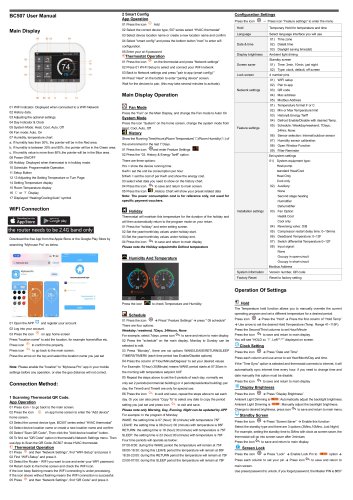
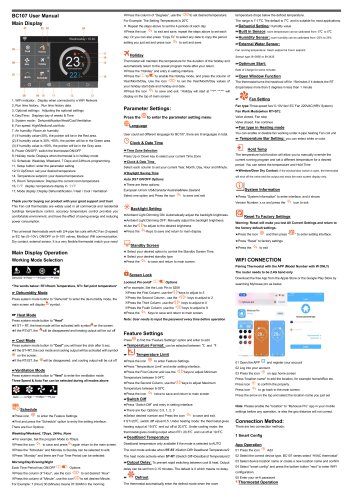
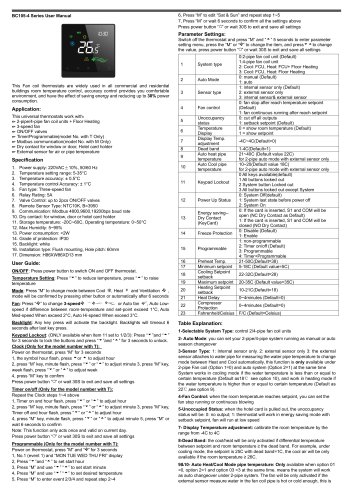
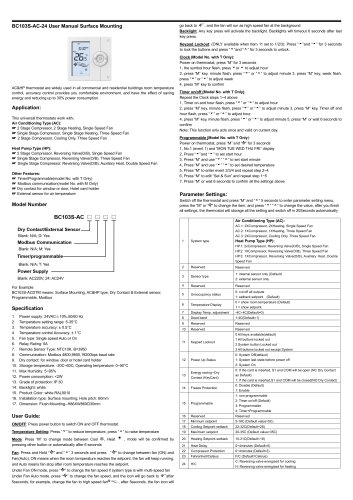
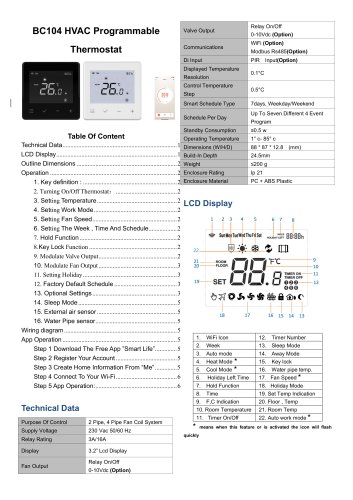
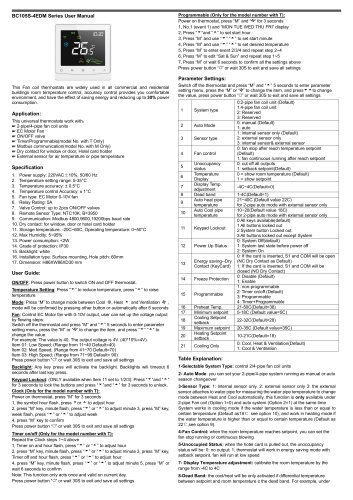
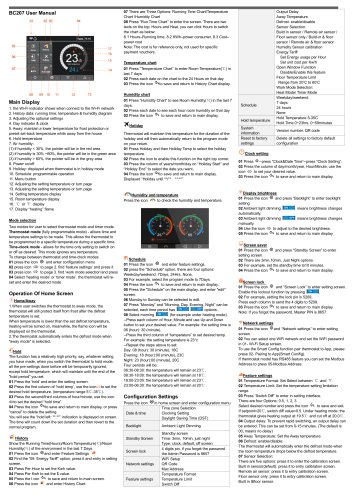
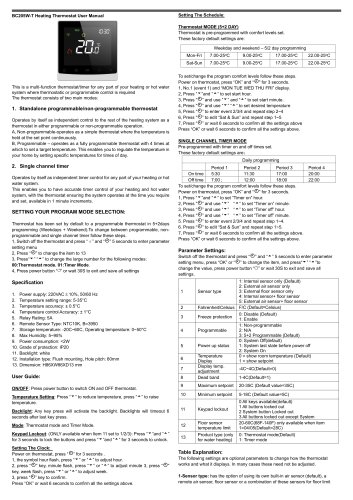
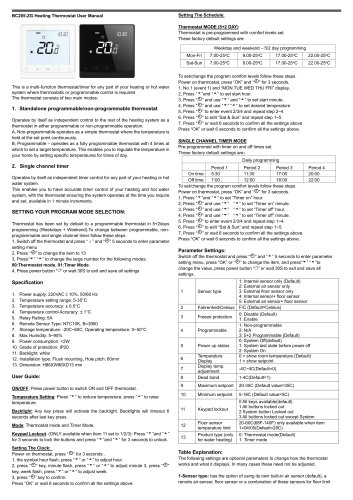
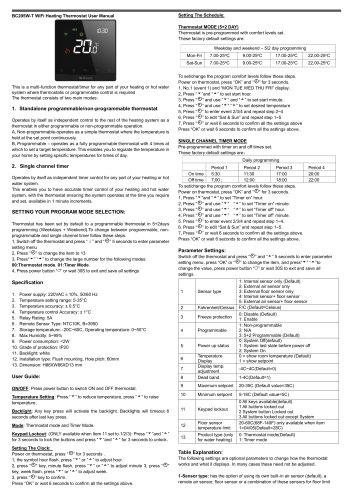
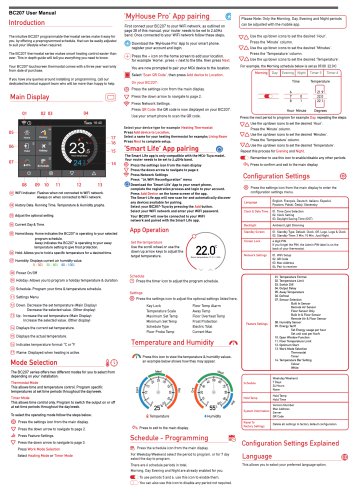
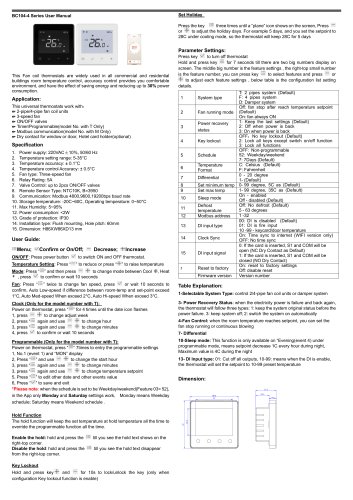
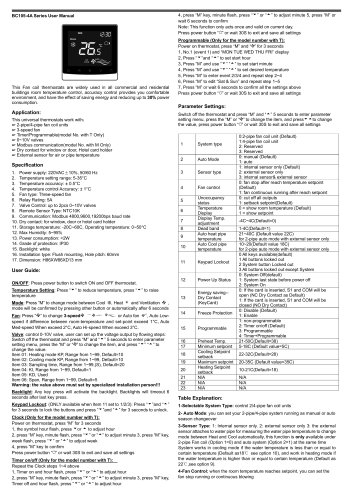
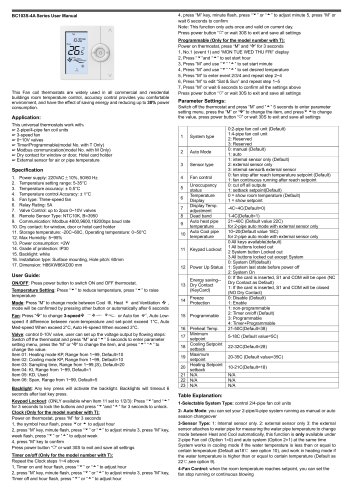
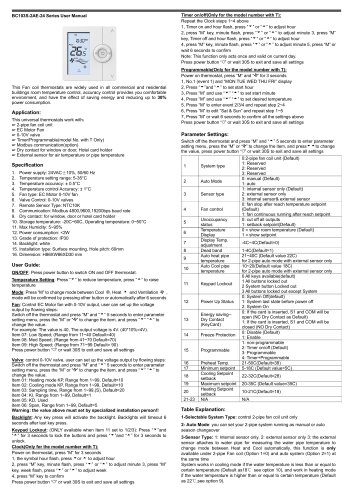
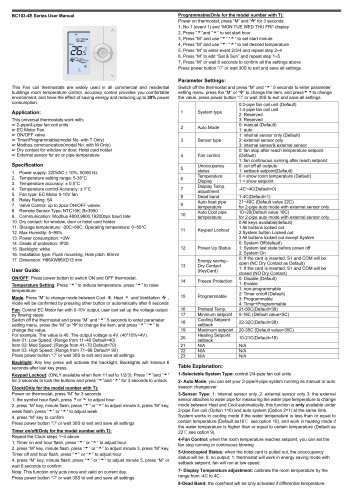
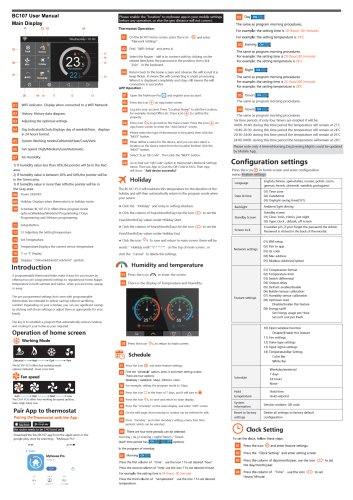
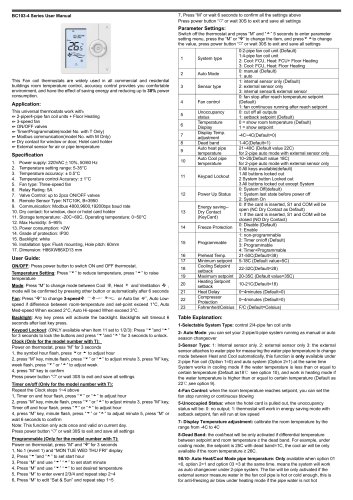
Configuration Settings Press the icon © ^ Press icon “Feature settings” to enter the menu Download the free App from the Apple Store or the Google Play Store by searching “Myhouse Pro” as below Note: Please enable the "location" to “Myhouse Pro” app in your mobile settings before any operation, or else the geo distance will not correct. Connection Method: 1 Scanning Thermostat QR Code. 01 Press icon < to go back to the main screen. 02 Press the icon © on app home screen to enter the “Add device" home screen. 03 Select the correct device type, BC507 series select “HVAC thermostat” 04 Select device location name or create a new location name and confirm 05 Select "Scan QR Code", Then click the "Add device location" button. 06 To find out "QR Code" option in thermostat's Network Settings menu. Then use App to Scan the QR Code, BC507 chose HVAC thermostat. Thermostat Operation 01 Press and then “Network Settings”, find “WiFi-Setup” and press it 02 Find “WIFI-Setup” and press it. 03 Select the Router - WIFI you want to use and enter your WIFI password. 04 Return back to the home screen and check the WIFI icon. If the icon keep flashing means the WIFI connecting is under processing. If the icon shows without flashing means the WIFI connection is successful. 05 Press and then “Network Settings”, find “QR Code” and press it. 2 Smart Config App Operation 02 Select the correct device type, 507 series select “HVAC thermostat” 03 Select device location name or create a new location name and confirm 04 Select "smart config" and press the bottom button "next” to enter wifi configuration. 05 Enter your wi-fi password Thermostat Operation 01 Press the icon on the thermostat and press “Network settings” 02 Press 01 WI-FI Setup to select and connect your WIFI network 03 Back to Network settings and press "pair to app (smart config) " 04 Press” Next" on the bottom to enter "pairing device" screen. Wait for the devices to pair, (this may take several minutes to activate). Main Display Operation Press the “Fan” on the Main Display, and change the Fan mode to Auto/ On System Mode Press the icon “System” on the home screen, change the system mode from Heat, Cool, Auto, Off Show the Running Time(Hours)/Room Temperature(C)/Room Humidity(%) of the environment in the last 7 Days. 01 Press the icon ©and enter Feature Settings W 02 Press the “03. History & Energy Tariff” option. There are three options: Hrs = show the device running time Kw/h= set the unit kw consumption per hour $/Kwh = set the cost of per Kw/h and show the energy cost. 03 select what data you need to show on the history chart. 04 Press the icon ^ to save and return to main screen. 05 Press the icon m ,History Chart will show your preset related data Note: The power consumption cost is for reference only, not used for specific payment vouchers. Thermostat will maintain this temperature for the duration of the holiday and will then automatically return to the program mode on your return. 01 Press the “holiday” and enter setting screen. 02 Set the year/month/day values under holiday start. 03 Set the year/month/day values under holiday end. 04 Press the icon ^ to save and return to main display Please note the Holiday setpoint=the Defrost temperature 01 Press the icon © Press” Feature Settings” press" 05 schedule" There are four options: Weekday / weekend, 7Days, 24Hours, None For example, select 7days. press icon ^ to save and return to main display. 02 Press the "schedule" on the main display, Monday to Sunday can be selected to edit. 03 Press “Monday”, there are six options WAKE/LEAVE/RETURN/SLEEP /TIMER5/TIMER6 (each time period has Enable/Disable options) 04 Press the column of “Hour/Minute/Degrees” to set your desired values For Example: 7(Hour):30(Minute) means WAKE period starts at 07:30am in the morning with temperature setpoint XXF 05 Repeat the steps above to set the 6 periods of each day, normally we only set 2 periods(commercial building) or 4 periods(residential building) per day, the Timer5 and Timer6 are only for special use. 06 Press the icon to exit and save, repeat the steps above to set each day. Or you can also press “Copy To” to select any date to copy the period setting you just set and press icon to exit and save. Please note only Morning, Day, Evening, Night can be updated by APP For example: In the program of Monday: WAKE: the setting time is 07 (hour): 00 (minute) with temperature 75F LEAVE: the setting time is 08 (hour): 00 (minute) with temperature is 85F RETURN: the setting time is 18 (hour):30 (minute) with temperature is 75F SLEEP: the setting time is 23 (hour):00 (minute) with temperature is 78F Four time periods will operate as below: 07:00-8:00: during this WAKE period the temperature will remain at 75F 08:00-18:30: during this LEAVE period the temperature will remain at 85F 18:30-23:00: during this RETURN period the temperature will remain at 75F 23:00-07:00: during this SLEEP period the temperature will remain at 78F The Temperature hold function allows you to manually override the current operating program and set a different temperature for a desired period. Press icon © ^ Press the “Hold” ^ Press the first column of “Hold Temp” ^ Use arrow to set the desired Hold Temperature (Temp. Range 41~115F). Press the Second/Third columns to set Hour/Minute Press the icon ^ to save and return to main display You will see “HOLD xx °F, Left**:**” displayed on screen. Clock Setting Press the icon © ^ Press “Date and Time” Press each column and use arrow to set Year/Month/Day and time. If the “Time Sync” option is selected and thermostat connects to internet, it will automatically sync internet time every hour. if you need to change time and date manually this option must be disable. Press the icon to save and return to main display Display Brightness Press the icon © ^ Press “Display Brightness” Ambient Light Dimming is Automatically adjust the backlight brightness. Ambient Light Dimming is : "*■: Manually adjust the backlight brightness. Change to desired brightness, press icon ^ to save and return to main menu. Standby Screen Press the icon © ^ Press “Screen Saver” Enable this function Select the standby type and there are 3 options (3Mins,10Mins, Just Night) For example, setting the standby time to 3Mins with clock as screen saver, the thermostat will go into screen saver after 3mintues Press the icon ^ to save and return to main display. Screen Lock Press the icon © Press “Lock” Enable Lock Pin to l ONM option Press each column to set your pin Press icon ^ to save and return to main screen.
Open the catalog to page 1All Breeze Controls catalogs and technical brochures
 Breeze TV01 Datasheet
18 Pages
 Breeze V7-06 Datasheet
2 Pages
 Breeze V7-05 Datasheet
3 Pages
 Breeze V7-04 Datasheet
2 Pages
 Breeze V7-03 Datasheet
2 Pages
 Breeze V7-02 Datasheet
2 Pages
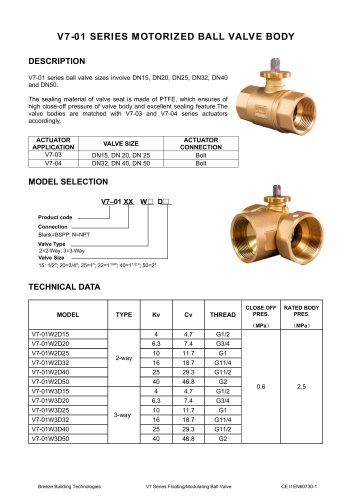 Breeze V7-01 Datasheet
2 Pages
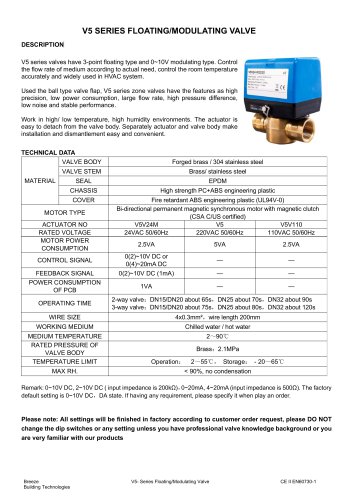 Breeze V5 Datasheet
3 Pages
 Breeze V4 Datasheet
8 Pages
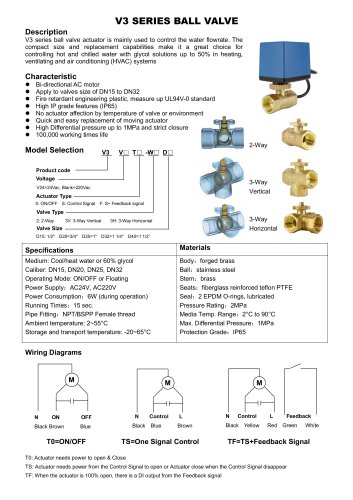 Breeze V3 Datasheet
2 Pages
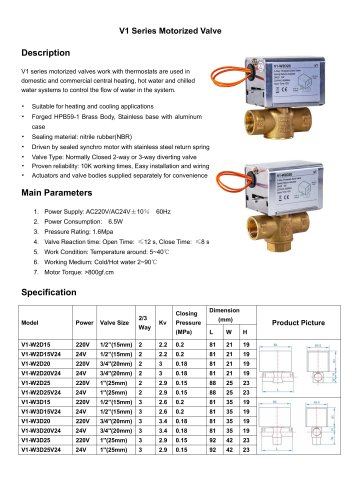 Breeze v1 datasheet
2 Pages
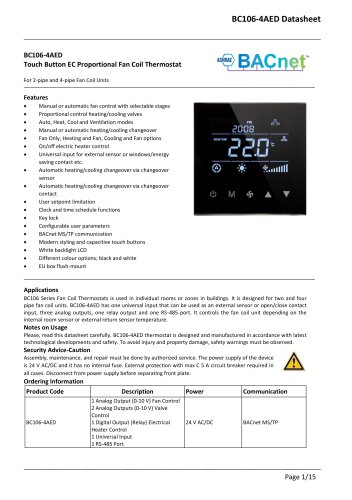 Breeze BC106-4AED Datasheet
15 Pages
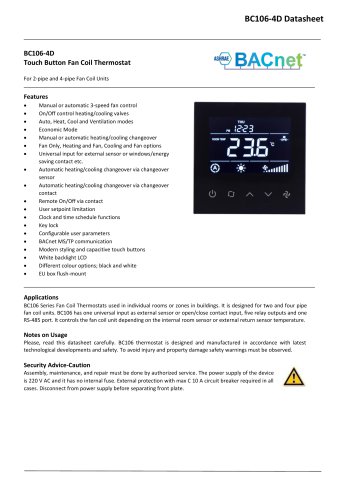 Breeze BC106-4D Datasheet
18 Pages
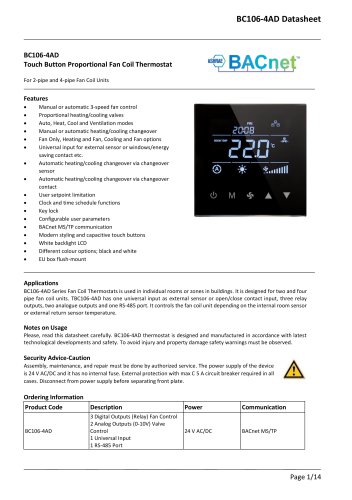 Breeze BC106-4AD Datasheet
14 Pages
 Breeze BC107-2A/4A LoRaWAN
3 Pages
 Breeze BC107-2/4 LoRaWAN
2 Pages
 Breeze BC205Z-T Datasheet
3 Pages
 Breeze BC105W-4D Datasheet
3 Pages
 Breeze BC105-AC&HP Datasheet
2 Pages
 Breeze BC103-AC&HP Datasheet
2 Pages
 Breeze BC107W-4E Datasheet
3 Pages
 Breeze BC105W-2/4D Datasheet
3 Pages
 Breeze BC104W-4D Datasheet
6 Pages
 Breeze BC105W-4ED Datasheet
3 Pages
 Breeze BC204-E Datasheet
6 Pages
 Breeze BC203-E Datasheet
2 Pages
 Breeze BC205-E Datasheet
3 Pages
 Breeze BC207-E Datasheet
2 Pages
 Breeze BC204 Datasheet
2 Pages
 Breeze BC205W Datasheet
3 Pages
 Breeze BC205Z-T Datasheet
3 Pages
 Breeze BC205W-T Datasheet
3 Pages
 Breeze BC207W-T Datasheet
3 Pages
 Breeze BC203 Datasheet
2 Pages
 Breeze BC104-4AM Datasheet
2 Pages
 Breeze BC107-4EDM Datasheet
3 Pages
 Breeze BC107-2A/4A Datasheet
3 Pages
 Breeze BC105-4EDM Datasheet
2 Pages
 Breeze BC105-4AEDM Datasheet
2 Pages
 Breeze BC105-4AD Datasheet
2 Pages
 Breeze BC103-4ADM Datasheet
2 Pages
 Breeze BC103-2AEDM Datasheet
2 Pages
 Breeze BC103-4EDM Datasheet
2 Pages
 Breeze BC35-4 Datasheet
2 Pages
 Breeze BC104-4M Datasheet
2 Pages
 Breeze BC104W-4 Datasheet
2 Pages
 Breeze BC105W-4 Datasheet
2 Pages
 Breeze BC105-4DM Datasheet
2 Pages
 Breeze BC103S-ACDM Datasheet
2 Pages
 Breeze BC107-2/4 Datasheet
3 Pages
 Breeze BC107-4DM Datasheet
3 Pages
 Breeze BC107W-2/4 Datasheet
3 Pages
 Breeze BC103-4DM Datasheet
2 Pages


- White thermostat
- Programmable thermostat
- Heating thermostat
- Digital thermostat
- Wall-mounted thermostat
- Thermostat with digital display
- Room thermostat
- Wireless thermostat
- Air conditioning thermostat
- Black thermostat
- Thermostat with touchscreen
- Manual thermostat
- Recessed thermostat
- Underfloor heating thermostat
- WiFi thermostat
- Home automation system thermostat
- Radio thermostat
- Recessed wall thermostat
- Ventilation system thermostat