- Catalogs
- Breeze Controls
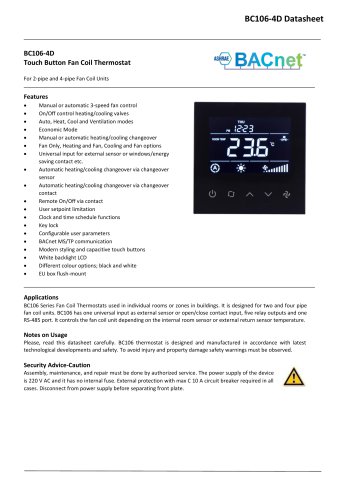
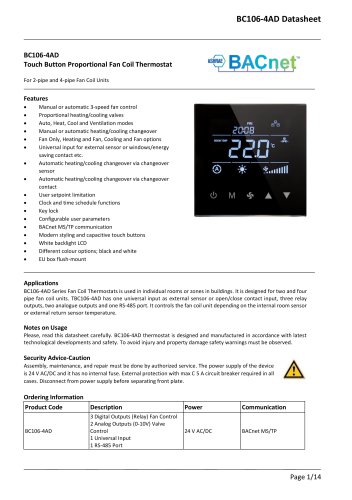
- Breeze BC207-E Datasheet
Breeze BC207-E Datasheet
1 /2Pages
Breeze BC207-E Datasheet
1 /2Pages
Catalog excerpts
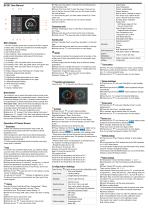
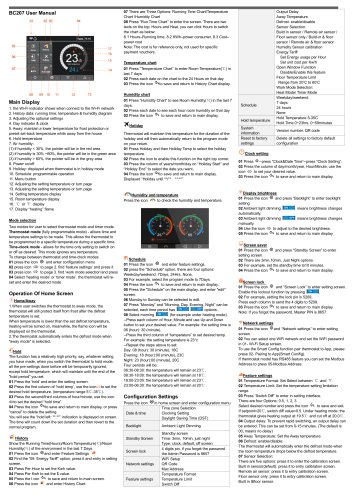
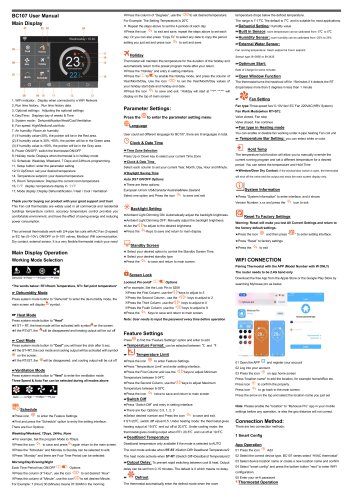
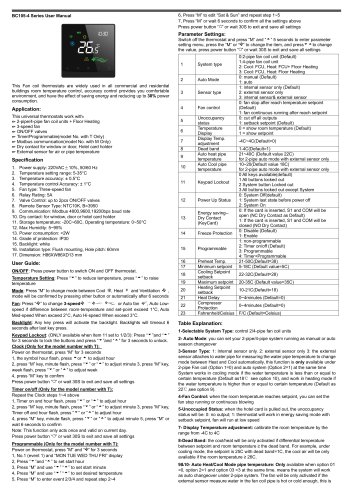
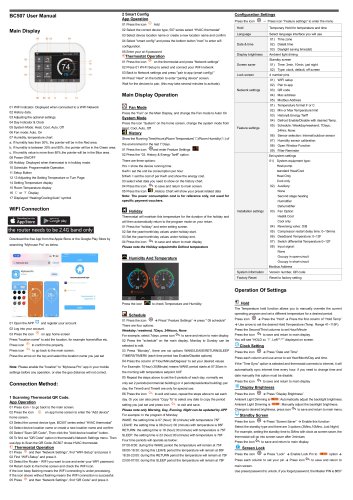
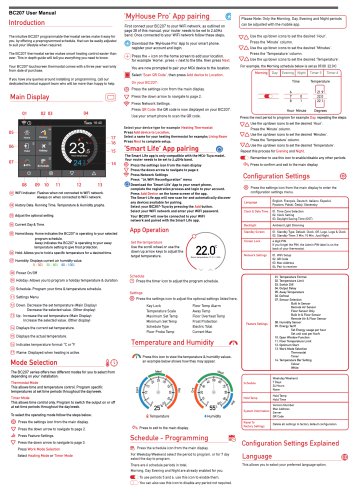
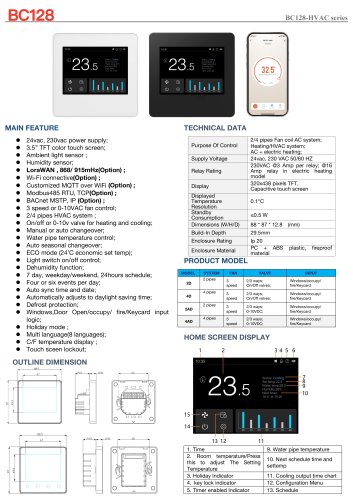
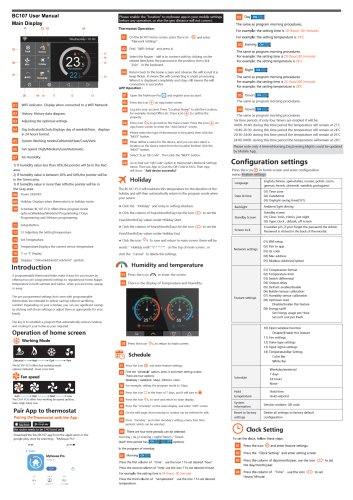
Configuration Settings Press the icon ® in home screen and enter configuration menu Clock setting Main Display 1. the Wi-Fi indicator shows when connect to the Wi-Fi network 2. History data: running time; temperature & humidity diagram 3. Adjusting the optional settings 5. Away: maintain a lower temperature for frost protection or preset set-back temperature while away from the house (1) if humidity < 30%, the pointer will be in the red area (2) if humidity is 30% ~60%, the pointer will be in the green area (3) if humidity > 60%, the pointer will be in the grey area 9. Holiday: displayed when thermostat is in holiday mode 10. Schedule: programmable operation 12. Adjusting the setting temperature or turn page 13. Adjusting the setting temperature or turn page 14. Setting temperature display 15. Room temperature display 17. Display “heating” flame Mode selection Two modes for user to select thermostat mode and timer mode. Thermostat mode (fully programmable mode) - allows time and temperature settings to be made. This allows the thermostat to be programmed to a specific temperature during a specific time. Time-clock mode - allows for the time only setting to switch on or off as desired. This mode ignores any temperature. To change between thermostat and time-clock modes: 01 press the icon @ and enter configuration menu 02 press icon <10 to page 2. find ‘feature settings’ and press it 03 press icon <n> to page 3. find ‘work mode selection’and press 04 Select ‘heating mode' or ‘timer mode'. the thermostat will reset and enter the desired mode Operation Of Home Screen 1 .When user switches the thermostat to away mode, the thermostat will still protect itself from frost after the defrost temperature is set. When temperature is lower than the set defrost temperature, heating will be turned on, meanwhile, the flame icon will be displayed on the thermostat. 2.The thermostat automatically enters the defrost mode when "away mode" is selected. The function has a relatively high priority, say, whatever setting you have made, when you switch the thermostat to hold mode, all the pre-settings done before will be temporarily ignored, except hold temperature, which will maintain until the end of the "hold period" you set. 01 Press the ‘hold' and enter the setting screen. 02 Press the first column of ‘hold temp’, use the icon to set the desired hold temperature. (temperature range 5C-35C). 03 Press the second/third columns of hour/minute, use the icon <H>to set the desired “hold time”. 04 Press the icon ^to save and return to main display, or press “cancel” to delete the setting. You will see the “hold left: **:**” indication is displayed on screen. The time will count down the set duration and then revert to the normal program. Show the Running Time(Hours)/Room Temperature(C)/Room Humidity(%) of the environment in the last 7 Days. 01 Press the icon ©and enter Feature Settings 02 Find the “09. Energy Tariff” option, press it and entry in setting screen. 03 Press Per Hour to set the Kwh value. 05 Press the I con ^ to save and return to main screen. 06 Press the icon - and enter History Chart. 07 There are Three Options: Running Time Chart/Temperature Chart /Humidity Chart 08 Press “Run Time Chart” to enter the screen. There are two texts on the top: Hours and Heat, you can click Hours to switch the chart as below: 8.1 Hours-Running time, 8.2 KWh-power consumer, 8.3 Cost-power cost Note: The cost is for reference only, not used for specific payment vouchers. Temperature chart 01 Press “Temperature Chart” to enter Room Temperature(C) in last 7 days 02 Press each date on the chart to the 24 Hours on that day 03 Press the icon ^to save and return to History Chart display. Humidity chart 01 Press “Humidity Chart” to see Room Humidity(%) in the last 7 days. 02 Press each date to see each hour room humidity on that day 03 Press the icon ^ to save and return to main display. Thermostat will maintain this temperature for the duration of the holiday and will then automatically return to the program mode on your return. 01 Press Holiday and then Holiday Temp to select the holiday temperature. 02 Press the icon to enable this function on the right top corner. 03 Press the column of years/month/day on “Holiday Start” and “Holiday End” to select the date you want. 04 Press the icon ^to save and return to main display. Displayed “Holiday until **/** **:**” Press the icon A to check the humidity and temperature. 01 Press the icon @ and enter feature settings. 02 press the "Schedule" option, there are four options: Weekday/weekend, 7Days, 24Hrs, None. 03 For example, select the program mode to 7Days. 04 Press the icon ^ to save and return to main display. 05 Press the "Schedule" on the main display, and enter "edit" screen. 06 Monday to Sunday can be selected to edit. 07 Press “Monday” and “Morning, Day, Evening, Night” can be selected, each time period has d^H options. 08 Select morning d^H (for example under heating mode). --Press each column of Hour, Minute and use Up and Down button to set your desired value. For example: the setting time is 06 (hour): 30 (minute). --Press the third column of “temperature” to set desired temp. For example: the setting temperature is 23°c --Repeat the steps above to set: Day: 08 (hour): 30 (minute), 18C Evening: 18 (hour):00 (minute), 23C Night: 23 (hour):00 (minute), 20C Four periods will be: 06:30-08:30: the temperature will remain at 23C. 08:30-18:00: the temperature will remain at 18C. 18:00-23:00: the temperature will remain at 23C. 23:00-06:30: the temperature will remain at 20C 01 Press ©—press "Clock&Date Time”-press "Clock Setting”. 02 Press the column of day/month/year, Hour/Minute, use the icon oo to set your desired value. 03 Press the icon ^ to save and return to main display. Display brightness 01 Press the icon © and press “Backlight” to enter backlight setting 02 Ambient light dimming means brightness changes 03 Ambient light dimming means brightness changes 04 Use the icon oo to adjust to the desired brightness. 05 Press the icon ^ to save and return to main display. Screen saver 01 Press the icon © and press “Standby Screen” to enter setting screen. 02 There are 3min,10min, Just Night options. 03 For example, set the standby time tol 0 minutes. 04 Press the icon ^ to save and return to main display. Screen lock 01 Press the icon © and “Screen Lock” to enter setting screen. Enable this lockout function by pressing d^H. 02 For example, setting the lock pin is 5209. Press each column to send the 4 digits to 5209. 03 Press the icon ^ to save and return to main display. Note: If you forget the password, Master PIN is 8657. Network settings 01 Press the icon © and “Network settings” to enter setting screen. 02 You can select one WiFi network and set the WiFi password in 01- Wi-Fi Setup screen. To use the Smart Config function pair thermostat to App, please press 02- Pairing to App(Smart Conifig). If thermostat model has RS485 feature you can set the Modbus Address to press 05-Modbus Address. Feature settings 01 Temperature Format: Set Select between C and F. 02 Temperature Limit: Set the temperature setting limitation range. 03 Press “Switch Diff” to enter in setting interface. There are four Options: 0.5, 1, 2, 3 Select desired number and press the icon ^ to save and exit. If setpoint=20C, switch diff value=0.5. Under heating mode: the thermostat gives heating output at 19.5C and cut off at 20.0C. 04 Output delay: To prevent rapid switching, an output delay can be entered. This can be set from 0-15 minutes. (The default is 00, means no delay) 05 Away Temperature: Set the Away temperature. The thermostat will automatically enter the defrost mode when the room temperature drops below the defrost temperature. There are five options: press it to enter the calibration screen. Built in sensor(default): press it to entry calibration screen. Remote air sensor: press it to entry calibration screen. Floor sensor only: press it to entry calibration screen.
Open the catalog to page 1All Breeze Controls catalogs and technical brochures
 Breeze TV01 Datasheet
18 Pages
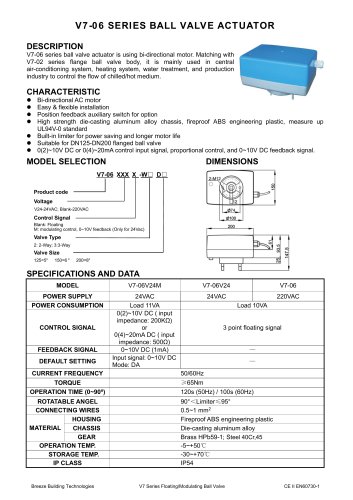 Breeze V7-06 Datasheet
2 Pages
 Breeze V7-05 Datasheet
3 Pages
 Breeze V7-04 Datasheet
2 Pages
 Breeze V7-03 Datasheet
2 Pages
 Breeze V7-02 Datasheet
2 Pages
 Breeze V7-01 Datasheet
2 Pages
 Breeze V5 Datasheet
3 Pages
 Breeze V4 Datasheet
8 Pages
 Breeze V3 Datasheet
2 Pages
 Breeze v1 datasheet
2 Pages
 Breeze BC106-4AED Datasheet
15 Pages
 Breeze BC106-4D Datasheet
18 Pages
 Breeze BC106-4AD Datasheet
14 Pages
 Breeze BC107-2A/4A LoRaWAN
3 Pages
 Breeze BC107-2/4 LoRaWAN
2 Pages
 Breeze BC205Z-T Datasheet
3 Pages
 Breeze BC105W-4D Datasheet
3 Pages
 Breeze BC105-AC&HP Datasheet
2 Pages
 Breeze BC103-AC&HP Datasheet
2 Pages
 Breeze BC507 Datasheet
2 Pages
 Breeze BC107W-4E Datasheet
3 Pages
 Breeze BC105W-2/4D Datasheet
3 Pages
 Breeze BC104W-4D Datasheet
6 Pages
 Breeze BC105W-4ED Datasheet
3 Pages
 Breeze BC204-E Datasheet
6 Pages
 Breeze BC203-E Datasheet
2 Pages
 Breeze BC205-E Datasheet
3 Pages
 Breeze BC204 Datasheet
2 Pages
 Breeze BC205W Datasheet
3 Pages
 Breeze BC205Z-T Datasheet
3 Pages
 Breeze BC205W-T Datasheet
3 Pages
 Breeze BC207W-T Datasheet
3 Pages
 Breeze BC203 Datasheet
2 Pages
 Breeze BC104-4AM Datasheet
2 Pages
 Breeze BC107-4EDM Datasheet
3 Pages
 Breeze BC107-2A/4A Datasheet
3 Pages
 Breeze BC105-4EDM Datasheet
2 Pages
 Breeze BC105-4AEDM Datasheet
2 Pages
 Breeze BC105-4AD Datasheet
2 Pages
 Breeze BC103-4ADM Datasheet
2 Pages
 Breeze BC103-2AEDM Datasheet
2 Pages
 Breeze BC103-4EDM Datasheet
2 Pages
 Breeze BC35-4 Datasheet
2 Pages
 Breeze BC104-4M Datasheet
2 Pages
 Breeze BC104W-4 Datasheet
2 Pages
 Breeze BC105W-4 Datasheet
2 Pages
 Breeze BC105-4DM Datasheet
2 Pages
 Breeze BC103S-ACDM Datasheet
2 Pages
 Breeze BC107-2/4 Datasheet
3 Pages
 Breeze BC107-4DM Datasheet
3 Pages
 Breeze BC107W-2/4 Datasheet
3 Pages
 Breeze BC103-4DM Datasheet
2 Pages


- White thermostat
- Programmable thermostat
- Heating thermostat
- Digital thermostat
- Wall-mounted thermostat
- Thermostat with digital display
- Room thermostat
- Wireless thermostat
- Air conditioning thermostat
- Black thermostat
- Thermostat with touchscreen
- Manual thermostat
- Recessed thermostat
- Underfloor heating thermostat
- WiFi thermostat
- Home automation system thermostat
- Radio thermostat
- Recessed wall thermostat
- Ventilation system thermostat