- Catalogs
- Breeze Controls
- Breeze BC107-2/4 LoRaWAN
Breeze BC107-2/4 LoRaWAN
1 /2Pages
Breeze BC107-2/4 LoRaWAN
1 /2Pages
Catalog excerpts
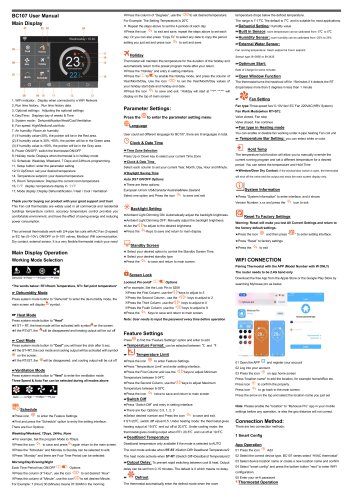
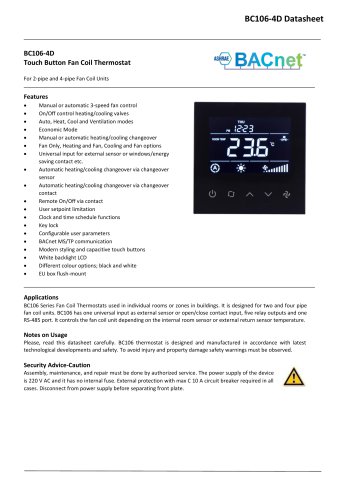
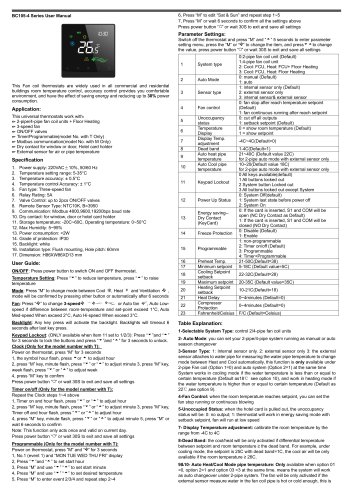
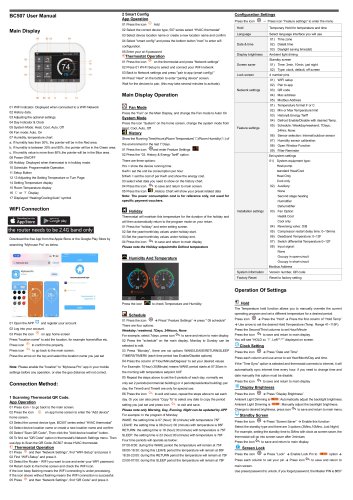
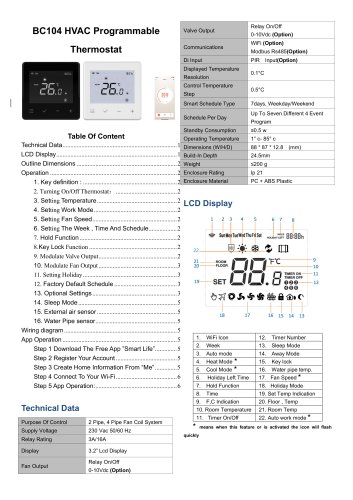
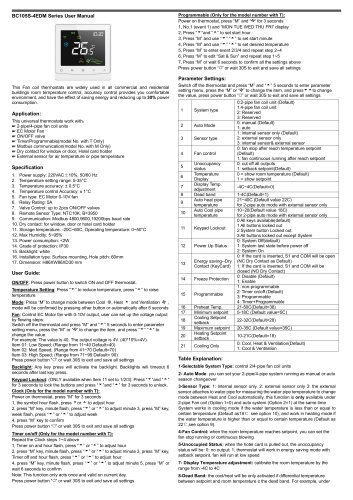
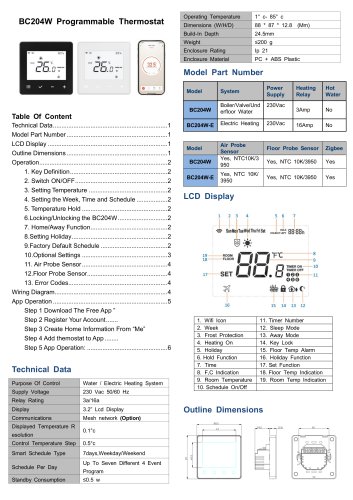
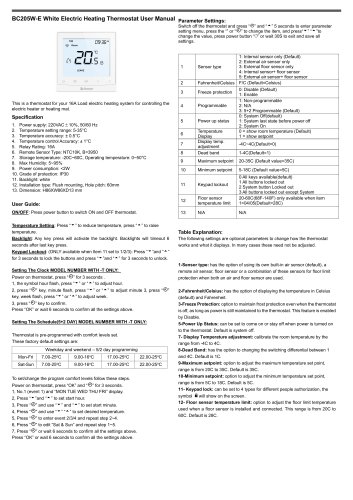
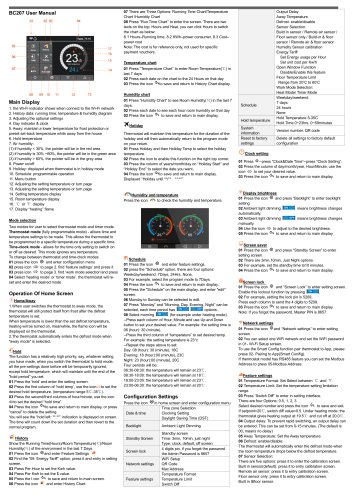
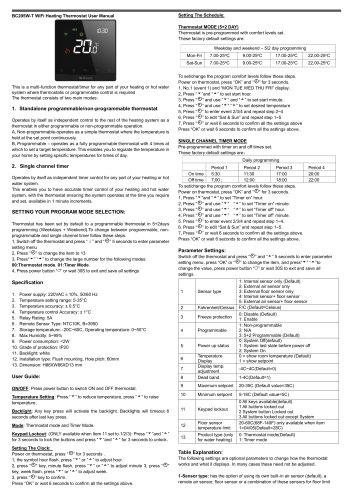
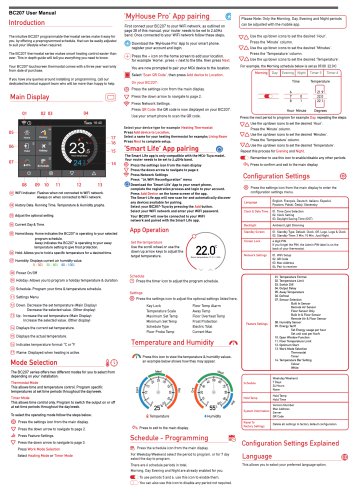
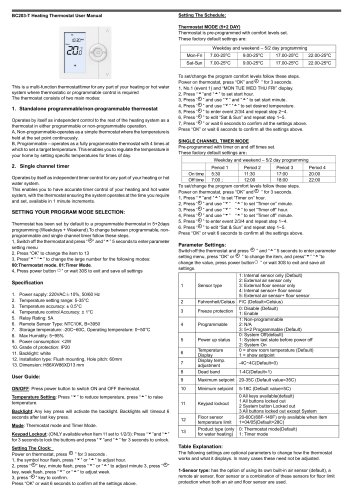
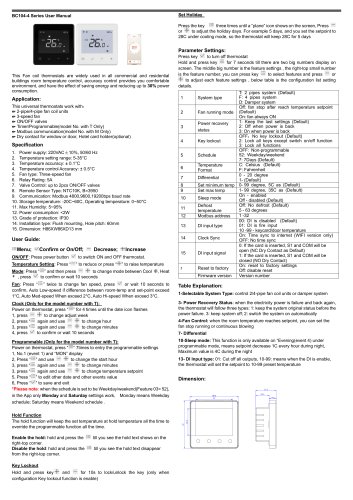
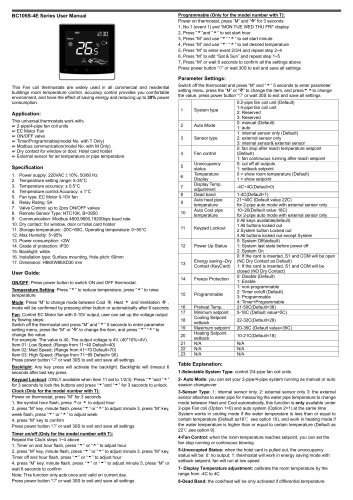
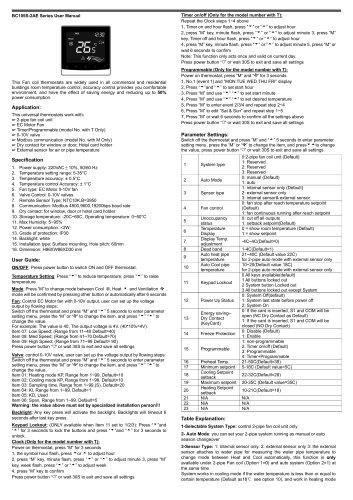
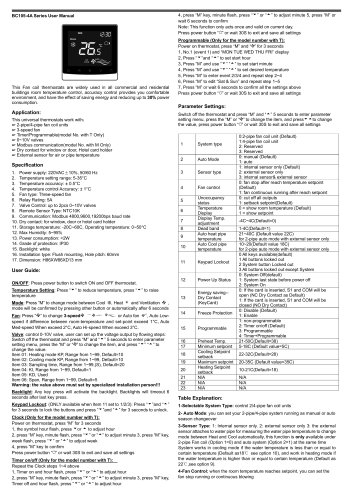
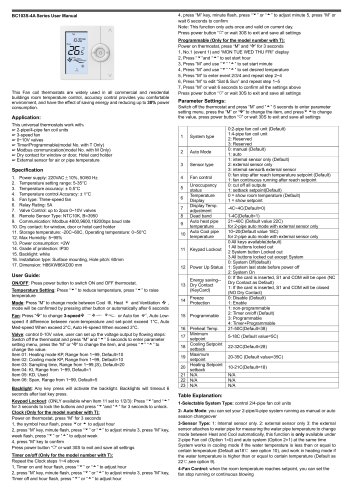
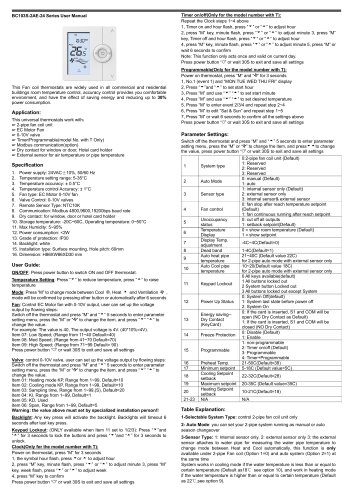
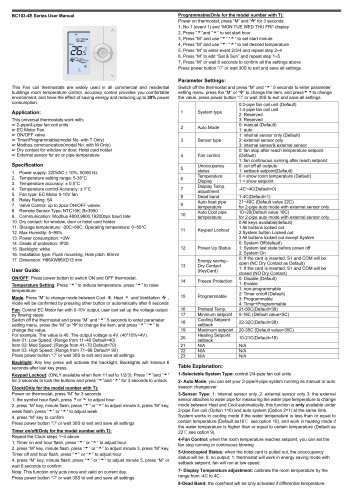
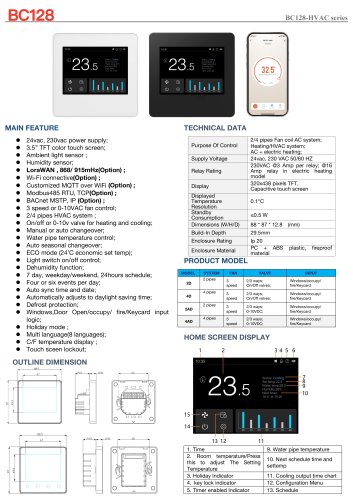
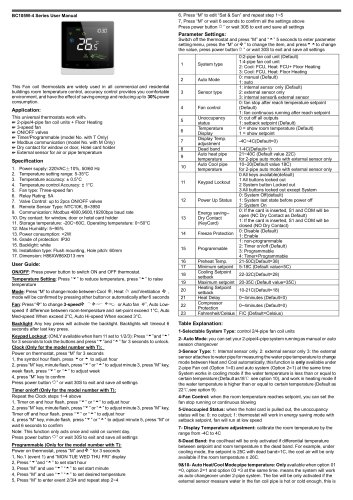
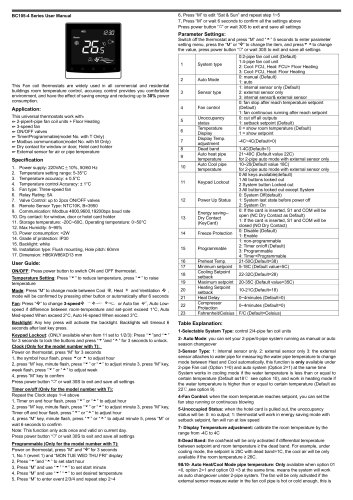
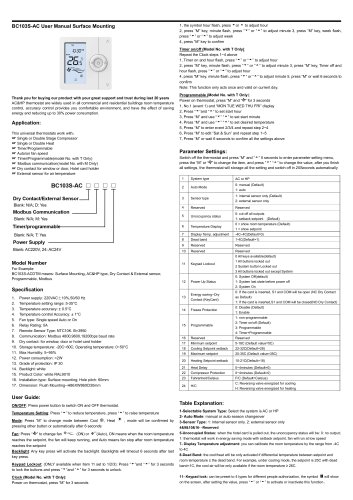
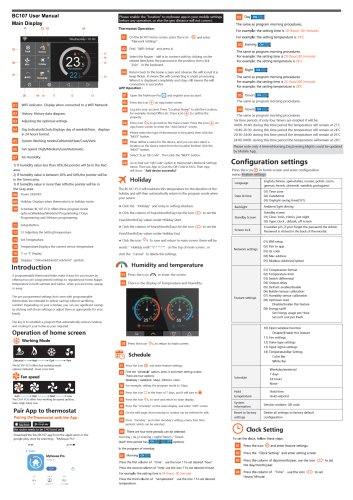
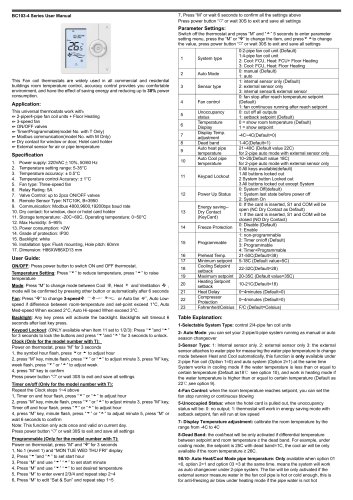
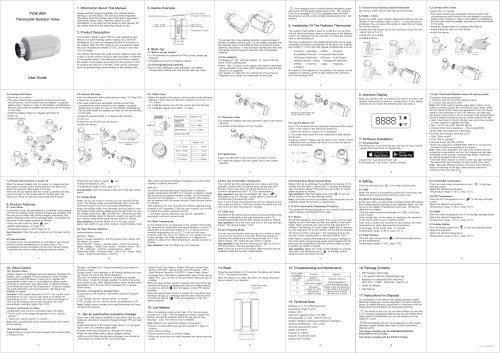
1, WiFi indicator: Display when connected to a WiFi Network 2, Run time history: Run time history data 3, Optional settings: Adjusting the optional settings 4, Day/Time: Displays day of weeks & Time 5, System mode: Dehumidification/Heat/Cool/Ventilation 7, Air humidity: Room air humidity (1) If humidity value<30%, the pointer will be in the Red area. (2) If humidity value is 30% ~60%, the pointer will be in the Green area. (3) If humidity value is >60%, the pointer will be in the Gray area. 8, Power ON/OFF: switch the thermostat ON/OFF 9, Holiday mode: Displays when thermostat is in holiday mode 10, Schedule: Weekday /Weekend, 7 Days and 24Hours programming. 11, Setup button: enter the parameter setting 12/13 Up/Down: set your desired temperature 14, Temperature setpoint: your desired temperature 15, Room Temperature: Displays the current room temperature 16, "C/°F display: temperature display in "C/°F 17, Mode display: Display Dehumidification / Heat / Cool / Ventilation Thank you for buying our product with your great support and trust This Fan coil thermostats are widely used in all commercial and residential buildings temperature control, accuracy temperature control provides you comfortable environment, and have the effect of saving energy and reducing power consumption. This universal thermostats work with 2/4-pipe fan coils with AC Fan (3-speed) or EC fan (0~10V), ON/OFF or 0~10V valves, Modbus/ Wifi communication, Dry contact, external sensor. It is a very flexible thermostat match your need Main Display Operation Working Mode Selection *The words below: RT=Room Temperature, ST= Set point temperature1b Dehumidity Mode Press system mode button to "Dehumid" to enter the de-humidity mode, the main screen will display symbol. Press system mode button to "Heat" ★ If ST > RT, the heat mode will be activated with symbol^ on the screen. ★if the RTaST, the ^ will be disappeared and heating output will be cut off Press system mode button to "Cool" you will hear the click after 5 sec. ★ If the ST<RT, the cool mode and cooling output will be activated with symbol ★ If the RTSST, the will be disappeared, and cooling output will be cut off ^Ventilation Mode Press system mode button to "Vent" to enter the ventilation mode Three Speed & Auto Fan can be selected during all modes above J^Press the column of “Degrees”, use the to set desired temperature. For Example: The Setting Temperature is 20°C Repeat the steps above to set the 4 periods of each day J^Press the icon to exit and save, repeat the steps above to set each day. Or you can also press “Copy To” to select any date to copy the period setting you just set and press icon to exit and save. Thermostat will maintain this temperature for the duration of the holiday and automatically return to the preset program mode after your return. J^Press the “Holiday” and entry in setting interface. J^Press the to to enable the Holiday mode, and press the column of Year/Month/Day, Use the icon to set the Year/Month/Day values of your holiday start date and holiday end date. J^Press the icon to save and exit. “Holiday will start at 2/22:2” will display on the top of main screen Parameter Settings: Press the to enter the parameter setting menu Language User could set different language for BC107, there are 8 languages in total. Clock & Date Time BTime Zone Selection Press Up or Down key to select your current Time Zone BClock & Date Time Select each column to set your current Year, Month, Day, Hour and Minute. ^Daylight Saving Time Auto DST ON/OFF Options ★There are three options: European Union/ US&Canada/Australia&New Zealand Select one option and Press the icon to save and exit Backlight Setting ★Ambient Light Dimming ON: Automatically adjust the backlight brightness. ★Ambient Light Dimming OFF: Manually adjust the backlight brightness. ★ Use the to adjust to the desired brightness ★ Press the Keys to save and return to main display Standby Screen ★ Select your desired option to control the Standby Screen Time. ★ Select your desired standby type ★ Press the to save and return to main screen. Lockout Pin on/off Options J^Press the First Column ,use the keys to adjust to 5 J^Press the Second Column , use the keys to adjust to 2 J^Press the Third Column ,use the keys to adjust to 0 J^Press the Fouth Column ,use the keys to adjust to 9 return to main screen. Note: User needs to input the password every time before operation Feature Settings Press to find the “Feature Settings” option and enter to edit p-Temperature Format: can be selected between °C and °F. ★ Press the icon to enter Feature Settings. ★Press “Temperature Limit” and enter setting interface. ★ Press the First Column and use the keys to adjust Minimum Temperature between 5-34C ★ Press the Second Column, use the keys to adjust Maximum Temperature between 6-35°C twice to save and return to main screen ^Switch Diff ★ Press “Switch Diff” and entry in setting interface. ★There are four Options: 0.5, 1,2,3 ★Select desired number and Press the icon to save and exit. if ST=20C, switch diff value=0.5. Under heating mode: the thermostat gives heating output at 19.5C and cut off at 20.0C. Under cooling mode: the thermostat gives cooling output when RT= 20.5C and cut off at 19.5C. BDeadBand Temperature Deadband temperature only available if the mode is selected to AUTO The cool mode activate when RT-ST aSwtich Diff+Deadband Temperature/2 The heat mode activate when ST-RT aSwtich Diff+Deadband Temperature/2 ^Output Delay: To prevent rapid switching between cool & heat. Output delay can be set from 0-15 minutes. The default is 0 which means no delay. The thermostat automatically enter the defrost mode when the room temperature drops below the defrost temperature. The range is 7-17°C.The default is 7°C and is suitable for most applications. Dehumid Setting: Humidity value B-Built in Sensor: room temperature can be calibrated from -5°C to 5°C ^Humidity Sensor: room humidity can be calibrated from -25% to 25% BExternal Water Sensor: Fan running temperature: Heat> setpoint & Cool< setpoint BOptimum Start: Rate of Charge for some minutes BOpen Window Function The thermostat turns the heat/cool off for 15minutes if it detects the RT drops/raises more than 3 degrees in less than 1 minute Fan type:Three-speed fan/ 0-10V fan/ EC Fan 220VAC(HRV System) Fan Work Mode(when RT=ST): Valve closed, Fan stop Valve closed, Fan continue BFan type in Heating mode You can enable or disable fan working under 4-pipe heating Fan coil unit b Temperature Bar Setting: you can select white or color Hold Temp The temperature hold function will allow you to manually override the current running program and set a different temperature for a desired period. You can select the temperature and Hold Time BWindow/Door Dry Contact: if the window/door switch is open, the thermostat will shut off the valve and fan output and show the main screen display only. System Information ★ Press “System Information” to enter interface, and it shows Version Number: x.xx and press the icon to exit Reset To Factory Settings Warning: Reset will make you lost All Current Settings and return to the factory default settings. ★ Press the icon and then press “ ” to enter setting interface. ★Press “Reset” to factory settings ★Press the <r?j Note: Please enable the "location" to “Myhouse Pro” app in your mobile settings before any operation, or else the geo distance will not correct. Connection Method: There are two connection methods: 02 Select the correct device type, BC107 series select “HVAC thermostat” 03 Select device location name or create a new location name and confirm 04 Select "smart config" and press the bottom button "next” to enter WIFI configuration. 05 Enter your wi-fi password Thermostat Operation Press icon to enter the Feature Settings. ★ Find and press the “Schedule” option to entry the setting interface. There are four Options: ★ For example, Set the program Mode to 7Days. J^Press the icon to save and press again return to the main screen. ^Press the “Schedule” and Monday to Sunday can be selected to edit. ^Press “Monday” and there are Four Time Period can be selected: Each Time Period has ON/OFF Options J^Press the column of “Hour”, use the icon to set desired “Hour” J^Press the column of “Minute”, use the icon to set desired Minute.
Open the catalog to page 1All Breeze Controls catalogs and technical brochures
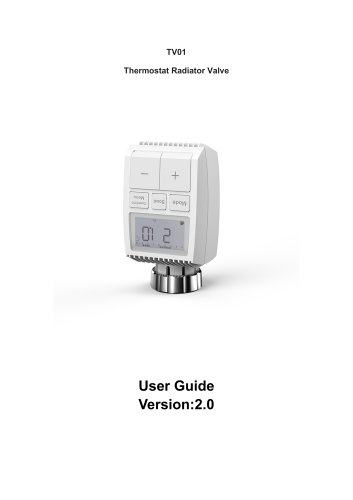 Breeze TV01 Datasheet
18 Pages
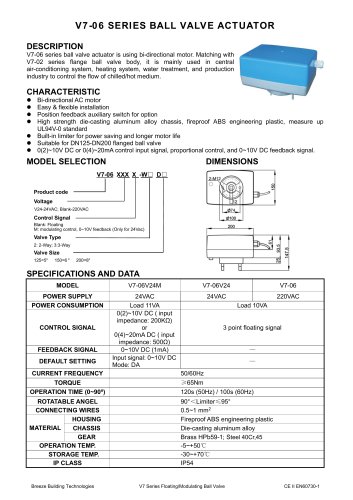 Breeze V7-06 Datasheet
2 Pages
 Breeze V7-05 Datasheet
3 Pages
 Breeze V7-04 Datasheet
2 Pages
 Breeze V7-03 Datasheet
2 Pages
 Breeze V7-02 Datasheet
2 Pages
 Breeze V7-01 Datasheet
2 Pages
 Breeze V5 Datasheet
3 Pages
 Breeze V4 Datasheet
8 Pages
 Breeze V3 Datasheet
2 Pages
 Breeze v1 datasheet
2 Pages
 Breeze BC106-4AED Datasheet
15 Pages
 Breeze BC106-4D Datasheet
18 Pages
 Breeze BC106-4AD Datasheet
14 Pages
 Breeze BC107-2A/4A LoRaWAN
3 Pages
 Breeze BC205Z-T Datasheet
3 Pages
 Breeze BC105W-4D Datasheet
3 Pages
 Breeze BC105-AC&HP Datasheet
2 Pages
 Breeze BC103-AC&HP Datasheet
2 Pages
 Breeze BC507 Datasheet
2 Pages
 Breeze BC107W-4E Datasheet
3 Pages
 Breeze BC105W-2/4D Datasheet
3 Pages
 Breeze BC104W-4D Datasheet
6 Pages
 Breeze BC105W-4ED Datasheet
3 Pages
 Breeze BC204-E Datasheet
6 Pages
 Breeze BC203-E Datasheet
2 Pages
 Breeze BC205-E Datasheet
3 Pages
 Breeze BC207-E Datasheet
2 Pages
 Breeze BC204 Datasheet
2 Pages
 Breeze BC205W Datasheet
3 Pages
 Breeze BC205Z-T Datasheet
3 Pages
 Breeze BC205W-T Datasheet
3 Pages
 Breeze BC207W-T Datasheet
3 Pages
 Breeze BC203 Datasheet
2 Pages
 Breeze BC104-4AM Datasheet
2 Pages
 Breeze BC107-4EDM Datasheet
3 Pages
 Breeze BC107-2A/4A Datasheet
3 Pages
 Breeze BC105-4EDM Datasheet
2 Pages
 Breeze BC105-4AEDM Datasheet
2 Pages
 Breeze BC105-4AD Datasheet
2 Pages
 Breeze BC103-4ADM Datasheet
2 Pages
 Breeze BC103-2AEDM Datasheet
2 Pages
 Breeze BC103-4EDM Datasheet
2 Pages
 Breeze BC35-4 Datasheet
2 Pages
 Breeze BC104-4M Datasheet
2 Pages
 Breeze BC104W-4 Datasheet
2 Pages
 Breeze BC105W-4 Datasheet
2 Pages
 Breeze BC105-4DM Datasheet
2 Pages
 Breeze BC103S-ACDM Datasheet
2 Pages
 Breeze BC107-2/4 Datasheet
3 Pages
 Breeze BC107-4DM Datasheet
3 Pages
 Breeze BC107W-2/4 Datasheet
3 Pages
 Breeze BC103-4DM Datasheet
2 Pages


- White thermostat
- Programmable thermostat
- Heating thermostat
- Digital thermostat
- Wall-mounted thermostat
- Thermostat with digital display
- Room thermostat
- Wireless thermostat
- Air conditioning thermostat
- Black thermostat
- Thermostat with touchscreen
- Manual thermostat
- Recessed thermostat
- Underfloor heating thermostat
- WiFi thermostat
- Home automation system thermostat
- Radio thermostat
- Recessed wall thermostat
- Ventilation system thermostat