
- Catalogs
- BlueScope Steel
- LOK-KLIPKLCLASSICDesignInstallGuideJune2013


LOK-KLIPKLCLASSICDesignInstallGuideJune2013

LOK-KLIPKLCLASSICDesignInstallGuideJune2013
The LYSAGHT Lok-kLip™ system offers a streamlined solution for end joints and expansion joints in LYSAGHT kLip-Lok CLASSIC® 700 roofing. It is designed for easy installation without pre-drilling and is suitable for cyclonic locations, providing a safe and effective weather-resistant seal.
System Components
The system includes a ZiNCALUME® steel bracket and a polyethylene foam weather strip. The bracket functions like a concealed fix bracket, secured with standard roofing fasteners, while the weather strip ensures protection against wind-driven rain.
Benefits
- Maintains clean roof lines with a low profile.
- Cost-effective for long-length roofing designs using shorter sheets.
- Preserves existing roofing warranties when installed correctly.
- Allows for thermal movement and requires no special purlin detailing.
- Compatible with translucent sheeting.
Thermal Expansion
Steel roofing expands and contracts with temperature changes. The Lok-kLip system reduces the impact of thermal movement by using shorter sheets.
Installation and Testing
The Lok-kLip system has been tested for wind uplift and weather resistance. Installation involves fixing brackets to the ribs of the lower sheet and placing weather strips on either side. For cyclonic areas, additional fasteners are used.
Roof Design Considerations
Ensure roofing sheets do not exceed recommended spans. Minimum roof slopes vary with purlin spacing, and drainage advice is available in the LYSAGHT Roofing & Walling installation Manual.
Installation Steps
- Install lower sheets according to the LYSAGHT manual.
- Attach Lok-kLip brackets and align with a stringline.
- Place interlocking weather strips adjacent to brackets.
- Lay upper sheets over Lok-kLip brackets, ensuring proper engagement.
- Secure underlap ribs at the roof's finishing edge.
Finishing
Complete the installation by securing the underlap ribs and preparing for barge flashing. Avoid walking on the roof edge to prevent damage.
Disclaimer
This document is for informational purposes and should not replace professional judgment. BlueScope Steel Limited disclaims liability for any loss or damage arising from the use of this publication.
Catalog excerpts

The easy solution to end joints / Fast and easy to install - installation practices / No special purlin detailing weather resistant seal.
Open the catalog to page 1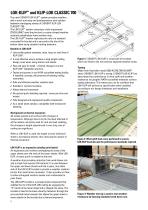
LOK-KLIP™ and KLIP-LOK CLASSIC 700 The new LYSAGHT LOK-KLIP™ system provides installers with a quick and easy end joint/expansion joint solution between overlapping sheets of LYSAGHT KLIP-LOK CLASSIC® 700. The LOK-KLIP™ system comprises a fully engineered ZINCALUME® steel bracket and a custom shaped weather resistant polyethylene foam weather strip. The LOK-KLIP™ bracket replicates the role of a standard concealed fix bracket and is secured to the ribs of the bottom sheet using standard roofing fasteners. Benefits of LOK-KLIP 3 ow profile system maintains clean, long run roof lines of L KLIP-LOK®....
Open the catalog to page 2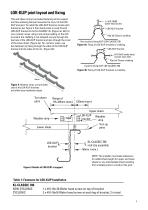
LOK-KLIP joint layout and fixing This will allow normal concealed fastening at the support 1 x #12-14x30 and thus allowing thermal movement to occur at the LOKhex. head screw KLIP end joint. To install the LOK-KLIP bracket, locate each bracket as per Figure 5, then hand LOK-KLIPsnap fit each press to bracket LOK-KLIP bracket to the KL-CLASSIC rib. (Figure 4a, 4b) For non-cyclonic areas, using a low torque setting on the drill KL-700 HS cladding to ensure the cladding is not stripped, secure through the top hole of thecyclonic fixing for KLIP-LOK 700HS Non LOK-KLIP bracket and also through the...
Open the catalog to page 3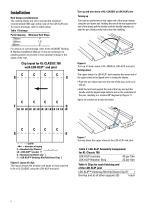
Turn up and turn down of KL-CLASSIC at LOK-KLIP joint Roof design considerations The roofing sheets are not to exceed the maximum recommended END span either side of the LOK-KLIP joint. To ensure drainage, refer to table below. Table 1 Drainage Turn-ups are performed on the upper end of the lower sheets using the turn down tool. Holding the end of the tool against the end of the sheet, pull the handle until the handle bottoms out onto the pan, being careful not to tear the cladding. Purlin Spacing Minimum Roof Slope 1750mm 1º 1250mm 1.5º 850mm 2º For advice on roof drainage, refer to the LYSAGHT...
Open the catalog to page 4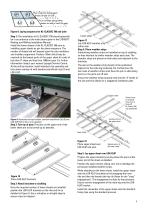
Then continue laying upper sheets to end of roof First continue laying lower sheets to end of roof (or gap) Figure 8: Laying sequence for KL-Classic 700 end joint Step 1: The installation of KL-CLASSIC 700 should generally be in accordance to the instructions given in the LYSAGHT Roofing and Walling Installation Manual. Install the lower sheets of the KL-CLASSIC 700 prior to installing upper sheets as per the above sequence. The number of sheets laid will depend upon the site conditions and installer programme. Packers (10mm thick) may be required on the lowest purlin of the upper sheet for roofs...
Open the catalog to page 5
Single start/finishing clip LOK-KLIP™ Underlap Rib Hold Down Clips Figure 13a & 13b : Start/finish clip (S) and Underlap Rib Hold Down Clip (F) Step 6: Finishing Continue the above process to the finishing edge/end of the roof. At the finishing edge of the roof, it is necessary to secure the two underlap ribs using LOK-KLIP™ Underlap Rib Hold Down Clips (F) screwed into position. Single start/ finishing clips (S) are also installed onto the underlap rib at all other supports. The overhanging weather strips can be cut or torn off. It is now ready to receive barge flashing. Avoid walking at the...
Open the catalog to page 6
Product Descriptions Disclaimer, warranties and limitation of liability All descriptions, specifications, illustrations, drawings, data, dimensions and weights contained this catalogue, all technical literature and websites containing information from BlueScope Lysaght are approximations only. They are intended by BlueScope Lysaght to be a general description for information and identification purposes and do not create a sale by description. BlueScope Lysaght reserves the right at any time to: This publication is intended to be an aid for all trades and professionals involved with specifying...
Open the catalog to page 7All BlueScope Steel catalogs and technical brochures
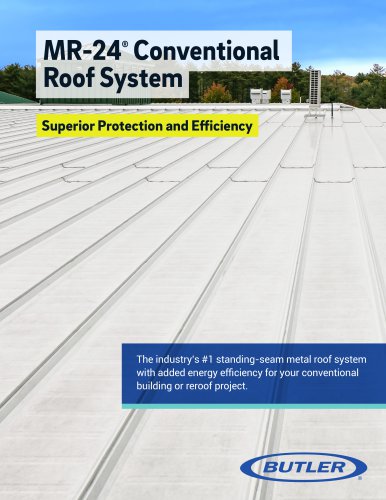 MR-24®
6 Pages
 CUSTOM ORB® CUSTOM BLUE ORB®
8 Pages
 Flatdek
6 Pages
 SPANDEK®
6 Pages
 Spanrib
6 Pages
 BONDEK®
12 Pages
 panl - line ? building system
16 Pages
 Rainwater solutions
12 Pages
 Custom ORB accent 35
6 Pages
 Custom ORB accent 21
6 Pages
 LysaghtTopspanMay2013
20 Pages


Archived catalogs
 Shed Colorbond
2 Pages
 Fencing Colorbond
6 Pages
 Guttering Colorbond
4 Pages
 Progect so case
16 Pages
 Colours fo roofing
2 Pages
 Curvers and Contours
6 Pages
 Zincalume
5 Pages
 Fencing
6 Pages
 Colorbond®steel protects
2 Pages
 Colorbond®
2 Pages

- Panel rainscreen cladding
- Fencing
- Metal cladding
- Metal fence
- Residential fence
- Profiled sheet
- Contemporary fence
- Smooth rainscreen cladding
- Steel sheet metal
- Industrial garden fence
- Industrial prefab building
- Commercial building
- Metal roofing
- Ribbed cladding
- Ribbed sheet metal
- Metal building
- Industrial modular building
- Industrial roof gutter