
Catalog excerpts

Baumit External Wall InsulationETICS Installation Guidelines step by step Ideen mit Zukunft. ■ General informations ■ General processing rules ■ Version April 2011
Open the catalog to page 1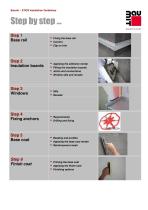
Baumit - ETICS Installation Guidelines baumit.com Step 1 Base rail Fixing the base rail Corners Clip on trim Step 2 Insulation boards ■ Applying the adhesive mortar ■ Fitting the insulation boards ■ Joints and connections ■ Window sills and reveals Sills Reveals Step 4 Fixing anchors ■ Requirements ■ Drilling and fixing Step 5 Base coat Beading and profiles Applying the base coat render Reinforcement mesm Step 6 Finish coat Priming the base coat Applying the finish coat Finishing options^
Open the catalog to page 2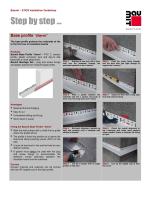
Baumit – ETICS Installation Guidelines Base profile “therm” The base profile protects the underside of the to the first row of insulation boards Products Baumit Base Profile “therm” - PVC “L” section profile, plastic connector pins and clip-on drip bead with a mesh attachment. Baumit Montage Set - plug and screw fixings and plastic packers for fixing the base profile. Starting at one end; drill a bore hole into the substrate through the perforated upstand on the L-section. Place a packer between the substrate and the L section and push it down onto the fixing shaft until it clicks. Butt...
Open the catalog to page 3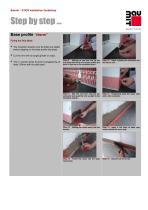
Baumit – ETICS Installation Guidelines Base profile “therm” Fixing the Drip Bead The insulation boards must be fitted and stable before clipping on the base profile drip bead. Cut the trim with an angle grinder or snips. The “L” section joints must be overlapped by at least 100mm with the drip bead. Starting at one end, line up the drip bead with the lip of the base profile and push in tight up to the insulation board Step 10 Insert a plastic pin connector into Step 11 Slot the next trim onto the pin Step 12 Temporarily prop the mesh strip connector and push the trim up tight to the...
Open the catalog to page 4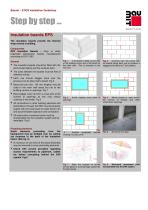
Baumit – ETICS Installation Guidelines Insulation boards EPS The insulation boards provide the thermal wrap around a building. Components EPS Insulation Boards – Grey or white expanded polystyrene boards manufactured according to EN 13163 General The insulation boards should be fitted with the joints butted tightly and the surfaces flush. Fig. 1 A full board is fitted on one side of the building corner and a half board on the other side. This is reversed on the next row. Fig. 2 Continue from the corner with full boards along each row to produce a staggered half bond or T-joint pattern. Fig....
Open the catalog to page 5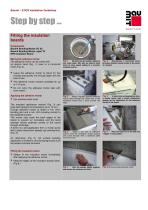
Baumit – ETICS Installation Guidelines Fitting the insulation boards Components Baumit Bonding Mortar DC 56 Baumit Bonding Mortar„open“W EPS Insulation Board Mixing the adhesive mortar The adhesive mortar can be mixed with an electric hand (Fig. 1) mixer or a horizontal mixer (Fig. 2). Sprinkle the dry powder adhesive into clean water. Mix with an electric hand mixer at slow speed setting to a smooth, workable mortar. Apply 3 equally spaced adhesive mortar dabs through the centre line of the insulation board and a strip around the edge. Apply a full coat of adhesive mortar onto the...
Open the catalog to page 6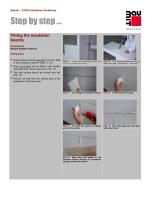
Baumit – ETICS Installation Guidelines Fitting the insulation boards Components Baumit System Foam B1 Filling joints Gaps between boards over 5mm must be filled in with insulation material. (Figs. 11-13) Check that the boards are plumb and in line. Do not bang the boards. Cut a wedge of insulation material. Cut back the excess as slightly proud of the surface. EPS insulation boards can be cut with a hand saw, a “hot knife” or a “hot wire”.! Gaps up to 5mm can be filled in with system insulating foam using a foam gun. (Fig. 14) The final surface should be smooth and flat. (Fig. 15) Remove...
Open the catalog to page 7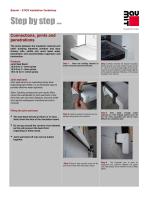
Baumit – ETICS Installation Guidelines Connections, joints and penetrations The joints between the insulation material and other building elements (window and door frames, sills, soffits etc) must resist water penetration and accommodate expansion and contraction. Products Joint Seal Band: 15/2-6 for 2 - 6mm joints 15/3-9 for 3 - 9mm joints 15/5-12 for 5 -12mm joints Clean the building element to ensure the joint seal band will stick. Step 2 When finished the facade insulation boards should carry past window reveal and sit 5 – 10mm in from the inside edge of the sill upstand to accommodate...
Open the catalog to page 8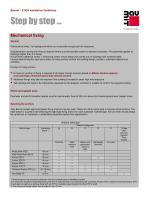
Baumit - ETICS Installation Guidelines baumit.com Mechanical fixing General Constructive fixing - for background which do not provide enough pull off resistance. Supplementary mechanical fixing is required where a purely bonded system is deemed unsuitable. This generally applies to buildings higher than 2.5 storey. Pull off tests (adhesive mortar + reinforcing mesh) should always be carried out on buildings with rendered walls. Factors determining the type and number of fixing anchors include the building design, location, substrate material and condition. Number of fixing anchors ■ A...
Open the catalog to page 9
Baumit - ETICS Installation Guidelines baumit.com Anchor lengths The required pull out resistance will only be achieved with the specified length. Calculating the required anchor length: anchoring depth + (existing render) + adhesive mortar thickness + insulation thickness. Drilling the bore hole The adhesive mortar must be sufficiently hard before installing supplementary mechanical fixing. The drill bit should be the same thickness as the anchor shaft. The power drill hammer action should not be used when boring into hollow or perforated masonry. Care must be taken not to damage the...
Open the catalog to page 10
Baumit - ETICS Installation Guidelines baumit.com Countersinking the anchors General Guide: The STR U fixing kit countersinks the fixing anchors into the insulation board. It combines a screw bit, a hole saw blade and a stop plate and is mounted onto a standard power drill. As the power drill is turned on the hole saw blades cuts into the insulation material immediately behind the anchor head. The screw action sinks the anchor into the insulation. The stop plate prevents the anchor from being fixed too deep. Action ■ Drill the bore hole. ■ Insert the anchor. ■ Slot the power drill screw bit...
Open the catalog to page 11All Back to Earth (SW) Ltd catalogs and technical brochures
-
Baumit Sanova SV 61
2 Pages
-
Baumit SpeedTop
2 Pages
-
Baumit StarTex
2 Pages
-
Ampatex® Sinco
2 Pages
-
Insyde Word Assistan
2 Pages
-
Ampacoll® Flexx pro
2 Pages
-
Fixit 222
2 Pages
-
STEICO flex 036
2 Pages
-
Product data sheet Wall 180
1 Pages


