


HURACAN

HURACAN
- Only qualified technicians should operate the device, adhering to safety warnings to prevent electric shock and other hazards.
- Disconnect the power supply before servicing.
- Allow the device to reach room temperature before exposure to temperature changes.
- Ensure the device is earthed and avoid modifications that void the warranty.
- Power Supply: AC120-240V, 50/60Hz, 1600W consumption.
- Light Source: LED with a color temperature of 8000±400K and a lifespan of over 50,000 hours.
- Movement: Pan and tilt with advanced repositioning system.
- Colors and Gobos: CMY+CTO color mixing, dichroic filters, and rotating gobo wheels.
- Control: DMX-512 with multiple channel modes and operation modes.
- Display: Full-color LCD with optional rechargeable battery.
- Includes components like LED assembly, tilt lock, display, and DMX connections.
- Installation must be performed by qualified personnel and include a secondary safety attachment.
- Do not use the fixture outside the temperature range of -10°C to 45°C.
- Connect devices in series using XLR cables and consider using a DMX terminator for long distances or noisy environments.
- Set the DMX starting address to ensure correct fixture response to control signals.
- Includes setup and operation of wireless DMX systems with indicators for connection status.
- Features a rotary knob for menu navigation and settings adjustments.
The device requires a Li-Ion rechargeable battery. For the initial installation, ensure the unit is disconnected from AC power. Install the battery, remove it, and then reinstall it. This procedure is necessary only for the first installation.
To set the DMX address, access the main menu by double-clicking the rotary knob. Navigate to 'ADDRESS' and select 'Set DMX Address'. Adjust the address using the rotary knob and confirm by long pressing to return to the main menu.
User modes allow customization of channel orders. Access 'USERS MODE' from the main menu, select the desired mode (Basic, Stand, User Mode A/B/C), and configure as needed. Return to the main menu by long pressing the rotary knob.
Various options such as No DMX Mode, Pan/Tilt Reverse, Pan Degree, Feedback, and Hibernation can be configured through the 'Options' menu. Each setting can be toggled or adjusted using the rotary knob, with changes confirmed by long pressing to return to the main menu.
Access the 'Service PIN' menu to set IP addresses, manage cross-load software, and clear LED timers. The default password is '050'.
Fan speed can be set to Auto, Stage, Studio, Silence, or Theatre. Display settings include shutoff time, flip display, key lock, and display flash options, all adjustable via the 'Display Setting' menu.
Choose between DMX, WDMX, Art-Net, and sACN signals through the 'Signal Select' menu.
Users can toggle between Celsius and Fahrenheit for temperature display. The process involves accessing the main menu, selecting 'Options', and then 'Temperature C/F'.
This function allows users to view the initial effect position, such as PAN settings. The navigation involves accessing the main menu and selecting 'Initial Pos.'.
The projector supports wireless data transmission. Users can activate or deactivate WDMX and log out from the wireless sender through the 'Wireless DMX' option.
Users can select between different dimming curves, such as Square Law and Linear, by navigating through the 'Dim Curve' option.
This function allows users to select the refresh rate from options like 1.2K, 2.4K, 16K, and 25K.
Users can toggle Gobo Correction on or off through the 'Gobo Correction' menu.
This function allows users to reset the Pan/Tilt fade settings.
Includes displaying DMX values, setting the device as a slave, and running auto programs. Users can navigate through the 'Trigger' menu to access these functions.
Users can restore factory settings by selecting 'Reset Default' and toggling between ON and OFF.
This section provides various information displays such as current time, total life hours, last run hours, LED hours, and timer PIN. Users can access these through the 'Info' menu.
Displays temperature and fan speed information. Users can access these through the 'Temp Info' and 'Fan Info' menus.
Users can view the software version and network settings through the 'Software Ver' and 'Network' menus.
Includes resetting the device, testing channels, manual control, calibration, and gobo replacement. These functions are accessible through the 'Test' menu.
Allows users to select, edit, and run programs. The master fixture can output different program signals to slave fixtures, which can be set to operate specific parts of the program.
The document outlines the DMX protocol for controlling lighting fixtures, detailing the functions and values for 70 DMX channels. Key functions include PAN and TILT movement, shutter and strobe effects, dimmer intensity, zoom, focus, color wheel adjustments, and various gobo and prism controls. Each channel is associated with specific values that dictate the behavior of the lighting fixture, such as speed, intensity, and color changes.
The document describes error messages that may appear during device operation. Errors are typically related to the malfunction of the magnetic-indexing circuit or stepper motor issues. Common errors include:
- PAN and TILT Movement Errors: Indicate issues with the yoke or head movement.
- Zoom and Focus Errors: Indicate problems with the zoom or focus mechanisms.
- Color Wheel Errors: Indicate issues with color wheel positioning.
- Regular maintenance and checks of the magnetic-indexing circuits and stepper motors are recommended to prevent errors.
- Users should avoid self-repair and contact authorized service providers for persistent issues.
Several error messages are detailed, indicating issues with the fixture's magnetic-indexing circuit or stepper motor. These errors include Blade 1_Rot, Blade 2 wheel, Blade 2_Rot wheel, Blade 3 wheel, Blade 3_Rot wheel, Blade 4 wheel, Blade 4_Rot wheel, All_Blade_Rot wheel, Frost 2 wheel, Animation_Rot 1 wheel, and Animation_Rot 2 wheel errors. Each error suggests that the respective movement is not in the default position after a reset, potentially due to sensor failure, missing magnets, or defective stepper motors or driving ICs on the main PCB.
Regular inspection and maintenance are crucial to ensure the device's longevity and performance. Key points include:
- Ensure all screws are tightly connected and free from corrosion.
- Check for deformations in housing lenses and installation points.
- Motorized parts should move smoothly without signs of wear.
- Power supply cables must be free from damage and material fatigue.
- Weekly cleaning of lenses to prevent dust accumulation.
- Weekly cleaning of fans for optimal airflow and cooling.
- Quarterly electrical checks by a qualified electrician to ensure good circuit contacts and prevent overheating.
All information is subject to change without notice, and errors and omissions are excepted.
Catalog excerpts

Manuel d’utilisation KEEP THIS MANUAL FOR FUTURE NEEDS
Open the catalog to page 1
7. DMX-512 CONNECTION WITH DMX TERMINATOR 13 8. DEVICE DMX START ADDRESS SELECTION 14 9. OPERTING INSTRUCTIONS OF THE INTERNAL DMX WIRELESS SYSTEM 14
Open the catalog to page 2
This device has left the factory in perfect condition. In order to maintain this condition and to ensure safe operation, it is absolutely necessary for the user to follow the safety instructions and warning notes written in this user manual. In order to install, operate, and maintain the lighting fixture safely and correctly we suggest that the installation and operation be carried out by qualified technicians and these instructions be carefully followed. CAUTION! HIGH VOLTAGE. RISK OF SEVERE OR FATAL ELECTRIC SHOCK CAUTION! ALWAYS DISCONNECT MAINS SUPPLY BEFORE REMOVING ANY FIXTURE COVERS NEVER...
Open the catalog to page 3
replaced by the manufacturer or their service agent or a similar qualified person in order to avoid injury. • When the device is not in use or before performing maintenance, always disconnect the device from the mains. Only handle the power cord from the plug .Never pull the plug out of a socket by tugging the power cord. • When powered on for the first time, some smoke or smell may occur. This is caused by coating on metal parts when heated and is normal.If you are concerned, please contact your distributor. • Do not focus the beam onto flammable surfaces. The minimum distance between the exiting...
Open the catalog to page 4
LIGHT SOURCE • LED: White LED, 8000±400K Color Temperature • Extremely long Life: >50,000H MOVEMENT • Pan movement: 540° /630° Optional (16 bit) • Tilt movement: 270° (16 bit) • Advanced moving system: fast, stable and quite, auto x-y repositioning COLORS • CMY+CTO color mixing, uniform, linear and speed can be adjustable • 1 Color wheel: 6 dichroic filters + open, indexable, rainbow effect GOBOS • 2 Rotating gobo wheel: 7 interchangeable, rotating, and indexable, gobo+open • ” Slot in & out ” gobo wheel system FEATURES • 3 Control channel modes: 46/44/70 channels • 2 Operation modes: DMX-512,...
Open the catalog to page 5
Advanced RDM function WEIGHT Net weight
Open the catalog to page 6
1) LED Assembly 2) Tilt Lock 3) Display 4) Rotary knob 5) Pan Lock 6) Handle
Open the catalog to page 7
4. DIMENSIONAL DRAWINGS 4.1. Fixture Dimension
Open the catalog to page 8
Black & White Gobo: Color Gobo 4.3. Color Filter Dimension 8
Open the catalog to page 9
4.4. Animation Filter Dimension
Open the catalog to page 10
A PLEASE CONSIDER THE RESPECTIVE NATIONAL NORMS DURING INSTALLATION. THE INSTALLATION MUST ONLY BE CARRIED OUT BY A _QUALIFIED PERSON._ • The applicable temperature for the lighting is between -10°C to 45°C. Do not use the lighting under or above the temperature. • The installation of the effect has to be built and constructed in a way that it can hold 10 times the weight for 1 hour without any harming deformation. • The installation must always be secured with a secondary safety attachment, e.g.an appropriate safety rope. • Never stand directly below the device when mounting, removing or servicing...
Open the catalog to page 11
• Fix the clamp to the bracket by tightening the M12 nut and bolt to the bracket through the 013 hole in the middle of the bracket. • Insert the quick-lock fasteners of the first Omega holder into the respective holes on the bottom of the device. Tighten the quick-lock fasteners fully clockwise. • Install the second Omega holder. • Pull the safety cable through the holes on the bottom of the base and over the trussing system or another suitable rigging point. Insert the end into the carabiner and tighten the safety screw. Important: This step is very important to ensure safe rigging of the fixture....
Open the catalog to page 12
• Be sure this fixture is kept at least 0.1 m away from any flammable materials (decoration etc.). • Always use and install the supplied safety cable as a safety measure to prevent accidental damage and/or injury in the event the clamp fails. Kg3 Important: Overhead rigging requires extensive experience, including (but not limited to) calculating working load limits, specifying installation/ rigging materials, and periodic safety inspection of all installation material as well as the device.If you lack these qualifications, do not attempt the rigging of this device yourself. Improper installation/...
Open the catalog to page 13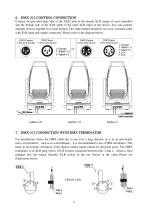
6. DMX-512 CONTROL CONNECTION Connect the provided male side of the XLR cable to the female XLR output of your controller and the female side of the XLR cable to the male XLR input of the device.You can connect multiple devices together in a serial fashion.The cable needed should be two core screened cable with XLR input and output connectors.Please refer to the diagram below. 7. DMX-512 CONNECTION WITH DMX TERMINATOR For installations where the DMX cable has to run over a long distance or is in an electrically noisy environment such as in a discotheque it is recommended to use a DMX terminator.This...
Open the catalog to page 14
8. DEVICE DMX START ADDRESS SELECTION All fixtures should be given a DMX starting address when using a DMX signal so that the correct fixture responds to the correct control signals.This digital starting address is the channel number from which the fixture starts to listen” the digital control information sent out from the “ to DMX controller.The allocation of this starting address is achieved by setting the correct address number on the display located on the base of the device. You can set the same starting address for all fixtures or a group of fixtures addresses for each fixture individually....
Open the catalog to page 15
2) When the fixture is power off, and the WDMX is in ON status if the fixture is connected to DMX controller.After the fixture is power on it can be controlled only by the DMX controller which connected.The fixture can log in the wireless transmitter and receive only radio signal from transmitter but not DMX from the transmitter. OFF De-activate WDMX In this status wireless system is not activated REST reset WDMX memory Can remove the fixture from the connection with the transmitter the fixture become free and ready to log in any transmitter. 9.4 Setup the wireless system 1) Connect the transmitter...
Open the catalog to page 16All AYRTON catalogs and technical brochures
 GHIBLI
20 Pages
 DIABLO
40 Pages
 MISTRAL
36 Pages
 LEVANTE
36 Pages
 WILDSUN 200 "S"
4 Pages
 WILDSUN 500 "K"
4 Pages
 COLORSUN 200
4 Pages
 VERSAPIX 100
4 Pages
 WILDSUN 500 C
4 Pages
 ARCALINE 2 3G
4 Pages
 ICECOLOR 1000
2 Pages
 ICECOLOR 500
2 Pages
 ICECOLOR 250
2 Pages
 AYRTON GENERAL CATALOGUE
52 Pages

- LED floodlight
- Outdoor projector
- Commercial floodlight
- Adjustable floodlight
- IP65 floodlight
- Spot floodlight
- Moving head spot
- Commercial moving head spot
- LED moving head spot
- Outdoor moving head spot
- RGBW LED floodlight
- Spot moving head spot
- IP20 moving head spot
- IP20 floodlight
- Color changer moving head spot
- Wash moving head spot
- Video projector
- Stage lighting moving head spot
- Discharge lamp moving head spot
- IP65 moving head spot