GHIBLI
1 /20Pages

GHIBLI
1 /20Pages
Catalog excerpts
USER MANUAL V.1.2 ENGLISH VERSION 05 2019
Open the catalog to page 1
4 Intioduction 4 Safety instructions 6 Dimensions 7 Description 7 Installation instructions 8 Installation method using truss hooks 9 Control Panel 10 Ghibli control panel menu - Option details 14 MasteCSlave Mode settings 15 DMX Chart 17 Error Messages 18 Care and maintenance 18 Technical Specifications
Open the catalog to page 3
power source. Thank you for selecting the AYRTON GHIBLI luminaire. Your GHIBLI conforms to Class 1 safety standards. The unit must be grounded electrically. Make sure that the power source connected to your GHIBLI is switched off before attempting any work on it. This product is not suitable for household use. You now own a professional lighting unit that offers endless possibilities. Before installing, make sure that no damage was done to your luminaire during transport. If this is the case, do not use the product and immediately contact your authorized AYRTON dealer. For your own safety and...
Open the catalog to page 4
Condensation may form on your GHIBLI in the following cases: •• Immediately after turning on the heating •• In places with fog or a high level of humidity •• When the luminaire is suddenly moved from a cold to a warm environment, or vice versa. In such cases, you must wait until the luminaire readjusts to the ambient temperature of the room where it will be installed for operation. necessary safety factors. Do not use your GHIBLI before being familiar with these recommendations and do not allow unqualified personnel to handle the product. To transport your GHIBLI, we strongly recommend that you...
Open the catalog to page 5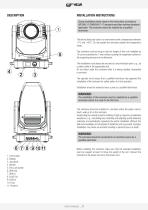
1. Lens output 2. Display 3. Jog wheel 4. Handle 5. Pan Lock button 6. DMX Out 7. DMX In 8. RJ45 Out 9. RJ45 In 10. Fuse 11. Power In INSTALLATION INSTRUCTIONS During installation please observe the instructions according to GB7000.15/EN60598-2-17standards and other national standards applicable. This luminaire should be installed by a qualified technician. The fixture should be used in an environment with a temperature between -5°C and +45°C. Do not operate the luminaire outside this temperature range. The luminaire must be hung so that the weight of this unit multiplied by 10 can be sustained...
Open the catalog to page 7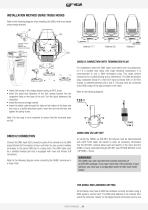
INSTALLATION METHOD USING TRUSS HOOKS Refer to the following diagram when installing the GHIBLI with truss hooks using omega bracket: DMX512 CONNECTION WITH TERMINATION PLUG For installations where the DMX cable must extend over long distances, or if it is located near areas with major electrical disturbance, it is recommended to use a DMX termination plug. This helps prevent luminaires from malfunctioning due to interference. The DMX termination plug, composed simply of a male XLR input connector with a 120-Ohm resistor, is soldered between pins 2 and 3. This plug must be connected to the DMX...
Open the catalog to page 8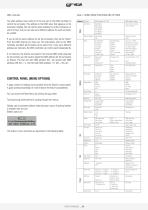
The start address must conform to the one set on the DMX controller to control the luminaire. This address is the DMX value that appears on the luminaire's display. You can set the same address for all the luminaires, or some of them, but you can also set a different address for each luminaire, as needed. If you do set the same address for all the luminaires, they will all “listen” from the DMX channel you have set. The instructions sent by the DMX controller will affect all luminaires at the same time. If you set a different address per luminaire, the DMX controller can control each independently....
Open the catalog to page 9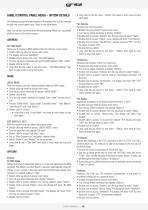
GHIBLI CONTROL PANEL MENU - OPTION DETAILS The following section provides details on the options that can be selected through the control panel menu. Refer to the table above. Note: You can exit this menu at any time by pressing “Mode Esc” repeatedly until you return to the home screen. ADDRESS SET DMX ADDR Allows you to change a DMX address from the fixture's control panel. ♦ Double click jog wheel to access main menu. ♦ The display will show “ADDRESS”. ♦ Double click to access the menu “Set DMX Address”. ♦ Turn the jog wheel clockwise and set the DMX address “A001~AXXX”. ♦ Double click to confirm...
Open the catalog to page 10
♦ Long click the jog wheel to exit menu -“Status” then back to main menu by long click again. Pan/Tilt Spd You can choose between four movement speeds, from “Speed 1” to “Speed 4.” The “Speed 1” setting is the fastest. ♦ Double click jog wheel to access main menu. ♦ Turn the jog wheel clockwise then display “Options”. ♦ Double click to access “Options” turn the jog wheel to select “Status”. ♦ Double click to access “Status” menu The display will show “Pan/Tilt Spd”. ♦ Double click to access to access “Pan/Tilt Spd” The display will show “Speed 1” Turn the jog wheel to select “Speed 1” “Speed...
Open the catalog to page 11
Flip Display Allows you to rotate the display by 180°. This can be highly useful when the fixture is installed with the head facing down. ♦ Double click jog wheel to access main menu. ♦ Turn the jog wheel clockwise then display “Options”. ♦ Double click to access “Options” turn the jog wheel to select “Display Setting”. ♦ Double click to access “Display Setting” menu The display will show “Flip Display”. ♦ Double click to access “Flip Display” The display will show “OFF” Turn the jog wheel to select “ON”. ♦ Double click to confirm ♦ Long click the jog wheel to exit menu -“Display Setting” then...
Open the catalog to page 12
Auto Program Allows you to run an internal program (a sequence of scenes) by selecting whether the fixture is operating alone or as a master. ♦ Double click jog wheel to access main menu. ♦ Turn the jog wheel clockwise then display“Options”. ♦ Double click to access “Options” turn the jog wheel to select “Trigger”. ♦ Double click to access “Trigger”menu The display will show “Auto Program”. ♦ Double click to access “Auto Program” The display will show “Master” “Alone”. ♦ Double click the jog wheel to back to last button press -“Trigger” then back to main menu by double click again. Note: See...
Open the catalog to page 13All AYRTON catalogs and technical brochures
 DIABLO
40 Pages
 HURACAN
48 Pages
 MISTRAL
36 Pages
 LEVANTE
36 Pages
 WILDSUN 200 "S"
4 Pages
 WILDSUN 500 "K"
4 Pages
 COLORSUN 200
4 Pages
 VERSAPIX 100
4 Pages
 WILDSUN 500 C
4 Pages
 ARCALINE 2 3G
4 Pages
 ICECOLOR 1000
2 Pages
 ICECOLOR 500
2 Pages
 ICECOLOR 250
2 Pages
 AYRTON GENERAL CATALOGUE
52 Pages

- Outdoor projector
- LED floodlight
- Commercial floodlight
- Adjustable floodlight
- IP65 floodlight
- Spot floodlight
- Moving head spot
- Commercial moving head spot
- LED moving head spot
- Outdoor moving head spot
- RGBW LED floodlight
- Spot moving head spot
- IP20 moving head spot
- Color changer moving head spot
- Wash moving head spot
- IP20 floodlight
- Stage lighting moving head spot
- Video projector
- Discharge lamp moving head spot
- IP65 moving head spot