DIABLO
1 /40Pages

DIABLO
1 /40Pages
Catalog excerpts

KEEP THIS MANUAL FOR FUTURE NEEDS
Open the catalog to page 1
7. DMX-512 CONNECTION WITH DMX TERMINATOR 13 8. DEVICE DMX START ADDRESS SELECTION 14
Open the catalog to page 2
1. SAFETY INSTRUCTIONS 1.1. IMPORTANT SAFETY WARNING This device has left the factory in perfect condition.In order to maintain this condition and to ensure safe operation it is absolutely necessary for the user to follow the safety instructions and warning notes written in this user manual. In order to install operate and maintain the lighting fixture safely and correctly we suggest that the installation and operation be carried out by qualified technicians and these instructions be carefully followed. CAUTION! HIGH VOLTAGE. RISK OF SEVERE OR FATAL ELECTRIC SHOCK CAUTION! ALWAYS DISCONNECT MAINS...
Open the catalog to page 3
• This device falls under protection-class I.Therefore, it is essential that the device be earthed. • If eitherlenses or displayare damaged (damage may include cracks or gashes in the material) they must be replaced. • Electrical connections, such as replacing the power plug, must be performed by a qualified person. • Make sure that the available voltage is not higher than that which is stated at the end of this manual. • Make sure the power cord is never crushed or damaged by sharp edges. Ifthis should be the case, replacement of the cable must be done by an authorized dealer. • If the external...
Open the catalog to page 4
may suffer damage and the warranty becomes void.Furthermore, any other operation may lead to short-circuits, burns, electric shocks etc. 2. FEATURES POWER SUPPLY • AC100-240V-, 50/60Hz • Power Consumption: 550W LIGHT SOURCE • LED: White LED 330W 7000K + 450K Color Temperature, high CRI @ DIABLO TC White LED 330W 8000 ± 500K Color Temperature @ DIABLO S • Extremely long Life: >20,000H MOVEMENT • Pan movement: 540° /630°Optional (16 bit) • Tilt movement: 270° (16 bit) • Advanced moving system: fast, stable and quite, auto x-y repositioning COLORS • CMY color mixing + CTO • 1 Color wheel: 7 dichroic...
Open the catalog to page 5
• Advanced and convenient full -color LCD, with rechargeable battery(optional) • Can be changed 180° reverse to fit for different installation position SOFTWARE 8 pre-installed programs available upon selection Upgrades: fast and convenient through DMX cable with DMX-512 controller Reset DMX address, remote lamp control, reset can all be done by the DMX controller Running time of fixture on display for reference OTHER SPEC Input signal isolation: guarantees stable signal transmission without interference Advanced RDM function WEIGHT Net weight: 21.9 kg
Open the catalog to page 6
1) LED Assembly 2) Display 3) Rotary knob 4) Handle 5) Lock button
Open the catalog to page 7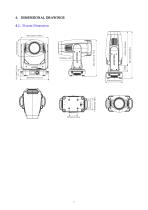
4. DIMENSIONAL DRAWINGS 4.1. Fixture Dimension
Open the catalog to page 8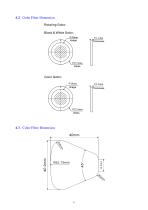
4.2. Gobo Filter Dimension Rotating Gobo: Black & White Gobo: Color Gobo: 4.3. Color Filter Dimension
Open the catalog to page 9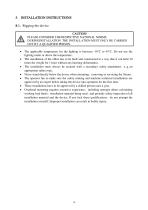
A PLEASE CONSIDER THE RESPECTIVE NATIONAL NORMS DURINGINSTALLATION. THE INSTALLATION MUST ONLY BE CARRIED _OUT BY A QUALIFIED PERSON._ • The applicable temperature for the lighting is between -10°C to 45°C. Do not use the lighting under or above the temperature. • The installation of the effect has to be built and constructed in a way that it can hold 10 times the weight for 1 hour without any harming deformation. • The installation must always be secured with a secondary safety attachment, e.g.an appropriate safety rope. • Never stand directly below the device when mounting, removing or servicing...
Open the catalog to page 11
8.2. Rigging using the omega brackets Fix the clamp to the bracket by tightening the M12 nut and boltto the bracket through the 13 hole in the middle of the bracket. Insert the quick-lock fasteners of the first Omega holder into the respective holes on the bottom of the device.Tighten the quick-lock fasteners fully clockwise. Install the second Omega holder. Pull the safety cable through the holes on the bottom of the base and over the trussing system or another suitable rigging point. Insert the end into the carabiner and tighten the safety screw. Important This step is very important to ensure...
Open the catalog to page 12
• Be sure this fixture is kept at least 0.1m away from any flammable materials (decoration etc.). • Always use and install the supplied safety cable as a safety measure to prevent accidental damage and/or injury in the event the clamp fails. Kg3Important: Overhead rigging requires extensive experience , including (but not limited to) calculatingworking load limits, specifying installation/ rigging materials, and periodic safety inspection of all installation material as well as the device .If you lack these qualifications, do not attempt therigging of this device yourself. Improper installation/...
Open the catalog to page 13
6. DMX-512 CONTROL CONNECTION Connect the provided male side of the XLR cable to the femaleXLR output of your controller and the female side of the XLR cable to the male XLR input of the device.You can connect multipledevices together in a serial fashion. The cable needed should be two core, screened cable with XLR input and output connectors. Please refer to the diagram below. Address 73 Address 37 Address 1 Series connection number: AC100-120V: Three Pcs; AC200-240V: Six Pcs 7. DMX-512 CONNECTION WITH DMX TERMINATOR For installations where the DMX cable has to run over a long distance or is...
Open the catalog to page 14
8. DEVICE DMX START ADDRESS SELECTION All fixtures should be given a DMX starting address when using a DMX signal so that the correct fixture responds to the correct control signals.This digital starting address is the channel number from which the fixture starts to listen” the digital control information sent out from the “ to DMX controller.The allocation of this starting address is achieved by setting the correct address number on the display located on the base of the device. You can set the same starting address for all fixtures or a group of fixtures addresses for each fixture individually....
Open the catalog to page 15
CAUTION! THE BATTERY MUST BE A LI-ION RECHARGEABLE BATTERY, THE SPECIFICATION IS AS FOLLOWING: To install the battery for the first time, please make sure the unit is not connected to AC power. Install the battery in the battery holder, then remove the battery and install it back. This procedure must be done only for the first battery installation. Default settings shaded
Open the catalog to page 16All AYRTON catalogs and technical brochures
 GHIBLI
20 Pages
 HURACAN
48 Pages
 MISTRAL
36 Pages
 LEVANTE
36 Pages
 WILDSUN 200 "S"
4 Pages
 WILDSUN 500 "K"
4 Pages
 COLORSUN 200
4 Pages
 VERSAPIX 100
4 Pages
 WILDSUN 500 C
4 Pages
 ARCALINE 2 3G
4 Pages
 ICECOLOR 1000
2 Pages
 ICECOLOR 500
2 Pages
 ICECOLOR 250
2 Pages
 AYRTON GENERAL CATALOGUE
52 Pages

- Outdoor projector
- LED floodlight
- Commercial floodlight
- Adjustable floodlight
- IP65 floodlight
- Spot floodlight
- Moving head spot
- Commercial moving head spot
- LED moving head spot
- Outdoor moving head spot
- RGBW LED floodlight
- Spot moving head spot
- IP20 moving head spot
- Color changer moving head spot
- Wash moving head spot
- IP20 floodlight
- Stage lighting moving head spot
- Video projector
- Discharge lamp moving head spot
- IP65 moving head spot