- Catalogs
- Armstrong ceilings - USA
- StyleStix Estimating & Installation Guide
StyleStix Estimating & Installation Guide

StyleStix Estimating & Installation Guide
- Step 1: Install 6' Wall Molding Covers by sliding them over the wall molding and aligning with the grid. Cut as necessary for corners and end walls.
- Step 2: Install 6' Grid Covers by snapping them onto the grid, aligning cutouts with intersections, and cutting to fit against wall moldings.
- Step 3: Install 2' Grid Covers perpendicular to the first row, ensuring coped ends fit against the 6' covers.
Catalog excerpts

StyleStix™ Decorative Ceiling Accents Installation Instructions RC-3222-1110
Open the catalog to page 1
StyleStix™ IMPORTANT INFORMATION CAUTION Avoid storing StyleStix materials at temperatures above 125 degrees Fahrenheit. StyleStix Grid Covers work best when the grid meets the wall at a 90 degree angle. See section on Grid Covers if the grid meets the wall at an angle other than 90 degrees. StyleStix Grid Covers fi t ceiling grid that measures 15/16" wide. StyleStix Grid Covers are only to be used with 2' x 2' grid systems. A 2' x 4' grid system must fi rst be converted to a 2' x 2' system with standard 2´ cross tees. Components • One package of StyleStix 6' Wall Molding Covers consists of 5...
Open the catalog to page 2
FAQ’s Do they fi t all grid systems? • StyleStix is designed to fi t grid measuring 15/16" wide. This is the standard grid measurement in most homes. We recommend you measure the face width of the grid. What if my current ceiling system is 2' x 4'? • StyleStix is made for a 2' x 2' ceiling suspension system. You can easily convert your 2' x 4' system by purchasing and snapping a 2' cross tee into place. Can I paint StyleStix? • Yes, with latex paint. Do StyleStix come in any other colors? • No, but it can be painted with latex paint. Do I have to remove my ceiling panels to install StyleStix...
Open the catalog to page 3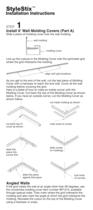
StyleStix™ Installation Instructions STEP 1 Install 6' Wall Molding Covers (Part A) Slide a piece of molding cover over the wall molding. Line up the cutouts in the Molding Cover with the perimeter grid where the grid intersects the molding. As you get to the end of the wall, cut the last piece of Molding Cover with a hacksaw to reach the end wall. Cover all the wall molding before covering the grid. Here is a detail of how to make an inside corner with the Molding Cover. Cut back the top of the Molding Cover as shown below. If you have an outside corner, cut the Molding Cover as shown below....
Open the catalog to page 4
align with intersecting grid 6' cover 2' cover intersection shown from below 4 grid cover grid push straight up STEP 2 Install 6' Grid Covers (Part B) Snap a piece of 6' StyleStix onto a grid member in the center of the ceiling, lining up the cutouts in the cover with the intersecting grid. Butt other pieces against the fi rst piece to continue to the ends of the grid. Cut the last pieces of 6' StyleStix Grid Cover with a hacksaw to butt against the Molding Covers at each end of the run. Repeat the process for every row of grid that runs parallel to the one you just covered. STEP 3 Install 2'...
Open the catalog to page 5
StyleStix™ Detalles decorativos del techo IInstrucciones de instalación
Open the catalog to page 6
StyleStix™ INFORMACIÓN IMPORTANTE Las Coberturas de la Cuadrícula de StyleStix trabajan mejor cuando la cuadrícula encuentra la pared en un 90 ángulo de grado. Vea sección en Coberturas de Cuadrícula si la cuadrícula encuentra la pared en un ángulo de otra manera que 90 grados. Las Coberturas de la Cuadrícula de StyleStix cuadrícula conveniente de techo que mide lejos. Las Coberturas de la Cuadrícula de StyleStix son de sólo ser utilizado con 2' x 2' sistemas de cuadrícula. Un sistema de la cuadrícula 2' x 4' debe ser convertido primero a un sistema 2' x 2' con estándar 2' tees transversales....
Open the catalog to page 7
Preguntas frecuentes ¿Ellos se ajustan a todos los sistemas de rejillas? • StyleStix está diseñado para ajustarse a rejillas que midan 15/16" de ancho. Esta es la medida estándar de las rejillas en la mayoría de las casas. Nosotros le recomendamos que mida el ancho de la rejilla. ¿Qué pasa si mi sistema actual del techo es de 2' x 4'? • StyleStix está hecho para sistemas de techos suspendidos de 2' x 2'. Usted puede convertir fácilmente su sistema de 2' x 4' comprando y cortando una unión en forma de T y colocándola en su lugar. ¿Puedo pintar las StyleStix? • Si, con pintura de latex. ¿StyleStix...
Open the catalog to page 8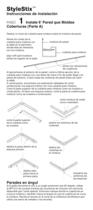
StyleStix™ Instrucciones de instalación PASO 1 Instale 6' Pared que Moldea Coberturas (Parte A) Deslice un trozo de cubierta para moldura sobre la moldura de pared. Alinee los cortes de la cubierta para moldura con la rejilla en el perímetro donde ésta se intersecta con los moldura. align with grid locations alinee los lugares de la rejilla Al aproximarse al extremo de la pared, corte la última sección de la cubierta para moldura con una sierra de mano a fi n de poder llegar a la pared de extremo. Cubra todas las molduras de pared antes de cubrir la rejilla. A continuación, encontrará una explicación...
Open the catalog to page 9
PASO 2 Instale las cubiertas de rejilla de 6' (Parte B) Encaje la sección de StyleStix de 6' (1,83 m) en una sección de rejilla en el centro del techo, alineando los cortes de la cubierta con la rejilla que intersecta. Empalme los demás trozos hacia la primera sección, continuando hacia los extremos de la rejilla. Corte las últimas piezas de la cubierta para moldura de 6' (1,83 m) StyleStix con una sierra de mano para empalmarlas con las cubiertas para moldura en cada extremo de la corrida. Repita el proceso de cada fi la de rejilla que corre paralela a una de las que acaba de cubrir. PASO 3...
Open the catalog to page 10All Armstrong ceilings - USA catalogs and technical brochures
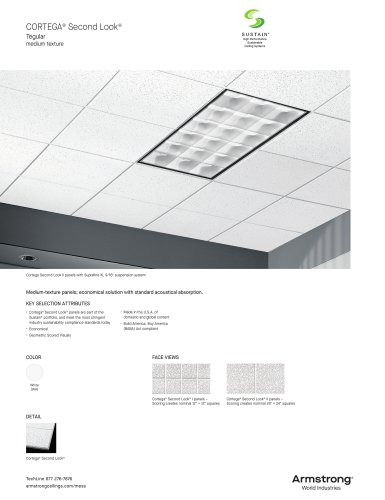 CORTEGA® Second Look®
2 Pages
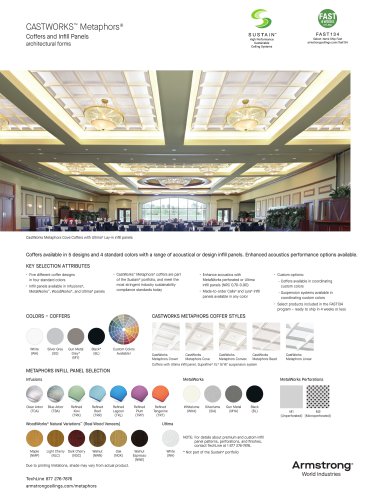 CASTWORKS™ Metaphors®
2 Pages
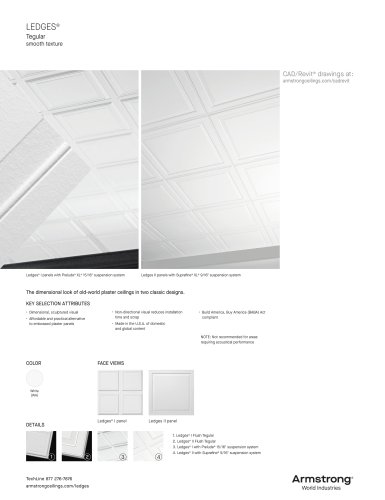 LEDGES®
2 Pages
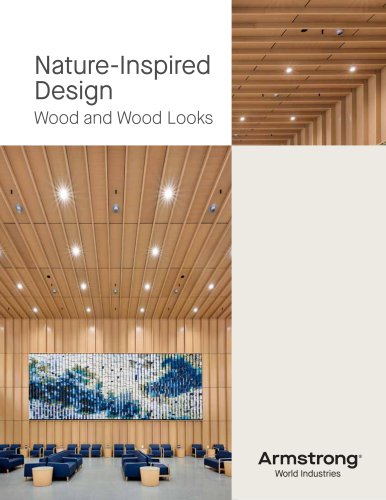 Wood and Wood Looks
28 Pages
 EASY ELEGANCE™
4 Pages
Archived catalogs
 Retail Ceiling Guide
28 Pages
 Custom creation
6 Pages
 Inspiring Great Spaces
8 Pages
 ALTERNA™ & ALTERNA RESERVE
56 Pages
 LUXE PLANK®
28 Pages
 VINYL plank flooring
24 Pages
 LUXURY FLOORING
40 Pages
 ABOOK 2018
47 Pages
 PRELUDE 24 - TL2
4 Pages
 Ultima+ brighten your space
6 Pages
 METALLAIRE™
6 Pages
 Room dividers
18 Pages
 WoodHaven Ceiling Planks
3 Pages
 CEILING & WALL LOOK BOOK 2023
16 Pages
 THE WINNING CHOICE
8 Pages
 sds mineral fiber
10 Pages
 Laminated Ceiling Solutions
15 Pages
 Ceiling & Wall Guide
24 Pages
 CEILING & WALL LOOK BOOK
16 Pages
 Metallaire Styles
6 Pages
 Contractor Series
8 Pages
 basement inspiration
8 Pages
 WoodHaven™ Ceiling Planks
8 Pages
 HomeStyle® Ceilings
8 Pages
 Custom Creations Brochure
2 Pages
 DECORAT I V E C E I L I N G
8 Pages
 Tin Look™ Paintable Ceilings
6 Pages
 Definitions Room Dividers
18 Pages
 Metallaire Ceilings
6 Pages
 Decorative Ceilings
6 Pages
 WoodHaven Ceilings
6 Pages
 Tin Look
4 Pages
 Retail Ceiling Guide
8 Pages


- Armstrong suspended ceiling
- Armstrong indoor suspended ceiling
- Armstrong acoustic suspended ceiling
- Metal suspended ceiling
- Armstrong panel suspended ceiling
- Armstrong decorative suspended ceiling
- Armstrong office suspended ceiling
- Armstrong tile suspended ceiling
- Armstrong perforated suspended ceiling
- Armstrong color suspended ceiling
- Aluminum ceiling
- Armstrong flame-retardant suspended ceiling
- Made from recycled materials suspended ceiling
- Armstrong commercial suspended ceiling
- Modular suspended ceiling
- Conference room suspended ceiling
- Armstrong strip suspended ceiling
- Sustainable suspended ceiling
- Armstrong suspended ceiling with hidden framework
- Wooden ceiling