- Catalogs
- Armstrong ceilings - USA
- installation instructions 15-16 and 9-16 grid
installation instructions 15-16 and 9-16 grid
1 /6Pages

installation instructions 15-16 and 9-16 grid
1 /6Pages
Catalog excerpts

How to Install Your Armstrong Suspended Ceiling SAFETY TIPS: • Safety glasses and gloves are recommended to be worn during installation. Metal grid components can be sharp. • When working overhead, make sure your work area is clear of obstructions and that your ladder is stable. IMPORTANT INFORMATION: • Store and install panels in areas with temperature and humidity ranges that meet specific product warranty requirements. • emove panels from the cartons 24 hours before installation and allow them to adjust to normal interior conditions of the area R where installation will take place. • Never install ceiling panels below an existing ceiling that contains embedded radiant-heat coils. • Do not apply loose fill or batt insulation so that it rests directly on the panels. • Keep hands clean to avoid smudges on the finished ceiling. • Always cut mineral fiber or fiberglass ceiling panels face up with a sharp utility knife. • Main beams should be installed perpendicular to the joists. • Main beams are typically installed on 4' centers. If your room configuration is unusual, you may require additional components. • o allow for ceiling tile installation and accessibility, the minimum drop is 3" with traditional hanger wire or 2.5" with T QuickHang™ grid hooks. (QuickHang instructions are notated by a gray background) NOTE: QuickHang hooks and brackets are available through select retailers. Visit ceilings.com/stores for where to buy. • nstallations with light fixtures will likely require additional clearance and support. Consult the light manufacturer’s instructions I for details. • hen installing below an existing drywall ceiling, a minimum 4" drop is required to install panels. Joists will need to be located W and marked. NOTE: QuickHang hardware cannot be used below drywall ceilings. TOOLS NEEDED TO INSTALL YOUR CEILING LOCATE HIDDEN JOISTS TO INSTALL WIRE FASTENERS Use either a stud finder or locate hidden joists by tapping on the ceiling until you hear a solid thud. Drive a nail in here. Repeat this to locate other joists and determine their direction. Mark the joist locations with chalk lines. • ind joists (A). F • rive nails to find exact center line of joists. D • nap chalk line for each joist (B). S Sample Room A Joist usually 16" on center B Snapped chalk lines in center of joists Joist direction PLANNING YOUR ARMSTRONG CEILING Main beams typically run perpendicular to the joists. If you have an existing drywall ceiling you will need to locate and
Open the catalog to page 1
SAMPLE PANEL LAYOUT Determine panel layout For best appearance, border panels should be the same size on the opposite sides of the room and as large as possible. Use your room dimensions and follow the formula in the worksheets below. Width of border panel Length of border panel Main beams 4' apart Sample worksheets using 2' x 4' panels in a 9' x 10' 6" room Cross tees 2' apart INSTALL HANGER WIRE OR QUICKHANG GRID HOOKS IMPORTANT: The first row of main beams in a 2' x 4' panel installation should be the border panel size from the wall. In a 2' x 2' panel installation, the first main beam can...
Open the catalog to page 2
How to Install Your Armstrong Suspended Ceiling Traditional Hanger Wire • Snap Chalk Line for Main Beams 4' Apart (A). • Screw in Wire Fasteners 4' Apart (B). • Wrap hanger wire securely around itself 3 times (C). NOTE: Additional hanger wires may be needed to support light fixtures. • easure up 7/8" from the bottom of the molding. Drive nail into wall just M above molding. Do the same on other side of room. Stretch a string from nail to nail along a row of wires (D). • wing hanger wires over to string and bend each one at 90° where they S touch the string (E). • tretch additional strings to...
Open the catalog to page 3
How to Install Your Armstrong Suspended Ceiling 1" long vertical mark INSTALL GRID STEP Prepare and Hang Main Beams • o prepare the first main beam, trim the end of the T main beam so that a cross tee slot on the main beam is the border panel distance from the wall (B). (This creates the proper border tile opening.) TIP: Cut the top of the grid first with tin snips and then bend the grid open and cut the face of the grid (A). • lace the cut end of the first main beam on the wall P molding and using the round holes in the grid, hang main beams on the hanger wire or hook perpendicular to joists....
Open the catalog to page 4
• Install two 4' cross tees between the two main beams in line with the first two border tees (C). (illus. B) • To check that your grid is square, measure across the diagonals of the 2' x 4' opening. The measurements will be the same if the grid is square. If the measurements are not the same, trim one of the mains further until the diagonals are equal. (illus. B) Installing Remaining Grid & Leveling the System • Complete the first two rows of main beams by hanging main beams from the hooks and joining their ends together. Listen for an audible click to ensure a good connection. (illus. C and...
Open the catalog to page 5
How to Install Your Armstrong Suspended Ceiling INSTALL CEILING PANELS STEP Installing Panels • ift panel at angle up through the grid; drop into place (A). L If there’s an obstruction in the area where you are inserting a ceiling tile, TIP: you may need to lift the ceiling tile through an adjacent opening and gently move it across the back of the grid into place. • rim border panels using a straight edge; panels should be cut face side T up (B). For tegular tiles, you will need to cut the edge that’s resting on the wall molding to allow it to lay flat. Cutting “Tegular”/“Recessed Grid”, ceiling...
Open the catalog to page 6All Armstrong ceilings - USA catalogs and technical brochures
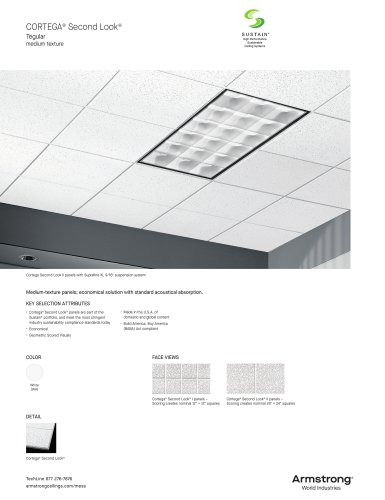 CORTEGA® Second Look®
2 Pages
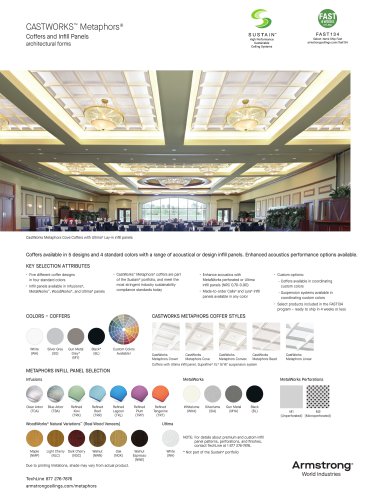 CASTWORKS™ Metaphors®
2 Pages
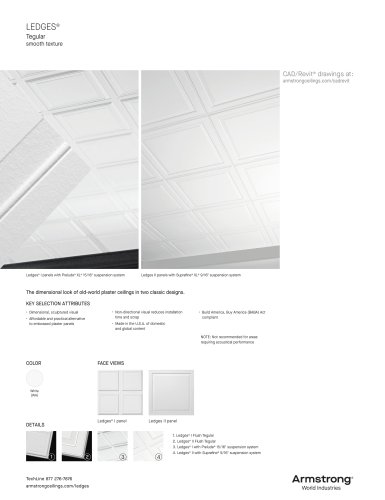 LEDGES®
2 Pages
 Wood and Wood Looks
28 Pages
 EASY ELEGANCE™
4 Pages
Archived catalogs
 Retail Ceiling Guide
28 Pages
 Custom creation
6 Pages
 Inspiring Great Spaces
8 Pages
 ALTERNA™ & ALTERNA RESERVE
56 Pages
 LUXE PLANK®
28 Pages
 VINYL plank flooring
24 Pages
 LUXURY FLOORING
40 Pages
 ABOOK 2018
47 Pages
 PRELUDE 24 - TL2
4 Pages
 Ultima+ brighten your space
6 Pages
 METALLAIRE™
6 Pages
 Room dividers
18 Pages
 WoodHaven Ceiling Planks
3 Pages
 CEILING & WALL LOOK BOOK 2023
16 Pages
 THE WINNING CHOICE
8 Pages
 sds mineral fiber
10 Pages
 Laminated Ceiling Solutions
15 Pages
 Ceiling & Wall Guide
24 Pages
 CEILING & WALL LOOK BOOK
16 Pages
 Metallaire Styles
6 Pages
 Contractor Series
8 Pages
 basement inspiration
8 Pages
 WoodHaven™ Ceiling Planks
8 Pages
 HomeStyle® Ceilings
8 Pages
 Custom Creations Brochure
2 Pages
 DECORAT I V E C E I L I N G
8 Pages
 Tin Look™ Paintable Ceilings
6 Pages
 Definitions Room Dividers
18 Pages
 Metallaire Ceilings
6 Pages
 Decorative Ceilings
6 Pages
 WoodHaven Ceilings
6 Pages
 Tin Look
4 Pages
 Retail Ceiling Guide
8 Pages


- Armstrong indoor suspended ceiling
- Armstrong acoustic suspended ceiling
- Metal suspended ceiling
- Armstrong panel suspended ceiling
- Armstrong decorative suspended ceiling
- Armstrong office suspended ceiling
- Armstrong tile suspended ceiling
- Armstrong perforated suspended ceiling
- Armstrong color suspended ceiling
- Aluminum ceiling
- Armstrong flame-retardant suspended ceiling
- Made from recycled materials suspended ceiling
- Armstrong commercial suspended ceiling
- Modular suspended ceiling
- Conference room suspended ceiling
- Armstrong strip suspended ceiling
- Sustainable suspended ceiling
- Armstrong suspended ceiling with hidden framework
- Wooden ceiling