- Catalogs
- Armstrong ceilings - USA
- Easy Elegance Ceiling Panel Estimating & Installation Guide
Easy Elegance Ceiling Panel Estimating & Installation Guide

Easy Elegance Ceiling Panel Estimating & Installation Guide
- Lighting Compatibility: Recessed lighting is compatible with Easy Elegance Coffers, provided fixtures are supported by the ceiling grid or framing structure.
- Paintability: Panels can be painted with latex paint before installation, ensuring they are clean and dry.
- Fire Safety: Products comply with residential building codes for safety.
- Moisture Resistance: Rigid PVC tiles are highly moisture-resistant and do not absorb water.
- Installation Flexibility: Tiles are designed for grid mount/drop ceiling applications and can be cut to fit room perimeters.
- Maintenance: Panels can be cleaned with a damp cloth.
- Easy Elegance Coffers require a 2' x 2' grid system with specific clearance requirements: 6" for Coffers and 3" for Border Panels.
- Installation options include creating a drywall border or cutting border panels.
- Planning the Project: Identify joist locations and plan the room layout, ensuring the drywall border is of equal width on both sides.
- Calculating Grid Position: Use a formula to determine border widths, ensuring symmetry in the room layout.
- Installing the Grid System: Install wall moldings and main beam wire fasteners, ensuring proper alignment and support for the ceiling grid.
1. Installation of Hanger Wires and Main Beams: Install wire fasteners on joists every 4 feet along the chalk lines for main beams. Use 12 or 16 gauge hanger wires, twisting them securely three times. For rooms longer than 12 feet, add main beams as needed and pre-bend hanger wires at 8 to 12-foot intervals to ensure leveling.
2. Hanging and Leveling Main Beams: Trim the first main beam to align with the cross tee guide string. Use nails to stretch a string line across the room, aligning hanger wires and bending them at 90 degrees. Install the first main beam at the guide string, connecting subsequent beams until the last one needs trimming.
3. Installation of Cross Tees: Install 4-foot cross tees at 2-foot intervals, and 2-foot cross tees at midpoints. Ensure the border is the predetermined size by realigning the first main beam with the guide string.
4. Attaching Grid System to Wall Molding: Ensure the grid system is square before fastening. Drill or punch holes through the grid and wall molding, fastening with pop rivets or screws. Add extra hanger wires every two feet around the perimeter drywall border.
Drywall Application and Finishing:
1. Installing Perimeter Drywall Border: Measure and cut drywall to fit from the main beam to the wall. Use Type-S 1-1/4 inch drywall screws placed every 6 to 8 inches. Do not fasten drywall along the inside edge where it meets ceiling panels initially.
2. Reinforcing Unsupported Drywall Joints: Use wood furring strips to stabilize joints unsupported by the grid system. Finish by taping joints, spackling, sanding, and painting.
3. Installing Ceiling Panels: Lift panels and angle them through the grid, setting them in place.
Special Situations:
For irregularly shaped rooms, extend the perimeter drywall border to enhance appearance. Continue the suspended grid into the area using additional main beams and cross tees, ensuring all intersections have hanger wires.
Illustrations:
Illustrations provide visual guidance for each step, including typical hanger wire placement, installation of main beams and cross tees, and special situations for irregular room shapes.
This document provides a detailed table of measurements for various room sizes and ceiling panel configurations. The table includes dimensions, area in square feet, number of panels, main beams, and cross tees required for different room sizes ranging from 6' x 6' to 10' x 48'.
Procedures and Recommendations:
The document includes instructions for selecting ceiling panels based on room size. It recommends using one two-bulb 4' fluorescent lighting fixture for every 75 square feet and one luminous panel for each recessed lighting fixture. It also advises placing main beams parallel to either the room's short or long dimension, depending on the layout.
Standards and Norms:
The guide provides a standardized approach for estimating the number of ceiling panels and grids needed for suspended ceilings. It emphasizes the importance of aligning main beams correctly to ensure optimal lighting and structural integrity.
Key Data from Tables:
The tables list specific measurements and quantities for ceiling components, such as the number of panels and beams required for different room sizes. This data is crucial for accurate planning and purchasing of materials.
Critical Information:
- Use one two-bulb 4' fluorescent fixture per 75 sq. ft.
- Align main beams parallel to the room's dimensions.
- Follow the table for precise panel and beam requirements based on room size.
Catalog excerpts

Easy Elegance™ Ceiling Panel Installation Instructions RESIDENTIAL USE ONLY SÓLO PARA USO RESIDENCIAL Instrucciones de instalación de paneles de techo Easy Elegance™
Open the catalog to page 1
1 Easy Elegance Coffers FAQ’s Can I use recessed (can) lighting with Armstrong Easy Elegance Coffers? • Absolutely! Simply install your lights per the manufacturer’s instructions, making sure that the fi xtures are supported by your t-bar, drop ceiling grid or the framing structure above it. We recommend using the Armstrong Easy Elegance Panel when installing the can lights. Can I paint Armstrong Easy Elegance Coffers? • All Armstrong Easy Elegance products can be painted with latex paint before installation. Make sure that your ceiling panels are clean and dry, and experiment on a sample with...
Open the catalog to page 2
2 U INSTALLATION OPTION A Using A Drywall Border INSTALACIÓN OPCIÓN A Utilizando un borde de Yeso
Open the catalog to page 3
3 Installation OPTION 2' x 2' INSTRUCTIONS WHEN USING A DRYWALL BORDER WITH EASY ELEGANCE™ COFFERS (RESIDENTIAL USE ONLY) Installing BorderStyle Suspended Ceilings with Perimeter Drywall Borders For use with Armstrong Prelude® and Prelude Fire Guard suspended ceilings systems featuring Armstrong 2' x 2' ceiling panels. PLEASE READ To ensure a beautiful, excitingly different and versatile BorderStyle suspended ceiling, please read these installation instructions carefully. We recommend that you take the time to lay out a plan of your room and use it as a guide. Materials and Tools MATERIALS NEEDED:...
Open the catalog to page 4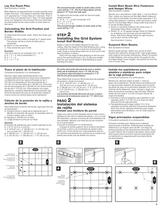
Lay Out Room Plan See illustration 2 below Main Beams run perpendicular to joists (usually room length direction). The distance between Main Beams is 4' spanned by 4' Cross Tees at 2' intervals. Then 2' Cross Tees run between the 4' Tees. For best appearance, our designers recommend that your perimeter drywall border be the same width on both sides of the room. Calculating the Grid Position and Border Widths To determine the border width, follow this three-part formula. A. Divide the room width or length by 2' (panel size). The answer will be a whole number plus a remainder. B. Add 2' to the...
Open the catalog to page 5
5 Prepare Hanger Wires See illustration 7 below. For rooms longer than 12', add Main Beams as needed. Stretch additional strings to pre-bend Hanger Wires at 8' to 12' intervals. This will help level the entire room. Hang and Level Main Beams See illustration 8 below. Trim fi rst Main Beam with snips. Cut so that a Cross Tee slot lines up with the Cross Tee guide string when the trimmed end is set on the end Wall Molding. a. Drive a nail into the wall just above the top of the wall molding on each side of the room. Make sure the nails are in line with a row of hanger wires. b. Stretch a tight...
Open the catalog to page 6
6 Reinforce Unsupported Drywall Joints See illustration 13 below. To provide additional support whenever one drywall piece meets another and is unsupported by the grid system, we recommend using a wood Furring Strip. Overlap the joint and screw or use construction adhesive to stabilize the joint and insure a smooth fi t. Finish the drywall by taping all drywall joints and corners. Spackle, sand and complete, following standard drywall techniques. Mask off the grid system with tape for protection before painting the perimeter border. Install All Ceiling Panels See illustration 14 below. Lift panels...
Open the catalog to page 7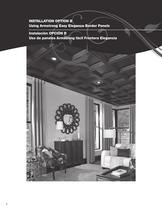
U 7 INSTALLATION OPTION B Using Armstrong Easy Elegance Border Panels Instalación OPCIÓN B Uso de paneles Armstrong fácil Frontera Elegancia
Open the catalog to page 8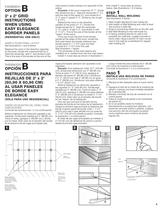
main beams (mains always run opposite of the joists). Example: If the room measures 15' 7", divide this dimension by 2´. Take the remainder (1' 3"), add the size of the panel (2´), and divide by 2 (1' 3" plus 2' equals 3' 3". Divide by two to get 1' 9-1/2"). Measure the room in the direction parallel of the joists (11' 3"). Divide this measurement by 2'. Take the remainder (1' 3"), add 2' to get 3' 3", and divide in half (1' 7-1/2"). This is the size of the border at the “sides” of the room. Once you know the size of the border panels at the sides of the room, locate the fi rst main beam the...
Open the catalog to page 9
STEP 2 INSTALL SUSPENSION GRID Install fasteners and Hanger Wires See illustration 3 below. 1. Snap chalk lines for Main Beams 4' apart (A). 2. Screw in Wire Fasteners 4' apart (B). 3. Wrap Hanger Wire securely around itself 3 times (C). Prebend hanger wires See illustration 3 below. 1. Measure up 7/8 from the bottom of the molding. Drive nail into wall joist just above molding. 2. Do the same on the other side of the room. Strtetch a string from nail to nail along a row of wires. (A) 3. Swing hanger wire over to string and bend each one at 90 where they touch the string (B). Stretch additional...
Open the catalog to page 10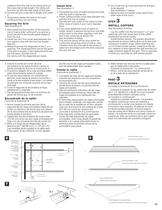
measure from the wall to the string and cut the cross tee to that length. The string will then line up with the near edge of the main. 6. Cut the second cross tee to length and insert it. 7. Temporarily fasten the tees to the wall molding so they do not move. Squaring the Grid See illustration 6. 1. Now install the fi rst section of the second row of mains after cutting off one end so a cross tee slot is the border panel distance from the end. 2. Install two four foot cross tees between the two mains in line with the fi rst two border tees (C). 3. Measure across the diagonals of the 2' x 4' opening....
Open the catalog to page 11All Armstrong ceilings - USA catalogs and technical brochures
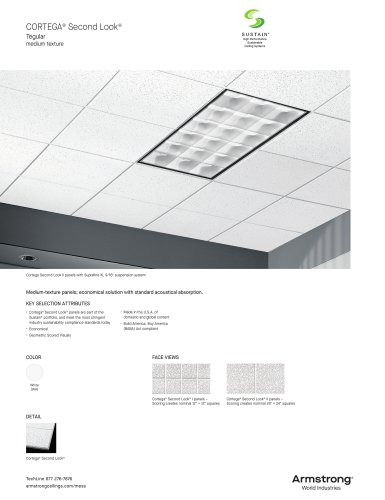 CORTEGA® Second Look®
2 Pages
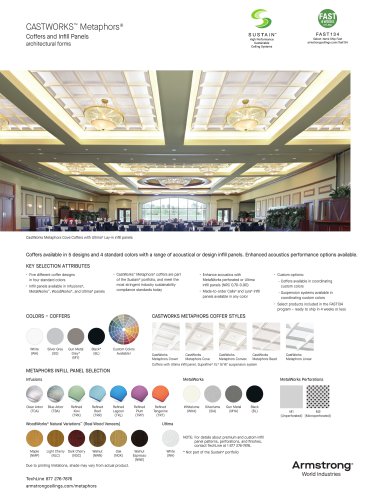 CASTWORKS™ Metaphors®
2 Pages
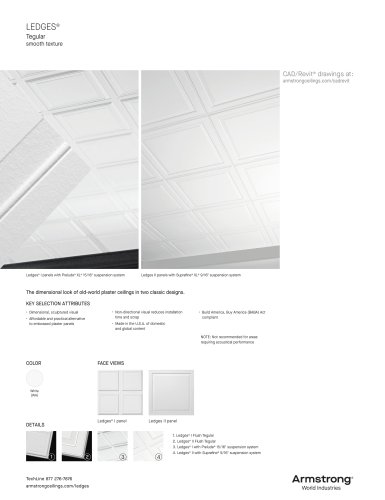 LEDGES®
2 Pages
 Wood and Wood Looks
28 Pages
 EASY ELEGANCE™
4 Pages
Archived catalogs
 Retail Ceiling Guide
28 Pages
 Custom creation
6 Pages
 Inspiring Great Spaces
8 Pages
 ALTERNA™ & ALTERNA RESERVE
56 Pages
 LUXE PLANK®
28 Pages
 VINYL plank flooring
24 Pages
 LUXURY FLOORING
40 Pages
 ABOOK 2018
47 Pages
 PRELUDE 24 - TL2
4 Pages
 Ultima+ brighten your space
6 Pages
 METALLAIRE™
6 Pages
 Room dividers
18 Pages
 WoodHaven Ceiling Planks
3 Pages
 CEILING & WALL LOOK BOOK 2023
16 Pages
 THE WINNING CHOICE
8 Pages
 sds mineral fiber
10 Pages
 Laminated Ceiling Solutions
15 Pages
 Ceiling & Wall Guide
24 Pages
 CEILING & WALL LOOK BOOK
16 Pages
 Metallaire Styles
6 Pages
 Contractor Series
8 Pages
 basement inspiration
8 Pages
 WoodHaven™ Ceiling Planks
8 Pages
 HomeStyle® Ceilings
8 Pages
 Custom Creations Brochure
2 Pages
 DECORAT I V E C E I L I N G
8 Pages
 Tin Look™ Paintable Ceilings
6 Pages
 Definitions Room Dividers
18 Pages
 Metallaire Ceilings
6 Pages
 Decorative Ceilings
6 Pages
 WoodHaven Ceilings
6 Pages
 Tin Look
4 Pages
 Retail Ceiling Guide
8 Pages


- Armstrong indoor suspended ceiling
- Armstrong acoustic suspended ceiling
- Metal suspended ceiling
- Armstrong panel suspended ceiling
- Armstrong decorative suspended ceiling
- Armstrong office suspended ceiling
- Armstrong tile suspended ceiling
- Armstrong perforated suspended ceiling
- Armstrong color suspended ceiling
- Aluminum ceiling
- Armstrong flame-retardant suspended ceiling
- Made from recycled materials suspended ceiling
- Armstrong commercial suspended ceiling
- Modular suspended ceiling
- Conference room suspended ceiling
- Armstrong strip suspended ceiling
- Sustainable suspended ceiling
- Armstrong suspended ceiling with hidden framework
- Wooden ceiling