
- Catalogs
- Ambrogio Robot
- L85_vers.3.1_INGLESE_


L85_vers.3.1_INGLESE_

L85_vers.3.1_INGLESE_
This manual is crucial for the safe and efficient use of a robotic lawnmower, emphasizing adherence to instructions to prevent safety hazards and economic damage. It includes translations from Italian and uses symbols to highlight critical information.
The appliance's nameplate provides essential details such as the manufacturer's name, CE conformity, model, serial number, and technical specifications. These details are necessary for technical assistance.
The manual outlines potential hazards and stresses caution. Key safety regulations include:
- Understanding and following safety instructions before use.
- Ensuring no one is in the working area during operation.
- Supervising the robot in unsecured areas.
- Restricting use to knowledgeable individuals.
- Prohibiting tampering with safety devices.
- Clearing the lawn of objects that could damage the robot.
- Avoiding operation during sprinkler use.
- Ensure the robot and other devices do not operate simultaneously.
- Disconnect power before adjustments or maintenance.
- Replace damaged parts and use only original spare parts.
- Regularly check the robot for wear or damage.
- Avoid using or charging the robot in explosive environments.
- Use only the manufacturer-supplied battery charger.
- Bumpers: Stops the robot if it hits an object over 10 cm high.
- Inclinometer: Stops the blade if the robot tips over.
- Emergency Stop Switch: Instantly stops the robot and blade.
- Over-current Protection: Stops the robot if motors overheat.
- No Signal Sensor: Stops the robot if no signal is detected.
- Models: 7085EVO and 7085EL0.
- Dimensions: 593x298x439 mm.
- Cutting height: 25-65 mm.
- Motor types: Brush and brushless.
- Operating temperature: -10°C to 50°C.
- Sound level: 65 dB(A).
- Water protection: IP44.
- Plan installation carefully, ensuring proper positioning of the charging station.
- Lay the perimeter wire according to guidelines.
- Consider potential interference from other robots.
- The robot trims grass within a perimeter wire, changing direction upon encountering obstacles.
- It can recognize thicker grass and activate a spiral movement for better trimming.
- The "Recall" wire extends for about 2 meters with a 5 cm gap between each wire.
- Requires a special perimeter wire setup, forming a triangle.
- Ensure the lawn is even and free of obstacles.
- The wire can be buried or laid on the ground.
- Position the power supply unit out of children's reach.
- Place the robot inside the charging station and press the ON key to start charging.
This document is a user manual for a robotic lawnmower, detailing its operation, programming, and safety features.
Instructions on turning on the robot and initiating the charging process are provided.
Users are advised to follow procedures for adjustments, particularly for setting the cutting height.
The manual outlines the obligations for safe use and describes the robot's control functions.
The robot's functions can be programmed through a menu system.
Users can program the robot's operating days and times.
Instructions are provided for programming secondary areas for automatic mowing.
The manual includes a section on safety programming.
This user manual provides detailed instructions for the safe and efficient use of the robotic lawnmower.
The robot has two main operating modes: Automatic and Closed Area.
Users can select the language for messages and menus.
Ensure the lawn height is compatible and verify the work area is properly marked.
To stop the robot safely, use the "STOP" key and disconnect the power plug.
The robot returns to the charging station under specific conditions.
For closed areas without a charging station, specific setup instructions are provided.
The robot can be secured with a customizable four-digit password.
During operation, the display shows mower speed, blade speed, and battery charge.
Before storage, fully charge the battery and perform maintenance.
Ensure the charging station is clean and start the charging cycle.
Simulate test maneuvers initially and avoid mowing wet or excessively high grass.
Regularly clean and check the blade, battery knobs, and contact plates.
Use a sponge with mild detergent for external surfaces.
Common issues include abnormal vibrations and incorrect charging station positioning.
The document provides a comprehensive guide for troubleshooting and maintaining the robot.
Recommendations for replacing parts emphasize using original spare parts.
The document outlines proper disposal methods for the robot and batteries.
The manufacturer declares compliance with various EU directives.
Catalog excerpts

USER’S MANUAL
Open the catalog to page 1
Reproduction, even partial, of this document without written permission by the manufacturer is strictly forbidden. The manufacturer assumes a policy of continual improvement and reserves the right to modify this document without prior notice on condition that the changes do not constitute health and safety risks. © 2008 - Text, illustrations and page layout by Tipolito La Zecca. The text may be reproduced, in whole or in part, on condition that the author is mentioned.
Open the catalog to page 2
GENERAL INFORMATION This manual forms an integral part of the appliance and was produced by the Manufacturer to provide the necessary information to people authorised to interact with it during its working life. Operators of the appliance must adopt correct working practices and must carefully read and follow all the instructions contained in this manual. This manual is written by the Manufacturer in the original language of Italian and may be translated into other languages to meet legal and/or commercial requirements. Carefully read the instructions contained in this manual to avoid any unnecessary...
Open the catalog to page 3
IDENTIFICATION OF MANUFACTURER AND EQUIPMENT The nameplate shown here is applied directly onto the appliance. It contains references and all the information essential for safely operating the device. For any technical requirements, please contact the Manufacturer’s Technical Service Centre or an authorised dealer. For technical assistance, please indicate the data reported on the identification plate, the approximate hours of use and the type of fault detected. DATA PLATE (A) Name of manufacturer (C) Model Manufactured by Xxxxxxxxxxxxxxxxxx, Xxxxxxxxxxxxxxxxx XXXXX Xxxxxxxxxxxxxxxxxxxxxxxx (XX)...
Open the catalog to page 4
• Never allow people to sit on the robot. Never lift the robot to inspect the blade or to carry it while it is running. Do not place hands and feet under the robot when it is in operation. EN • Do not use the robot when a sprinkler system is running. In this case, program the robot and the sprinkler system so that they do not operate at the same time. Do not wash the robot with high-pressure water jets and do not immerse it in water, partially or completely, as it is not watertight. • Disconnect the power supply and activate the safety device before performing any adjustment or maintenance that...
Open the catalog to page 5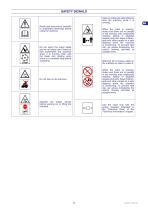
A Read user instructions carefully - to understand meanings before j—t—u using the machine. Keep an adequate safe distance from the machine while it is running. Do not touch the rotary blade and do not place your hands or feet underneath the machine when it is running. Wait until the blade and rotating parts come to a complete stop before accessing. While the robot is working, make sure there are no people in the working area (especially children, elderly or disabled people) and pets. Keep children, pets and other people at a safe distance when the machine is functioning. To prevent...
Open the catalog to page 6
(*) Depends on the condition of the grass, lawn and the complexity of the mowing area. User's manual
Open the catalog to page 7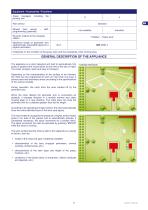
Equipment / Accessories / Functions (12) Depends on the condition of the grass, lawn and the complexity of the mowing area. The appliance is a robot designed and built to automatically trim grass in gardens and house lawns at any time of the day or night. It is small, compact, silent and easy to transport. Depending on the characteristics of the surface to be trimmed, the robot can be programmed to work on more than one area: a primary area and secondary areas (according to the specifications of the various models). During operation, the robot trims the area marked off by the perimeter wire. When...
Open the catalog to page 8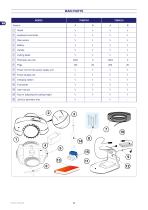
User's manual
Open the catalog to page 9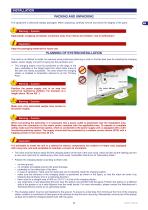
INSTALLATION PACKING AND UNPACKING The equipment is delivered suitably packaged. When unpacking, carefully remove and check the integrity of the parts. Warning – Caution Keep plastic wrapping and plastic containers away from infants and children: risk of suffocation! Important Keep the packaging materials for future use. PLANNING OF SYSTEM INSTALLATION The robot is not difficult to install, but requires some preliminary planning in order to find the best area for installing the charging station, power supply unit and for laying out the perimeter wire. The charging station must be positioned on...
Open the catalog to page 10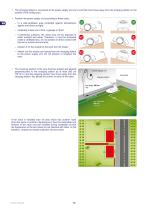
The charging station is connected to the power supply unit via a cord that must move away from the charging station on the outside of the cutting area. Position the power supply unit according to these rules: in a well-ventilated area protected against atmospheric agents and direct sunlight; preferably inside your home, a garage or shed; if positioned outdoors, the robot must not be exposed to direct sunlight and water. Therefore, it must be protected inside a ventilated box. Do not position in direct contact with the soil or humid environments; position it on the outside of the lawn and not...
Open the catalog to page 11
Before installing the perimeter wire, it is necessary to check the entire surface of the lawn. Make any necessary adjustments to the grassy surface during the laying of the perimeter wire in order to allow the robot to function correctly. 1. Evaluate the best method for returning to the charging station according to the instructions described in the chapter “REENTRY METHOD TO THE CHARGING STATION”. 2. Evaluate whether a special installation of the perimeter wire is necessary according to the instructions described in the chapter “SET-UP OF THE ROBOT’S QUICK RE-ENTRY TO THE CHARGING STATION”....
Open the catalog to page 12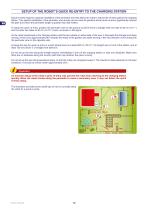
SETUP OF THE ROBOT’S QUICK RE-ENTRY TO THE CHARGING STATION Quick re-entry requires a special installation of the perimeter wire that allows the robot to reduce the re-entry path to the charging station. This special installation of the perimeter wire should only be used for gardens where quick re-entry significantly reduces the path and where the perimeter length is greater than 200 meters. To setup the quick re-entry, position the perimeter wire on the ground so that it forms a triangle with one side of 50 cm (19.7 ") and the other two sides of 40 cm (15.75 ") each, as shown in the figure....
Open the catalog to page 13All Ambrogio Robot catalogs and technical brochures
 L400i_vers.1.0_INGLESE
42 Pages
 L60
L6032 Pages
 CATALOGUE 2018
36 Pages