
- Catalogs
- Alton greenhouses
- OCTAGONAL 10x10


OCTAGONAL 10x10

OCTAGONAL 10x10
This document provides assembly instructions and safety information for the Alton summerhouse. It is important to review these instructions thoroughly before beginning assembly. The manual is available online for reprinting, and customer service is available for additional advice.
Safety Warning
During assembly, wear protective gear and handle glass carefully. Avoid assembling in high winds and ensure snow is cleared from the roof to prevent collapse. It is recommended to assemble with at least two people.
Site Preparation
Choose a flat, level area for the summerhouse. A concrete or slabbed base is recommended for stability and drainage. Avoid placing the summerhouse under trees and select a sheltered site to minimize wind damage.
Additional Considerations
Verify that all components are included before starting assembly. The wood is treated with a preservative, which should be reapplied annually or replaced with an oil-based product for a permanent finish.
Base Preparation
The base should be larger than the building, with a recommended slab base size of 3660mm x 3640mm.
Overview
Position the base in the desired location. Pre-drill timber to prevent splitting. If glass breaks, remove beading to replace it. Required tools include a spirit level, screwdriver, drill, hammer, and saw.
Floor Assembly
Lay out floor sections ensuring correct alignment and fix them with 60mm screws. Connect middle sections and attach noggins.
Side Assembly
Position side panels as desired, drill pilot holes, and fix with screws. Do not fix panels to the floor yet.
Door Installation
Install the door handle before fitting the door section and fix the door panel with screws.
Roof Assembly
Construct the roof using top brackets and roof bars. Fix roof bars to the ridge bracket and side frame, then install soffit boards and ply roof sheets.
Side Cloaking
Fit side corner cloaking with screws.
Fixing to Floor
Drill pilot holes in the cill section and fix sides to the floor with screws.
Roof Felting
Cut roof felt sections using a template and fix felt to the roof with clout nails, ensuring proper alignment and spacing.
Catalog excerpts
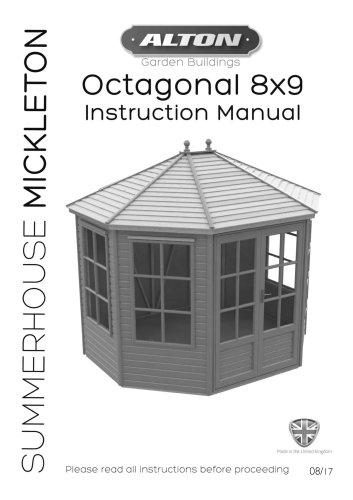
SUMMERHOUSE BROADWELL Octagonal 10x10Instruction Manual Please read all instructions before proceeding 08/17
Open the catalog to page 1
0' x 10' Cedar Summerhouse Assembly Instructions Section Page - 3 Contents: Introduction Base Preparation Overview Floor Assembly Side Assembly Door Installation Roof Assembly Side Cloaking Fixing to Floor Roof Felting Fascias and Capping Slatted Roof Installation (optional) Top Cap and Finial Casement Stay Set-up Cabin Hook Fitting Architrave Fitting Window Trim Fitting Weather Strip Fitting Parts Lists
Open the catalog to page 2
Introduction Thank you for purchasing your new Alton summerhouse. We recommend you familiarise yourself with the instructions and read all safety information before you commence assembly. This instruction manual is also available online at www.greenhousepeople.co.uk in the technical help section should you need to reprint it. Should you require any additional advice you can always call us on 01782 385409. Safety Warning Glass and timber can potentially cause injury. Please ensure you wear protective goggles, gloves, headgear and suitable footwear when assembling the building. Please remember...
Open the catalog to page 3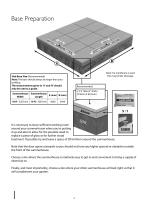
Base Preparation Note: If a membrane is used this may hinder drainage. Slab Base Size (Recommended) Note: The base should always be larger than your building. The measurements given in ‘A’ and ‘B’ should only be used as a guide. Recommended 3’ X 2’ Slab (2” thick) (910mm X 610mm) Summerhouse Summerhouse A (mm) B (mm) Width Length 10 ft - 3267mm 10 ft - 3267mm It is necessary to leave sufficient working room around your summerhouse when you're putting it up and also to allow for the possible need to replace a piece of glass or for further wood treatment. If possible try and leave a space of 2ft/610mm...
Open the catalog to page 4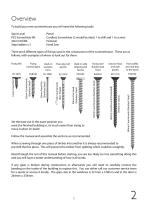
Overview To build your new summerhouse you will need the following tools: Spirit Level PZ2 Screwdriver Bit 4mm Drill Bit Step ladders x 2 Pencil Cordless Screwdriver (2 would be ideal, 1 to drill and 1 to screw) Hammer Hand Saw There are 8 different types of fixings used in the construction of the summerhouse. These are as follows, with examples of where to look out for them: Set the base out in the exact position you want the finished building in, its much easier than trying to move it when it’s built! 80mm Countersunk (Stainless Steel) Fixes soffits and roof bars to the eaves Used on floor...
Open the catalog to page 5
Floor Assembly Begin by laying out two of the floor sections. The floor sections are handed, this is because of the notches in the sides so make sure you have one of each hand. Slide them together making sure the outside edges line up. Drill pilot holes with the drill bit provided and fix with 60mm passivated screws at the points shown by the arrows in the diagram below. Repeat this with the remaining two end sections. Fix the base noggins to one of the floor assemblies as shown in diagram 2. Drill pilot holes in the noggins and fix with 60mm passivated screws into the frame of the floor. Dia....
Open the catalog to page 6
Floor Assembly Now connect the two middle sections of flooring. Drill two pilot holes and fix together with 60mm passivated screws. Makes sure the groves in the floor boards line up before fixing. Next fix the rest of the base noggins to the middle section of flooring. Fix these as before with 2 screws per noggin. Diagram 5 You can now move the first end section of flooring into position (the one with the noggins attached), then slot the middle section onto the noggins.
Open the catalog to page 7
Floor Assembly Finally line up the other end section of flooring, before sliding this onto the noggins make a small mark on the floor board on the centerline of the noggin. This is to help you get the fixing screw in the correct position. Once you have made the marks at each position you can slide the floor section onto the noggins of the middle sections. Check that the edges of the floor are in line before drilling pilot holes through the floor board in line with the noggin. Then fix with 60mm passivated screws (diagram 8). Its is crucial to get the floor flat and level as this will affect how...
Open the catalog to page 8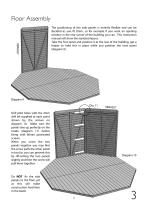
Floor Assembly The positioning of the side panels is entirely flexible and can be decided as you fit them, so for example if you want an opening window in the rear corner of the building you can. This instruction manual will show the standard layout. Take the first panel and position it at the rear of the building, get a helper to hold this in place while you position the next panel (diagram 9). Diagram 9 Dia. 11 Drill pilot holes with the 4mm drill bit supplied at each point shown by the arrows on diagram 10. Make sure the panels line up perfectly on the inside (diagram 11) before fixing with...
Open the catalog to page 9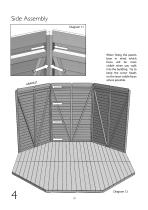
Side Assembly Diagram 11 When fixing the panels bear in mind which faces will be most visible when you walk into the building. Try to keep the screw heads on the least visible faces where possible.
Open the catalog to page 10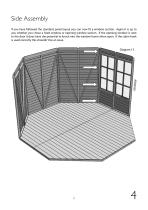
Side Assembly If you have followed the standard panel layout you can now fit a window section. Again it is up to you whether you chose a fixed window or opening window section. If the opening window is next to the door it does have the potential to knock into the window frame when open. If the cabin hook is used correctly this shouldn’t be an issue. Diagram 13
Open the catalog to page 11
Side Assembly Fit the next panel as you did the last.
Open the catalog to page 12
Side Assembly Diagram 15 When fixing two window sections together you should drill your pilot hole through the frame as normal, just be extra careful you don’t drill into the window frame on the other side. Then fix with 60mm passivated screws.
Open the catalog to page 13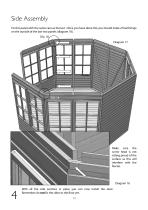
Side Assembly Fix this panel with the same care as the last. Once you have done this you should make 2 final fixings on the outside of the last two panels (diagram 18). Dia. 18 Diagram 17 Make sure the screw head is not sitting proud of the surface as this will interfere with the fascias. With all the side sections in place you can now install the door. Remember do not fix the sides to the floor yet. 14
Open the catalog to page 14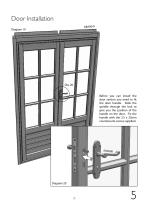
Before you can install the door section you need to fit the door handle. Slide the spindle through the lock to give you the position of the handle on the door. Fix the handle with the 3.5 x 25mm countersunk screws supplied.
Open the catalog to page 15Archived catalogs
 EVO FUSION 10
44 Pages
 octagonal ssummerhouse
52 Pages
 summerhouse
8 Pages
 evolution four LT
52 Pages