- Catalogs
- Alton greenhouses
- EVO FUSION 10
EVO FUSION 10
1 /44Pages
EVO FUSION 10
1 /44Pages
Catalog excerpts

Cedar Greenhouses 10ft Wide Instruction Manual (Use in conjunction with main greenhouse instructions) Made in the United Kingdom Please read all instructions before proceeding 03/18
Open the catalog to page 1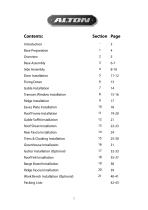
Contents: Section introduction - Transom Window Installation 8 Eaves Plate Installation 10 Roof Frame Installation 11 Gable Soffit Installation 12 Roof Sheet Installation 13 Rear Fascia Installation 14 Trims & Cloaking Installation 15 Gutter Installation (Optional) 17 Roof Felt Installation 18 Barge Board Installation 19 Ridge Fascia Installation 20 Work Bench Installation (Optional) 21 Packing Lists
Open the catalog to page 2
Introduction Thank you for purchasing your new Alton building. We recommend you familiarise yourself with the instructions and read all safety information before you commence assembly. This instruction manual is also available online at www.greenhousepeople.co.uk in the technical help section should you need to reprint it. Should you require any additional advice you can always call us on 01782 385409. Safety Warning Glass, aluminium and timber can potentially cause injury. Please ensure you wear protective goggles, gloves, headgear and suitable footwear when assembling and glazing the building....
Open the catalog to page 3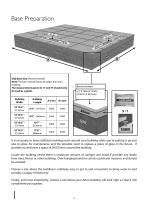
Slab Base Size (Recommended) Note: The base should always be larger than your building. The measurements given in 'A' and 'B' should only be used as a guide. It is necessary to leave sufficient working room around your building when you're putting it up and also to allow for maintenance and the possible need to replace a piece of glass in the future. If possible try and leave a space of 2ft/610mm around the building. Locate the building where there is maximum amount of sunlight and avoid if possible any shade from trees, fences or other buildings. Over-hanging branches can be a particular nuisance...
Open the catalog to page 4
Overview To build you new Fusion greenhouse you will need the following tools: Spirit Level Pencil 4mm Drill Bit Hammer Drill 7mm Masonry Bit Pozidrive No. 2 Screwdriver Bit Cordless Screwdriver (2 would be ideal, 1 to drill and 1 to screw) Hammer Step ladders There are 9 types of screws used in the construction of the workshop. These are as follows: 5 x 80mm Countersunk (Zinc plated) 5 x 80mm Countersunk (Stainless Steel) 5 x 60mm Countersunk (Zinc plated) 02-1816 5 x 40mm Countersunk (Zinc plated) (Zinc plated) EV0336 3.5 x 25mm Countersunk (Stainless Steel) 4 x 50mm Pan Head (Stainless Steel)...
Open the catalog to page 5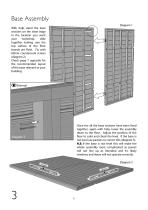
Base Assembly Diagram 1 With help stand the base sections on the short edge in the location you want your workshop, slide together making sure the top surface of the floor boards are flush. Fix with 60mm countersunk screws (diagram 2). Check page 7 opposite for the recommended layout of the base relevant to your building. Once the all the base sections have been fixed together, again with help, lower the assembly down to the floor. Adjust the position of the floor to suite and check the level. If the base is not level use packers to correct this (diagram 3). N.B. If the base is not level this...
Open the catalog to page 6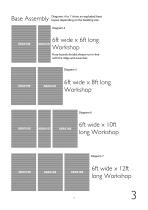
Diagrams 4 to 7 show an exploded base layout depending on the building size. Diagram 4 6ft wide x 6ft long Workshop Floor boards should always run in-line with the ridge and eaves bar. Diagram 6 6ft wide x 10ft long Workshop 6ft wide x 12ft long Workshop
Open the catalog to page 7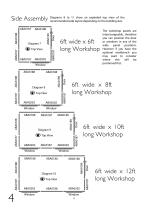
Side Assembly 6ft wide x 6ft long Workshop Diagrams 8 to 11 show an exploded top view of the recommended side layout depending on the building size. Diagram 8 Top View ABA0202 Window Diagram 10 Top View ABA0202 Window 6ft wide x 10ft long Workshop 6ft wide x 8ft long Workshop The workshop panels are interchangeable, therefore you can position the door or windows in any of the wide panel positions. However if you have the optional workbench you may want to consider where this will be positioned first. 6ft wide x 12ft long Workshop
Open the catalog to page 8
Side Assembly Before you place any of the panels remember to remove the transit blocks from the bottom of the panels (diagram 12a), once removed be careful not to damage the cladding. Position the first panel onto the base (diagram 12b). Its best to start at the rear of the building with the large plain panel. You can then offer up the next panel adjacent to it. The rear panel meets the inside face of the side panel (diagram 14). Drill pilot holes and fix together with four 80mm countersunk zinc plated screws (02-1868), diagram 13. Do NOT fix the side panels to the base at this stage. This is...
Open the catalog to page 9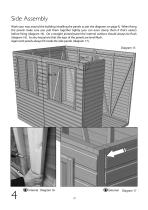
Side Assembly Work your way around the building installing the panels as per the diagrams on page 8. When fixing the panels make sure you pull them together tightly (you can even clamp them if that’s easier) before fixing (diagram 16). On a straight jointed panel the internal surfaces should always be flush (diagram 16). Its also important that the tops of the panels are level/flush. Again end panels always fit inside the side panels (diagram 17). Diagram 15 Dia. 17
Open the catalog to page 10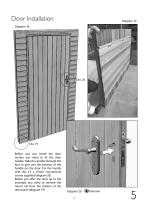
Door Installation Dia. 19 Before you can install the door section you need to fit the door handle. Slide the spindle through the lock to give you the position of the handle on the door. Fix the handle with the 3.5 x 25mm countersunk screws supplied (diagram 20). Before you offer the door up to the assembly you need to remove the transit rail from the bottom of the door panel (diagram 19).
Open the catalog to page 11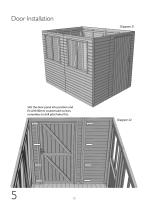
Door Installation Diagram 21 Slot the door panel into position and fix with 80mm countersunk screws, remember to drill pilot holes first. Diagram 22
Open the catalog to page 12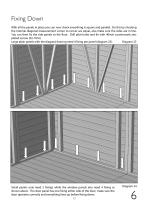
Fixing Down With all the panels in place you can now check everything is square and parallel. Do this by checking the internal diagonal measurement corner to corner are equal, also make sure the sides are in line. You can then fix the side panels to the floor. Drill pilot holes and fix with 40mm countersunk zinc plated screws (02-1816). Diagram 23 Large plain panels with the diagonal bracing need 4 fixing per panel (diagram 23). Small panels only need 2 fixings while the window panels also need 4 fixing as shown above. The door panel has one fixing either side of the door, make sure the door...
Open the catalog to page 13Archived catalogs
 octagonal ssummerhouse
52 Pages
 summerhouse
8 Pages
 evolution four LT
52 Pages
 OCTAGONAL 10x10
46 Pages