- Catalogs
- Alfa Forni
- Napoli
Napoli
1 /84Pages

Napoli
1 /84Pages
Catalog excerpts

FORNO NAPOLI
Open the catalog to page 1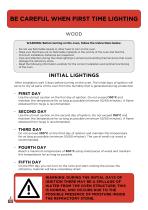
BE CAREFUL WHEN FIRST TIME LIGHTING WOOD WARNING: Before turning on the oven, follow the instructions below. - Do not use flammable liquids or other fuels to turn on the oven. - Make sure that there are no flammable materials in the vicinity of the oven and that the minimum installation distances are respected. - Care and attention during the initial lightings is aimed at preventing thermal shock that could damage the refractory stone. - Read the following information carefully for the correct installation and optimal functioning of the oven. INITIAL LIGHTINGS After installation wait 3 days before...
Open the catalog to page 4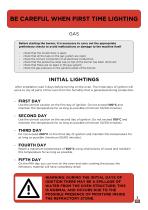
BE CAREFUL WHEN FIRST TIME LIGHTING GAS Before starting the burner, it is necessary to carry out the appropriate preliminary checks to avoid malfunctions or damage to the machine itself - - - - - - check check check check check check that the mouth door is open; that all the taps on the gas system are open; the correct connection of all electrical conductors; that the protective steel cap on top of the burner has been removed; that there are no leaks in the gas system; the gas pressure on the general outlet of the burner; INITIAL LIGHTINGS After installation wait 3 days before turning on the...
Open the catalog to page 5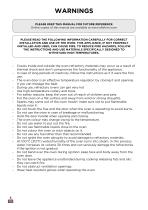
PLEASE KEEP THIS MANUAL FOR FUTURE REFERENCE Online copies of this manual are available at www.alfaforni.com V') ( \ PLEASE READ THE FOLLOWING INFORMATION CAREFULLY FOR CORRECT INSTALLATION AND USE OF THE OVEN. THIS APPLIANCE, IF NOT PROPERLY INSTALLED AND USED, CAN CAUSE FIRE. TO REDUCE FIRE HAZARDS, FOLLOW THE INSTRUCTIONS AND USE MATERIALS SPECIFICALLY DESIGNED TO WITHSTAND HIGH TEMPERATURES. V) - Cracks inside and outside the oven refractory materials may occur as a result of thermal shock and don’t compromise the functionality of the appliance. - In case of long periods of inactivity, follow...
Open the catalog to page 6
WARNINGS ONLY FOR WOOD-FIRED OR HYBRID OVENS Do not throw logs on the fire but lay them on it Do not make a big fire that comes out of the oven mouth Do not use any fuel other than firewood
Open the catalog to page 7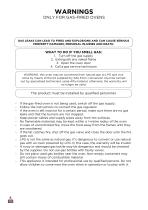
WARNINGS ONLY FOR GAS-FIRED OVENS GAS LEAKS CAN LEAD TO FIRES AND EXPLOSIONS AND CAN CAUSE SERIOUS PROPERTY DAMAGES, PERSONAL INJURIES AND DEATH. WHAT TO DO IF YOU SMELL GAS: 1. Turn off the gas supply 2. Extinguish any naked flame 3. Open the oven door 4. Call a gas service technician WARNING: this oven may be converted from natural gas to LPG and vice versa by means of the kit supplied by Alfa Forni; conversion must be carried out by specialised technicians using Alfa material, otherwise, the warranty will no longer be valid. The product must be installed by qualified personnel. - If the gas-fired...
Open the catalog to page 8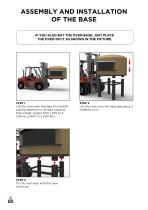
ASSEMBLY AND INSTALLATION OF THE BASE IF YOU ALSO BUY THE OVEN BASE, JUST PLACE THE OVEN ON IT AS SHOWN IN THE PICTURE. STEP 1 Lift the oven with the help of a forklift paying attention to its load capacity that usually ranges from 1 200 to 2 200 kg (2 600 to 5 000 lbs). STEP 3 Fit the oven legs with the base structure. STEP 2 Lift the oven over the base and place it carefully on it.
Open the catalog to page 10
WARNING: THE EXTERNAL SIDES OF THE OVEN CAN REACH TEMPERATURES ABOVE 50°C (120°F). ANY FLAMMABLE MATERIALS MUST NOT BE WITHIN 1-METRE RADIUS OF THE OVEN. CAUTION: Put the oven away from wind or strong draughts. V The Napoli built-in oven is available. In gas-fired models, allow for a ventilation and inspection grid for the burner. / \ FOR YOUR SAFETY: Place the oven on a flat and stable surface. Involuntary movements during operation may result in personal injury and property damage. V) Consider a minimum distance of 50 cm (20 in) to place the flue according to the model and insulation. V) CAUTION:...
Open the catalog to page 11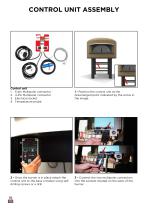
CONTROL UNIT ASSEMBLY Control unit 1. 5-pin Multipolar connector 2. 4-Pin Multipolar connector 3. Electrical socket 4. Temperature probe 1 - Position the control unit at the prearranged point indicated by the arrow in the image. 2 - Once the burner is in place attach the control unit to the base crossbar using selfdrilling screws or a drill 3 - Connect the two multipolar connectors into the sockets located on the back of the burner.
Open the catalog to page 12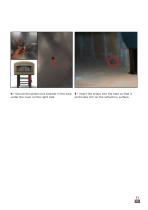
4 - Secure the probe lock bracket in the hole under the oven on the right side 5 - Insert the probe into the hole so that it protrudes 1cm on the refractory surface.
Open the catalog to page 13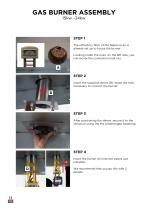
STEP 1 The refractory floor of the Napoli oven is already set up to house the burner. Looking under the oven, on the left side, you can locate the connection hole (A). STEP 2 Insert the supplied sleeve (B) inside the hole, necessary to connect the burner. STEP 3 After positioning the sleeve, secure it to the structure using the the prearranged fastening. STEP 4 Insert the burner (D) into the sleeve just installed. We recommend that you do this with 2 people.
Open the catalog to page 14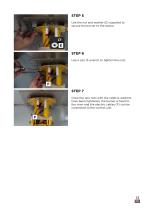
Use the nut and washer (E) supplied to secure the burner to the sleeve. Use a size 13 wrench to tighten the nuts. STEP 7 Once the two nuts with the relative washers have been tightened, the burner is fixed to the oven and the electric cables (F) can be connected to the control unit.
Open the catalog to page 15
IN THE EYES OF THE LAW, THE FLUE MUST SERVE ONLY ONE APPLIANCE. CONNECTING MANY OVENS TO THE SAME FLUE COULD COMPROMISE A REGULAR EVACUATION OF SMOKE. V_J Contact local fire services to find out about any restrictions regarding flue installation or inspection of oven installation. v") INDOOR FLUE CONNECTION For the Napoli oven to function correctly, it needs a flue with a diameter of 250 mm (10 in) and at least 4 metres (13 ft) high. 1. For existing and insufficient flues, it is advisable to use stainless steel connecting pipes with right diameter and proper insulation. 2. Seal with materials...
Open the catalog to page 16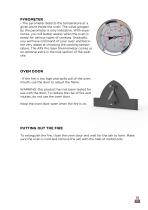
PYROMETER - The pyrometer detects the temperature at a given point inside the oven. The value gauged by the pyrometer is only indicative. With experience, you will better assess when the oven is ready for various types of cooking. Gradually, you will have command of your oven and become very adept at choosing the cooking temperature. The Alfa Pro laser thermometer comes as an optional extra in the tool section of the website. OVEN DOOR - If the fire is too high and spills out of the oven mouth, use the door to adjust the flame. WARNING: this product has not been tested for use with the door....
Open the catalog to page 17All Alfa Forni catalogs and technical brochures
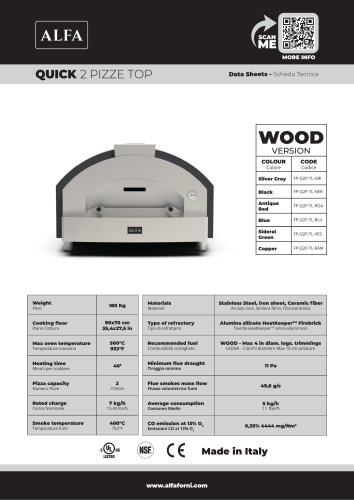 QUICK 2 PIZZE TOP
4 Pages
 FUTURO 2 PIZZE
2 Pages
 MODERNO 1 PIZZA
2 Pages
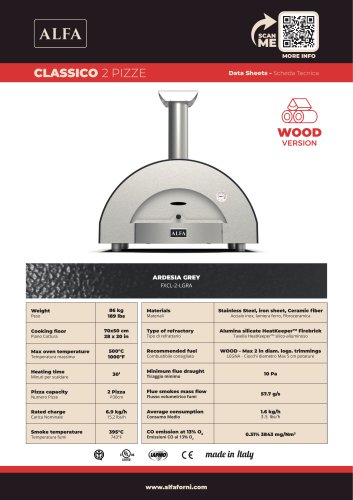 CLASSICO 2 PIZZE
2 Pages
 ZENO 6 PIZZE TOP
4 Pages
 Manual Domestic Oven
17 Pages
 ZENO
ZENO1 Page
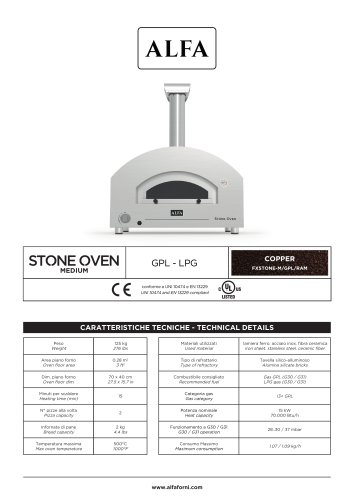 STONE OVEN
3 Pages
 PROFESSIONAL OVENS EVOLUTION
36 Pages
 PROFESSIONAL OVENS CLASSIC
36 Pages
- Table
- Industrial contemporary table
- Rectangular table
- Metal base table
- Outdoor table
- Metal table
- Pizza oven
- Free-standing pizza oven
- Commercial pizza oven
- Single pizza oven
- Electric pizza oven
- Single-chamber pizza oven
- Wood-burning pizza oven
- Manuel clean pizza oven
- Gas pizza oven
- Pizza oven with fixed rack
- Table on casters
- Home pizza oven
- Barbecue grill
- Outdoor pizza oven