カタログの抜粋
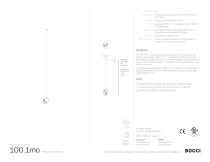
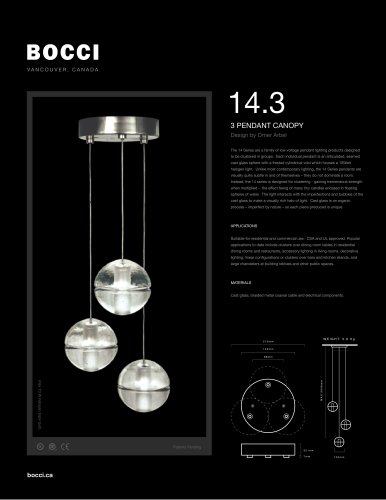
mini outie canopy 38mm (1.5”) in diameter x 16mm (0.6”) deep LAMPING: COAX: MATERIALS: WEIGHT: POWER SUPPLIES: 1.5w LED (2000K, 2500K, 3500K) adjustable 3000mm (10’) standard / up to 30500mm (100’) maximum blown glass, braided metal coaxial cable, electrical components, white polyurethane canopy approximately 2.75kg (6.1lb) remote mounted (fixture does not hook directly to a junction box). Power supplies included adjustable up to 3000 (10’) standard adjustable up to 30500 (100’) custom The 100.1mo is a single 100 pendant fixture with a mini outie canopy size. The mini outie canopy is 38mm (1.5”) in diameter and 16mm (0.6”) deep, which creates a subtle profile that will essentially disappear into the application surface. The pendant drop lengths on this light fixture are adjustable up to the specified maximum. 100 brings multiple glass artists together in a performative act. Molten glass bubbles are prepared and then smashed together to produce unpredictable interlocking glass forms. NOTES + Purchase replacement lamps online at www.bocci.com/shop/bulbs + All chandeliers will be outfitted with 2500K lamps if not specified. + Requires power supplies to be remote mounted. US Patent Pending EU Patent # 008526131-0001 LOW VOLTAGE LUMINAIRE E476186 Made in Vancouver, Canada MINI OUTIE CANOPY PRODUCT SPECIFICATION sales@bocci.com www.bocci.com europe@bocci.com www.bocci.com © 2021, Bocci Design and Manufacturing Inc. All rights reserved. Any inquiries s
カタログの1ページ目を開く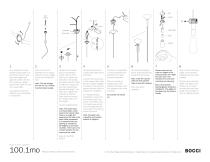
screws ~VAC Neutral Live lamp holder setscrews strain relief lamp 12V butt splice Very carefully uncoil the braided coaxial cable in a spool like manner. Insert your index fingers into opposite sides of the roll then rotate your fingers around each other to unroll the coaxial cable. Drill a 9mm (0.35”) diameter hole in ceiling material. Pull low voltage house wire through the hole. Determine the overall drop for the pendant fixture. Use the 2mm Allen key to loosen the setscrew in the canopy and gently feed the cable through the canopy until you have reached your desired drop length. Use Allen...
カタログの2ページ目を開く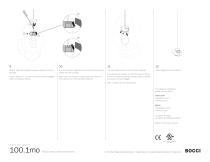
Step 2: Insert the pendant hardware assembly into the pendant. Give the pendant a gentle pull to ensure the screws are locked onto the pendant. The cap should sit flat on the pendant hardware. Clean fingerprints from surfaces. Step 3: Tighten the 3 screws until they are fully engaged (refer to illustration above). Slide cover cap onto the coaxial cable and place into the inset portion of the pendant hardware. If the screws are sticking out and the cap isn’t sitting flat on the pendant hardware, please check to ensure the screws are fully engaged. Refer to step 8 & 9 for more details. For...
カタログの3ページ目を開くBOCCIのすべてのカタログと技術パンフレット
-
 44
447 ページ
-
 16 armature
6 ページ
-
 38V armature
5 ページ
-
 73V random
7 ページ
-
 73
736 ページ
-
 14
147 ページ
-
 76
766 ページ
-
 87
876 ページ
-
 2015_Catalogue
71 ページ
-
 28s
28s2 ページ
-
 38.16
38.163 ページ
-
 38.3m
38.3m2 ページ
-
 57s
57s2 ページ
-
 57.5
57.53 ページ
-
 28d
28d1 ページ
-
 28.28
28.282 ページ
-
 28.19
28.192 ページ
-
 28.7 Random
2 ページ
-
 28.7
28.72 ページ
-
 28.5 Random
2 ページ
-
 28.3
28.32 ページ
-
 28.1
28.12 ページ
-
 38 Standard
7 ページ
-
 28 Custom
7 ページ
-
 28 Standard
8 ページ
-
 25.1
25.11 ページ
-
 21.50
21.503 ページ
-
 21.5
21.53 ページ
-
 21.1
21.13 ページ
-
 14.1m
14.1m2 ページ
-
 14.26
14.262 ページ
-
 14 Custom
26 ページ
-
 14 Standard
13 ページ


カタログアーカイブ
-
 28 armature
6 ページ
-
 Bocci Standard
54 ページ
-
 Custom Chandeliers
50 ページ