
Catalog excerpts

XLS8-50-PBK- Instructions The Solar Charger kit includes 1 ea. Of the following items unless otherwise noted: 1. Charge control 2. Solar module with grommets 3. Quick disconnect battery charging cable 4. Solar cable 5. 100 watt inverter 6. Storage bag 7. Storage core 8. D ring strap 9. 12 volt DC connector for inverter 10. 12 volt DC connector for DC load accessories 11. Landscape pins (8 each) 12. Amphenol release tool Caution solar modules produce voltage and current when exposed to sunlight
Open the catalog to page 1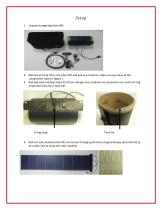
1. Unpack storage bag (item #6) 2. Remove end cap from core (item #7) and pull out contents, make sure you have all the components listed in figure 1 3. Remove solar modules (item # 2) from storage core, modules are secured to core with a D ring strap( item # 8) and 2 twist ties D ring strap Twist tie 4. Roll out solar module (item #2) and secure through grommets using landscape pins (item #11), be careful not to strike the solar modules
Open the catalog to page 2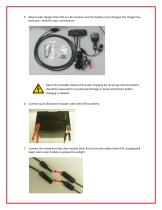
5. Mount solar charger (item #1) in a dry location near the battery to be charged, the charger has been pre – wired for your convenience Due to the portable nature of this solar charging kit, all wiring and connections should be inspected for any physical damage or loose connections before charging is initiated 6. Connect quick disconnect charger cable (item #3) to battery 7. Connect the wiring from the solar module (item #2) to the solar cables (item # 4); charging will begin when solar module is exposed to sunlight
Open the catalog to page 3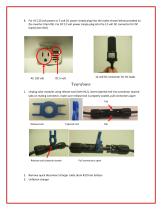
8. For AC 120 volt power or 5 volt DC power simply plug into the outlet shown below provided on the inverter (item #5). For DC 12 volt power simply plug into the 12 volt DC connector for DC ,. ~ _,- ,. 12 volt DC connector for DC loads 1. Unplug solar modules using release tool (item #12), insert tapered end into connector toward tabs on mating connector, make sure release tool is properly seated, pull connectors apart Release tool Tapered end Tab Release tool properly seated Pull connectors apart 2. Remove quick disconnect charger cable (item #3) from battery
Open the catalog to page 4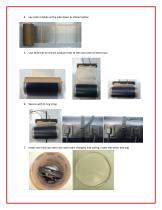
4. Lay solar module active side down as shown below 5. Use twist ties to secure module ends to the core and roll onto core 6. Secure with D ring strap 7. Insert one end cap onto core and insert chargers and wiring, insert the other end cap
Open the catalog to page 5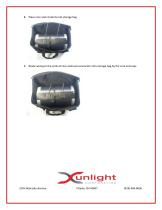
8. Place core and contents into storage bag 9. Route wiring to the ends of core and tuck connectors into storage bag by the core end caps
Open the catalog to page 6All XUNLIGHT CORPORATION catalogs and technical brochures
-
 XLD44-288-R4
1 Pages
-
 XLS-72_144
1 Pages
-
 xunlight_installations
11 Pages
-
 Brochure 2011 Q1
6 Pages

Archived catalogs
-
 XRS-R3
1 Pages
-
 XR-100W-R3
1 Pages
-
 XR-R2
XR-R21 Pages
-
 XR-88W-R2
1 Pages
-
 XP Series BROCHURE
1 Pages
-
 XR-36
XR-361 Pages
-
 XR-12
XR-121 Pages