- Catalogs
- Siemens Home Appliances
- 9000645988
- Products
- Catalogs
- News & Trends
- Exhibitions
9000645988
1 /24Pages

9000645988
1 /24Pages
Catalog excerpts
Built-in oven HB13AB.50B [en] Instruction manual
Open the catalog to page 1
ã=Safety precautions Please read this instruction manual carefully. Please keep the instruction and installation manuals in a safe place. Please pass on these manuals to the new owner if you sell the appliance. Before installation Damage during transport Check the appliance for damage after unpacking it. Do not connect the appliance if it has been damaged in transit. Electrical connection Only a licensed expert may connect the appliance. You will lose your warranty entitlement in the event of any damage caused by incorrect connection. Hot accessories and ovenware Risk of burns! Never remove ovenware...
Open the catalog to page 4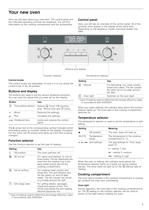
Your new oven Here you will learn about your new oven. The control panel and the individual operating controls are explained. You will find information on the cooking compartment and the accessories. Control panel Here, you will see an overview of the control panel. All of the symbols never appear in the display at the same time. Depending on the appliance model, individual details may differ. & %XWWRQV DQG GLVSOD\ )XQFWLRQ VHOHFWRU Control knobs The control knobs are retractable. To lock it in or out, press the control knob in the off position. 7HPSHUDWXUH VHOHFWRU Setting Use A Defrost For...
Open the catalog to page 5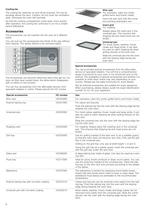
Cooling fan Wire rack For ovenware, cake tins, joints, grilled items and frozen meals. The cooling fan switches on and off as required. The hot air escapes above the door. Caution: do not cover the ventilation slots. Otherwise the oven will overheat. Insert the wire rack with the curvature pointing downward ¾. So that the cooking compartment cools down more quickly after operation, the cooling fan continues to run for a certain period afterwards. Insert grid For roasting. Accessories Always place the insert grid in the universal pan. This ensures that dripping fat and meat juices are collected....
Open the catalog to page 6
Special accessories HZ number Use Profi extra-deep pan with roasting rack HZ333000 Ideally suited for preparing large amounts. Lid for the Profi extra-deep pan HZ333001 The lid converts the Profi extra-deep pan into the Profi roasting dish. Glass roasting dish HZ915001 The glass roasting dish is suitable for pot roasts and bakes that are cooked in the oven. It is ideally suited to automatic programmes or automatic roasting. Metal roasting dish HZ26000 The roasting dish is intended for use on the extended cooking zone of the glass ceramic hob. It is suitable for the sensor cooking system as well...
Open the catalog to page 7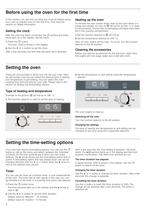
Before using the oven for the first time In this section, you can find out what you must do before using your oven to prepare food for the first time. First read the section on Safety information. Setting the clock Heating up the oven To remove the new cooker smell, heat up the oven when it is empty and closed. An hour of : 3D hot air at 240 °C is ideal for this purpose. Ensure that no packaging remnants have been left in the cooking compartment. After the oven has been connected, the 0 symbol and three zeros light up in the display. Set the clock. 1. Set the function selector to : 3D hot air....
Open the catalog to page 8
Checking the time settings Checking the time settings If several time-setting options are set, the relevant symbols are illuminated on the display. The time-setting options symbol is in the foreground and preceded by the N arrow. If several time-setting options are set, the relevant symbols are illuminated on the display. The time-setting options symbol is in the foreground and preceded by the N arrow. To call up the V timer, x cooking time, y end time or 0 clock, press the 0 button repeatedly until the N arrow is next to the relevant symbol. The display shows the value for a few seconds. To...
Open the catalog to page 9
cooking time has already started to elapse. The cooking result would no longer be correct. 1. Press the 0 button. Cancelling the end time 2. Use the @ or A button to set the clock. Use the A button to reset the end time to the current time. After a few seconds, the change is adopted. The oven starts. If the timer has been set, first press the 0 button twice. Checking the time settings If several time-setting options are set, the relevant symbols are illuminated on the display. The time-setting options symbol is in the foreground and preceded by the N arrow. The time 12:00 is shown in the display....
Open the catalog to page 10
Care and cleaning With good care and cleaning, your oven will remain clean and fully-functioning for a long time to come. Here we will explain how to maintain and clean your oven correctly. Notes ■ Slight differences in the colours on the front of the oven are caused by the use of different materials, such as glass, plastic and metal. ■ ■ Shadows on the door panel which look like streaks, are caused by reflections made by the oven light. Enamel is baked on at very high temperatures. This can cause some slight colour variations. This is normal and does not affect their function. The edges of thin...
Open the catalog to page 11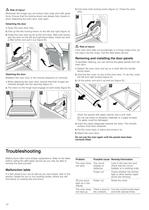
ã=Risk of injury! 3. Fold back both locking levers (figure C). Close the oven Whenever the hinges are not locked, they snap shut with great force. Ensure that the locking levers are always fully closed or, when detaching the oven door, fully open. door. & Detaching the door 1. Open the oven door fully. 2. Fold up the two locking levers on the left and right (figure A). 3. Close the oven door as far as the limit stop. With both hands, grip the door on the left and right-hand sides. Close the door a little further and pull it out (figure B). $ % ã=Risk of injury! If the oven door falls out accidentally...
Open the catalog to page 12
1. Place a tea towel in the oven when it is cold to prevent Error messages If an error message with “ appears, press the 0 button. The message disappears. A time function that has been set is cleared. If the error message does not disappear, please contact the after-sales service. damage. 2. Unscrew the glass cover by turning it anti-clockwise. You can take remedial action yourself if the following error message is displayed. Error message Possible cause Remedy/information “‹‚‚ A button was depressed for too long or is covered up. Press all buttons individually. Check whether any buttons are...
Open the catalog to page 13All Siemens Home Appliances catalogs and technical brochures
 Freestanding Appliances
42 Pages
 EZ977KZY1E
3 Pages
 CM678G4S6B
3 Pages
 HB672GBS1B
3 Pages
 HB676GBS6B
3 Pages
 EC9A5SB90
3 Pages
 WM14XEH4GB
3 Pages
 ET875FCP1D
2 Pages
 ET651HE17E
3 Pages
 Built-in Appliances Brochure
111 Pages
 catalog 2016
79 Pages
 Ovens 2009
22 Pages
 Free-standing Appliances
46 Pages
 Built in brochure
74 Pages
 Freestanding Brochure
46 Pages

Archived catalogs
 EX807LX67E
7 Pages
 2014 Built-in Appliances
77 Pages
 2022 Built-in Appliances
109 Pages
 9000371475
24 Pages
 9000443031
14 Pages
 9000455265
148 Pages
 9000523431
32 Pages
 9000538106
31 Pages
 9000644314
36 Pages
 9000644401
40 Pages
 9000646020
24 Pages
 9000650983
8 Pages
 90005263871
140 Pages
 90007104181
40 Pages
 9000731775
23 Pages
 90005805756
30 Pages
 90006317281
28 Pages
 90006502641
30 Pages
 90006944392
30 Pages
 9000755818
64 Pages
 90004930205
36 Pages
 90004930197
32 Pages
 Freestanding Cooling 09
20 Pages
 Freestanding Dishwashers 09
14 Pages
 Freestanding Washing 09
10 Pages
 Hobs 2009
9 Pages
 Cooker Hoods 2009
18 Pages
 Built-in Cooling 2009
20 Pages
 Built-in Laundry 2009
7 Pages
 Built-in Dishwashers 2009
16 Pages
 Tumble Dryers 2009
7 Pages
 Smart Living 2009
16 Pages

- Siemens electric oven
- Siemens range hood
- Range hood with built-in lighting
- Siemens cooktop
- Industrial coffee machine
- Siemens single oven
- Siemens cooktop with front controls
- Siemens wall-mounted range hood
- Siemens built-in cooktop
- Convection oven
- Automatic coffee machine
- Industrial dishwasher
- Siemens built-in oven
- Siemens single-chamber oven
- Siemens ducted range hood
- Industrial wine cellar
- Siemens induction cooktop
- Black coffee maker
- Cappuccino coffee machine